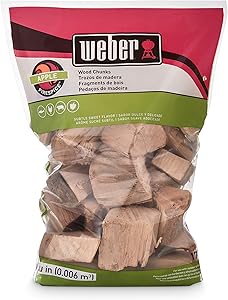
Weber 17139 Apple Wood Chunks, 350 cu. in. (0.006 Cubic Meter), m³
Subtle Sweet flavor
Chunk size pieces
Four pound bag
350 cu. in. (0.006 m^3) sized bag
HOW TO USE WOOD CHIPS FOR SMOKING ON A GAS GRILL
Wood chips are a great flavor enhancer and the most effective option for smoking on gas grills. Among the different woods that we can find are: Durazno, Algarrobo, Manzano, Naranjo and Hickory.
We must soak the wood chips for at least 30 minutes to be able to use them. They must be soaked so that the wood does not emit a flame and burns slowly.
We show you 3 different methods for you to use them on your gas grill:
A. With aluminum foil:
1.Soak 2 cups or handfuls of chips for 30 minutes in enough water to cover them.
2. With a sheet of aluminum foil of approximately 30 centimeters, make an envelope to put the chips, close it and open holes with the help of a skewer.
3.Place the envelope with the splinters on one side of the rack. Turn the grill to high direct heat, cover the grill and allow the smoke to concentrate for approximately 20 minutes.
4. For long cooking, the chips should be changed every 60 minutes.
B. In rectangular steel box on the grid:
1.The grill must be off. Soak 2 cups or handfuls of chips for 30 minutes in enough water to cover them.
2. Fill the smoke box with the soaked and drained chips.
3.Place the closed box with the chips on one side of the grid. Turn the grill to high direct heat, cover the grill and allow the smoke to concentrate for approximately 20 minutes.
4. For long cooking, the chips should be changed every 60 minutes.
C. In a triangular box between the flavoring bars:
1.The grill must be off. Soak 2 cups or handfuls of chips for 30 minutes in enough water to cover them.
2. Fill the smoke box with the soaked and drained chips.
3.Remove the upper rack from the grill, place the box between the flavoring bars and cover again with the rack.
4.Light the grill and leave covered for approximately 15 minutes to allow the smoke to concentrate.
5. For long cooking, the chips should be changed every 60 minutes.
Fits over 1 burger patty and a standard grilled cheese sandwich
Smoker boxes and wood chips for smokes
Smoking adds a lot to your barbecue experience and the varieties of woods and containers vary. Here's some information on smoker boxes and wood chips for smoking that might help you. If you don't have a smoker, you can improvise using your grill and using or improvising a smoker box. My favorite forests are alder, cherry, walnut, and walnut. The container containing the soaked wood chips or pellets should restrict the airflow so that the chips do not burn and burn, hold the ash when burning, and allow you to move the chips so they don't burn too quickly if you need to be. let this help you make some decisions.
Here are three different approaches to getting that smoky flavor on the grill:
The box of smokers that came with your grill is my first choice.
Second would be an aluminum package. In this would be the soaked wood chips and on one side several holes will be placed to allow the smoke to escape.
The last resort would be to improvise and use a clean soup can. Cut the lid off completely, place the soaked wood chips inside and replace the lid which has some holes to allow the smoke to escape.
Here is a list of the different wood shavings for smoking:
ACACIA - These trees are in the same family as mesquite. When burned in a smoker, acacia tastes similar to mesquite but is not as strong. It is a very fiery wood.
ALDER : very delicate with a hint of sweetness. It is fine with fish, pork, poultry, and light meat game birds.
ALMONDS : sweet smoke flavor, light ash. Good with all meats.
APPLE : very smooth, with a subtle fruity flavor, slightly sweet. Good with poultry (turns dark brown) and pork.
ASH - Fast burner, light but distinctive flavor. Good with fish and red meat.
BIRCH - Hardwood with a flavor similar to maple. Good with pork and poultry.
CHERRY : smooth and fruity. Good with poultry, pork and beef. Some members of the List say that cherry wood is the best wood for smoking. Wood from chokecherry trees can produce a bitter taste.
COTTON - is a softer wood than alder and has a very subtle flavor. Use it for fuel, but use a few bits of other woods (walnut, oak, pecan) for more flavor. Don't use poplar trees for smoking.
CRABAPPLE : similar to apple wood.
STAPLES - Cake. Provides a lot of smoke. Rich and fruity. Good with poultry, red meat, game and lamb.
HICKORY : the most commonly used wood for smoking - the king of smoking woods. Sweet to strong, strong bacon flavor. Good with pork, ham and meat.
LILAC : very light, subtle with a floral touch. Good with seafood and lamb.
MAPLE : smoky, smooth and slightly sweet. Good with pork, chicken, cheese, and small game birds.
MESQUITE : strong earthy flavor. Good with meat, fish, chicken and game. One of the hottest burning woods.
MULBERRY : the smell is sweet and reminiscent of an apple.
OAK : intense smoke flavor, the queen of wood for smoking. RED OAK is good for the ribs, WHITE OAK is the best charcoal to burn longer. All oak varieties reported as suitable for smoking. Good with red meat, pork, fish and heavy game.
ORANGE, LEMON AND GRAPED : Produces a pleasant smooth smoky flavor. Excellent with beef, pork, fish, and poultry.
PEARL : a pleasant subtle smoke flavor. Like the apple. Excellent with chicken and pork.
PECAN : sweet and smooth with a taste similar to hickory. Tasty with a subtle character. Good with poultry, beef, pork, and cheese. Pecan is a superior and versatile smoking wood.
SWEET FRUIT WOODS - APRICOT, PLOM, MACHACHILLA, NECTARINE : excellent in most white or pink meats, including chicken, turkey, pork and fish. The flavor is milder and sweeter than walnut.
WALNUT - ENGLISH and BLACK - Very intense smoke flavor, generally mixed with lighter woods such as almond, pear or apple. It can be bitter if used alone. Good with red meat and game.
IMPORTANT NOTE: types of wood that are not suitable or even poisonous when used for grilling - do not use wood from coniferous trees, such as PINE, FIR, SPRUCE, REDWOOD, CEDAR, CYPRESS, etc. Also ELM, EUCALYPTUS, SASSAFRAS, SYCAMORE and LIQUID AMBER are not suitable for smoking.
Safe Paw, Child Plant Dog Paw & Pet Safe Ice Melt -8lb, 100% Salt/Chloride Free -Non-Toxic, Vet Approved, No Concrete Damage, Fast Acting Formula, Last 3X Longer
PEOPLE & PET SAFE - Imagine an ice melt you can put down and never worry about. It won’t harm animals or children, and it won’t damage your property. That’s Safe Paw. Unlike anything else on the market, Safe Paw can change how winter affects our planet. Your grass, plants, and foliage are safe! Safe on eyes, skin and paws. It’s safe around and if ingested. Best of all: 100% salt & chloride free.
MELT AT LOW TEMPERATURES - Guaranteed to melt at low temperatures (-2°F), it’s non-toxic and biodegradable
VETERINARIAN RECOMMENDED FORMULA - Unlike other Pet Safe Ice Melts, Safe Paw's patented formula is guaranteed to not hurt people, pets, and the planet.
NON-CORROSIVE & LONG SHELF LIFE - It’s non corrosive and non-conductive. No damage to delicate machinery or worry about short circuits. Get instant melting without worrying about property damage. Concentrated formula assures long-term, maximum effectiveness from season to season.
EXCELLENT SPREAD RATE - Allows a typical back yard to be treated to make a safe winter play land for pets and people. Can be used for a long time on small and large areas.
HOW TO MELT ICE FROM THE GROUND: HOMEMADE TRICKS
One of the problems that arise after a great snowfall, such as that experienced in Spain with the storm Filomena, is that any snow-covered surface later becomes a dangerous ice rink, so we must try to remove that ice as soon as possible. Let's see then how to melt the ice from the ground , with some of the best homemade tricks .
One of the best tricks to melt ice is salt , but if we just add this, we will get little. The best thing then is to resort to these other tricks that we list.
SALT AND WATER TO MELT ICE ON THE GROUND
How to melt ice from the ground tricks
How do we say, salt is a great remedy when it comes to snow and ice. First, because if we put salt on the ground before it snows, we will ensure that it does not set and with that it does not end up accumulating and second, if we put salt on the ice already formed, we will avoid the dreaded slips and falls. But salt also serves to melt that same ice and how? very easy mixing with water .
Therefore, if you want to melt the ice accumulated on the floor of your terrace, at the entrance of your house, in the area where you have parked or in a specific area over which you must pass, you just have to take a large container and add a good quantity of salt and a liter or two of water . We mix well until the salt has dissolved in the water and then we pour over the ice . You will see that in a matter of seconds it will have melted.
DISH SOAP AND ALCOHOL TO MELT ICE ON THE FLOOR
How to melt ground ice
Another of the great home remedies or tricks that we have at our disposal to melt that layer of ice that has formed on the ground after it has snowed, is to take a container and pour six drops of soap or dish detergent into it, 1 / 4 cup of isopropyl alcohol and 2.5 liters of hot water . You mix well and then you put it on the ground or on the sidewalk. You will see how bubbles begin to form immediately and how almost by magic, the ice melts. It will also be good to have a shovel in hand to break up the pieces of ice that may be a little thicker or those that have not completely melted since the hot water may have already cooled when in contact with it. ice.
HOT WATER TO MELT ICE ON THE GROUND
How to melt ice from the ground
Although mixing the hot water with the salt or with the ingredients mentioned above will be much more effective, in case you do not have any of the above, you can always resort to just pouring boiling water over the ice . This can in fact be a simple remedy in those cases in which we still have a small piece of ice left and you know that with hot water you will be able to finish melting it. It will also be good that once you add the water, you have a shovel at hand to crush the ice and with it, that it finishes breaking and with that it will be much easier for you to get it to melt completely.
PICKLE JUICE TO MELT ICE ON THE GROUND
How to melt ground ice pickles
A trick that may surprise you but that is completely effective is to pour the hot juice of some pickles on the ice, since the juice that is obtained by boiling some pickles in hot water is very salty, which helps in erosion. of ice. Now that yes, once you pour the hot juice on the ice, it will be good to have the shovel at hand to collect the remains that begin to dissolve and remove them. Also, do not let juice remain on the floor (you can remove it with a towel), because if it is still very cold or at night it freezes, you will see how much ice will have formed again on the floor.
BEET JUICE TO MELT ICE OFF THE GROUND
How to melt ice from the ground beet juice
Another remedy that may sound strange, but beet juice can also help defrost ice on the ground and sidewalks. A trick that is used a lot in the United States, but little by little it seems that it has "viralized" and more and more, are people who are surprised to discover that it is really effective.
Of course, the first thing we have to do is treat the soil or steel it with brine (salt water), then apply the beet juice . Beet juice lowers the freezing temperature of the brine, so the salt can melt ice in colder weather than it could otherwise. That is, if you live in an area where the temperatures are really low, this will undoubtedly be a great remedy.
So to be able to melt all the ice on the ground that has accumulated for example at the entrance of your house, with brine and beet juice, dissolve 1 1/2 cups of salt in 4 liters of water. Then pour in 240 milliliters of beet juice.
You have to keep in mind that, yes, beet juice can leave stains on lighter surfaces, such as concrete. Because brine is even more corrosive than rock salt, limit the amount you apply in your driveway or anywhere else you use this remedy.
If you can't get the ingredients for any of these listed tricks, try sprinkling fireplace ash, coffee grounds, or sand on icy surfaces. These materials do not melt ice directly, but their dark color allows them to absorb heat, which helps accelerate melting. They will also provide some traction.
Melting ice on steps, sidewalk and driveway doesn't have to mean investing in expensive commercial de-icer. With the ingredients that we have listed and that many of us can have at home, it will be possible to get the ice melt to clean our paved surfaces quickly and economically.
Snow Joe AZ-10-EB-JUG Melt-2-Go Nature + Pet Friendly CMA Blended Ice Melter, 10 lb Jug
PET FRIENDLY: Formulated from nature’s own ingredients, EB Ice Melt provides a greener solution to deicing that is safer for pets. Unlikely to irritate paws or cause rashes.
ENVIRONMENTALLY SAFE: Leaves no slimy residue behind, making it safe to use on grass, turf, around trees and other vegetation. Protects surrounding hardscapes and softscapes when used as directed.
SAFE TO HANDLE: When used as directed, EB Ice Melt will not dry out or irritate the skin and can be safely and easily dispensed without requiring the use of protective clothing. MELT EB is specially treated with an anti-caking agent to extend shelf-life and improve dispersion.
FAST-ACTING IN FREEZING TEMPERATURES: Goes to work immediately upon contact with snow and ice to accelerate the deicing and melting process. Pre-treating surfaces will also prevent ice and snow from accumulating.
ANTI-CORROSION FORMULA: Enhanced with CMA (calcium magnesium acetate), an environmentally benign deicing agent, EB Ice Melt delivers fast and effective results without damaging surfaces such as concrete or metals.
Power Source Type: Manual
How to remove ice from the sidewalk
An icy sidewalk can be a danger to you, your family, and your neighbors. Many cities have laws that require you to remove ice from the sidewalk that runs along your property. Knowing how to remove ice quickly, safely and efficiently is preferable.
Method 1 Use defrosters
1 Buy a defroster. You can find it at your local hardware store. It is preferable to buy several bags at the beginning of the season. When the first blizzard hits, stores may be out of stock. [one]
You should store your defroster in a dry place, preferably in an airtight container to keep it away from moisture and sunlight. [2]
It is made mostly of halite or sodium chloride, which has a lower freezing point than water. This allows it to spread through the ice, break it up and create a layer of water under it.
2 Use the appropriate product correctly. Defrosters can be harmful to your health, your sidewalk, your lawn, and your pets. Don't use much and broom it off after the ice has thawed. If you feel the need to use more than 2 to 4 ounces (59 to 118 milliliters) per square meter (square yard), you could be using the wrong product for your goal. Defrosters operate at various temperatures and melt at different speeds. [3]
A hygroscopic de-icer removes moisture and can be very damaging to your skin and sidewalks. [4]
Some of these products contain more chemicals than others. Sometimes urea is included in the mix, but it can cause sidewalk damage.
Calcium chloride will melt ice at even lower temperatures than salt mixtures that do not contain it. It can work at -29 degrees Celsius (-20 degrees Fahrenheit), while salt is only good down to -10 degrees Celsius (15 degrees Fahrenheit). This is useful for melting the ice quickly when you need it on stairs or sidewalks, but you will need to reapply it frequently.
Halite will take longer to melt ice, but it doesn't have to be reapplied as often. Use it in areas that are used less frequently, such as driveways.
3 Spray a small amount of de-icer on the icy sidewalk. You don't need to use a lot of salt. Create a thin layer of salt on top of the ice. You should use about 2 or 4 ounces (59 or 118 milliliters), or 1 or 2 handfuls per square meter (square yard). [5]
It is preferable to sprinkle this layer of salt as soon as it starts to snow. When the ice thickens, it will be more difficult for the salt to be effective.
The salt should start to work within 15 to 30 minutes. It won't melt the ice, but it must have seeped through and created a layer of water between the ice and the sidewalk, as well as breaking up the ice sheet and making it easier to shovel.
4 Shovel the ice off the sidewalk. Now that the ice has broken, it should be easy to separate it and remove it with a snow shovel. Insert the tip of the shovel blade into the ice to separate it.
By placing one hand on top of the handle and the other 1 foot (30 centimeters) or along the length of the shovel, you place the blade under the broken ice.
Place the shovel under as much ice as you can and lift it off the sidewalk.
Turn and tilt the load of ice onto the side of the curb and keep shoveling it out.
5 Put a second layer of salt. You can use salt before, during and after a snow blizzard. Laying in a layer after you finish shoveling the snow will help prevent further snow formation. If the snow continues or reappears, you will already have a de-icer running at a lower level to make removing it later easier. [6]
Method 2 Make your own "ice melter"
1 Fill a 1 gallon (4-liter) drum with warm water. You will need to fill the container halfway to have a half gallon (2 liters) of warm water. Don't worry about making the water very hot. It still has to be cold enough to handle. [7]
2 Add dish soap. Use whatever liquid dish soap you have on hand and put six drops into the 1 gallon (4-liter) drum. Gently roll the doll to mix the soap in the water without lathering.
3 Finish the mixture with rubbing alcohol. Measure out 2 ounces (60 milliliters) of rubbing alcohol. You can use an alcohol meter to get an accurate measurement. Add the 2 ounces (60 milliliters) of rubbing alcohol to the 1 gallon (4 liter) drum. [8]
Rubbing alcohol or rubbing alcohol can be dangerous. Take your precautions when handling them. Avoid skin contact when wearing gloves. Don't touch your face after handling it. Wash your hands with plenty of soap and water. [9]
4 Pour the mixture over the ice. While the water is still warm, pour it generously over the ice you would like to remove. The solution will separate the ice and make it easier to shovel it. [10]
5 Shovel the ice. You must remove it safely and efficiently. This means getting ice and snow out of the way for walking and driving without injuring yourself in the process. [eleven]
Use a lightweight snow shovel that isn't too heavy for you.
Decide where you will pile the snow and ice before you begin so that you don't end up blocking the path for walking or driving and need to start over with that area.
Ideally, just push the snow and ice out, without lifting it.
If you lift them, keep your knees bent and your back straight. Remember to do the lift with your legs and only lift them as far as necessary to move them towards the stack. If you twist, turn your entire body, instead of turning at the waist.
Method 3 Using a snow blower
1 Choose a heavy duty machine. A snow blower can take care of some of the ice and save your back from shovel injury. If there are chunks of ice mixed in with the snow, the appropriate snow blower will take care of them. [12]
Avoid single-stage snow blowers, which use paddles, and go for a two-stage snow blower, which uses augers. Some bits have longer, sharper teeth, which is useful for breaking ice.
Gas snow blowers are often more reliable and stronger than electric ones.
2 Break the ice. Snow blowers will not be able to remove an ice sheet. This could show up as solid ground, and the blower will roll on top of it. Break up large sheets of ice with a shovel before using a snow blower. [13]
3 Read the user manual. Each snow blower comes with different controls, options, and instructions. Make sure you understand all the parts that move and how to use them by reading the instruction manual before using the blower.
Pay close attention to the way you operate the auger, the direction of the hopper, the clutch, and the steering levers.
Prime the snow blower with gasoline, oil, stabilizers, or necessary extension cords.
Look for accessories that might have come with the snow blower, such as blades, skid shoes, and shear bolts.
4 Plan the route. Know where you will place the snow and ice. Decide which side of the sidewalk you would like to blow the snow on and where to stack it. Never blow ice and snow onto cars, houses, or other people. Don't move the snow off your sidewalk onto someone's path. [14]
If it's windy, don't blow the snow that way, as it will be heading towards yours.
Avoid picking up and throwing gravel with the blower. If you are clearing a gravel surface, leave some snow on the gravel by lifting the necessary blades or augers to a height that does not completely reach the ground.
5 Start the snow blower in a ventilated area. You'll need to start the snow blower outdoors or in an open area. If you are in a shed or garage, make sure the doors are open for the discharge to come out. [fifteen]
6 Move the snow blower slowly over the area you are cleaning. Use both hands to drive the blower at a slow, steady pace, like mowing the lawn. Follow your planned route and be careful when turning. [16]
Some two-stage blowers have power steering options to help make turns.
Disable augers when turning and make sure the hopper is facing the correct direction before re-enabling them.
Keep pushing the snow blower over the area and making turns until the sidewalk is completely clear.
Tips
Take twenty-minute intervals to remove the ice and take a break when you have removed it completely.
An ice sock can be used to extend the life and minimize the cost of ice melting crystals. This type of sock is a polyester or nylon sock, which resists breaking when frozen, is so strong (31 kilos or 70 pounds or better resistance) as to support several kilos or pounds of crystals to melt ice. In addition, it has a weft pattern that prevents tears from unraveling the weft, resists UV damage, resists mild acids, and is rechargeable. Filling an ice sock with crystals to melt the ice without staining and placing it next to stairs or on roof siding can prevent ice barriers and icy stairs all winter long with a single application.
Warnings
Do not slip on the ice, this can break your bones or your head. Be very careful when you do it!
Wear warm clothing.
Never put your hands near the snow blower auger.
Do not refuel the snow blower while it is running.
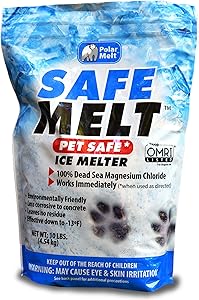
HARRIS Safe Melt Pet Friendly Ice and Snow Melter, Fast Acting 100% Pure Magnesium Chloride Formula, 10lb
Pet Safe - 100% Magnesium Chloride formula won't burn or irritate pets' paws and comes in a round pellet form with no jagged crystals
Works Immediately - Instantly melts ice on driveways, sidewalks, steps, balconies, patios, walkways, roadways and more
Effective at Low Temps - Works at temperatures down to -13 degrees Fahrenheit
Less Corrosive - Kinder to the environment than traditional rock salt ice melters and less corrosive to concrete than sodium chloride and calcium chloride
OMRI Listed - Listed with the Organic Minerals Research Institute for organic use
How to melt ice with salt and sugar
The water has a freezing point of 0 Cº. When water reaches this temperature, it turns into ice. To return from ice to liquid water, you can simply let the ice sit where the temperature is above freezing. However, sometimes speeding up the process is in order. Both sugar and salt lower the freezing point of water . Sugar and salt dissolved in water accelerate the defrosting process . Boiling the water helps maximize the speed of melting.
You will need to:
Salt
sugar
Water, at room temperature
stir stick
Bowls or containers
pans
Steps to follow: 1 Make your salt solution by adding salt to the water in a ratio no greater than 1: 3. At higher concentrations, the solution will saturate and crystallize.
2 Make your sugar solution by adding sugar to the water in a ratio no greater than 2: 3. If too much sugar is added, the solution will crystallize and cannot be poured.
3 Pour the two solutions over the ice to melt it .
If you want to read more articles similar to How to melt ice with salt and sugar , we recommend that you enter our Hobbies and Science category .
Tips
Heating the water in which the salt and sugar dissolve will speed up the melting process, because heating the water raises the saturation point, which means you can add more solute - salt or sugar - to each solution, and the Hot water raises the temperature rapidly when added to ice.
Wear hand protection, such as gloves, when handling frozen ice to avoid injury.
How to melt ice from a driveway without using salt
Ice on the sidewalk can create dangerous conditions for both walking and driving and requires immediate action. Grain salt, or sodium chloride, and other types of salts are often used to melt ice on the sidewalk and street; however, these products are not desirable in certain circumstances, as they can damage some surfaces and surrounding vegetation.
Salt-free de-icing products
Salt-free deicing compounds can be used in a similar way to ice melting salts. Calcium Magnesium Acetate, which is made from dolomitic limestone acetic acid, is a salt-free deicing product that is more expensive than those with salt, but causes less damage to concrete and vegetation, resulting in less makes it a suitable alternative to salts in sensitive environments. Another alternative is urea, which is often used as a fertilizer.
Absorbers and radiation and abrasives
Radiation absorbers are dark materials, such as graphite or carbon ash, that are applied to an icy sidewalk to speed up the rate of melt by increasing the absorption of solar energy. Although these materials are generally inexpensive and have little or no effect on the environment, they work slowly, can create clutter and untidiness around buildings, and become inefficient if snow and ice accumulates on them. Abrasives include materials such as cat litter sand or pebbles, which offer traction when applied on ice. Although abrasives do not melt ice directly, they can be combined with another de-icing compound to ensure better distribution and decrease the amount of compound used.
Electric cables or mats
Electric heating cables or mats eliminate the need for chemicals and require manual labor only at the time of installation or placement. All you need is a nearby source of electricity. The cables are usually installed at the same time as the fence material. However, they can be attached to certain surfaces by cutting a shallow well, laying the cable, and then sealing, to keep water away. Electric rugs are generally movable and are most effective for small areas with high traffic, such as the driveway.
Manual removal
Manually removing snow and ice at the right time allows you to effectively eliminate or reduce the need for salt or salt-free products. Shovel any snow that falls on the ice, then use an ice pick to break up thick ice sheets or a metal shovel to chip it away from the curb surface. Remove as much ice as you can in the early morning, then take advantage of the warmer temperatures of the day to remove loose ice in the afternoon, before the temperature begins to drop again.
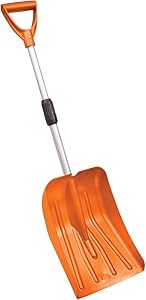
Emsco Group 1174A6 Bigfoot Collapsible Car Lightweight Aluminum-Polyethylene Scoop Trunk Shovel, Snow
Collapsible space saving shovel - this snow shovel is perfect for the car. It quickly disassembles and can be stored in very tight spaces.
Lightweight and durable scoop - made from polyethylene and aluminum, this shovel takes nothing to lift and you won't lose fuel mileage by keeping it in your car. It's incredibly tough and weather-resistant.
Telescoping handle - the handle can go from 28-36" Giving you a variety of lengths thanks to the fast Pin locking mechanism
Rescue yourself from emergencies - the bright, safety Orange shovel is very visible when you are having a roadside incident or when you get stuck at the end of the driveway.
Great multipurpose tool - not only can you get yourself out of snow but this scoop can be used to shovel all kinds of materials such as soil, gravel, grain and more.
The best tips to remove the ice from your car and the entrance to your house
Filomena has taken us all by surprise and the beginning of 2021 will be remembered by unprecedented snowfall. School closings, car damage, downed trees, possible shortages ... and, of course, lots of snow. While people play in the streets of the whole country, throw balls and take the opportunity to make dolls as if instead of Spain we were talking about Lapland , the authorities warn that it is better to stay at home and that you must be careful with snow (and ice ) from balconies and vehicles: better to remove it sooner rather than later. However, if after several days of unprecedented snowfall you are already a little familiar with the situation, you will have found that it is not as easy to get rid of it as you might have thought. For this reason, we leave you some tips and tricks so that it is not an impossible mission.
To clean ice and snow from the car
Without damaging the body, of course. The weight of the snow can cause damage , so it is best to remove it as soon as possible , especially since, when it turns into ice, it is more difficult to remove. The most important thing is that you do not use hot water, as you could damage the glass: use a scraper. Don't activate the windshields either. Some scrapers are heated, making them even more useful for removing ice. To speed up the process and defog the windows, turn on the air conditioning and be patient.
A useful trick is to place the accumulated snow in a large bucket and melt it in a bathtub of hot water
To clean a balcony
The Civil Guard warned: the snow must be removed before it turns into ice from balconies and terraces, because according to the architecture design they could have problems supporting the weight.
The best way to remove snow is to use a broom, shovel, or rake . Of course, before throwing it out on the street, check that no one is passing by (especially if you live in a building), and try to throw it away to avoid it falling, for example, on the terrace below. A useful trick is to place the accumulated snow in a large bucket and melt it in a bathtub of hot water. It seems unlikely that we will have a Filomena again , but if you want to prevent snow from accumulating in the future you can always consider buying a sloped awning.
To clean the way out of the house
Likewise, it was also advised to clear the entrances of the houses to avoid problems when leaving due to the accumulation of snow. The most advisable thing is to remove it with a shovel or a broom and then sprinkle salt, just to prevent ice from forming. House salt used in cooking works well, and the reason it's so important to add it is because salt water needs an even lower temperature to freeze. If the snow in the driveway has turned to ice, add salt and kitty litter on top. You may have to do it several times What if it has turned to ice? Pour kitty litter over the salt, you may have to do it several times if the area freezes again, but it is important, as ice on sidewalks or steps represents a serious safety hazard. When going out, be very careful and do it only if it is strictly necessary. You can help yourself with ski poles and there are also accessories that can be placed on the boots to give more grip and avoid tripping.
Walk taking short steps and lean forward, safety is the most important and nobody wants to end up in the emergency room in this time.
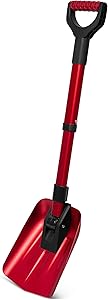
34” Folding Emergency Snow Shovel – Rugged Compact Tool for Car, Snowmobiles, or ATV – Compact Winter Survival Gear - Skiing Camping Mud Avalanche - Collapsible Multifunctional - Red
READY FOR WINTER: winter preparation is very important when it comes to traveling during the snowy months. A reliable and lightweight snow shovel is a must whether you’re driving to work, snow camping or snowmobiling in the back country. Our snow shovel is the perfect tool for all your winter wonderland adventures or emergencies
LIGHTWEIGHT & HEAVY DUTY: the lightweight aluminum construction allows you to easily maneuver the shovel when shoveling snow, dirt, mud, sand, etc. It also makes it the perfect shovel to carry when camping, back packing or snowmobiling. Designed with high quality aluminum ensuring you have a heavy duty shovel no matter what
COMPACT & COMFORTABLE: innovative folding design allows the shovel to quickly and easily collapse so you can attach to a backpack or stow away in your car, SUV, RV, truck, ATV, UTV or snowmobile. Easily packable for backcountry skiers or snowboarders.The shaft of the shovel extends to give you extra leverage while the rubber, textured handle gives you extra grip
MULTI-FUNCTIONAL USE: our snow shovel is great for shoveling snow but also works great with other natural elements including sand, dirt, mud, mulch, etc. It’s the perfect tool to take 4-wheeling, backpacking or camping during the spring and summer months.
COMPACT SMALL EMERGENCY SNOW SHOVEL. DIMENSIONS: Extended Dimensions: 9" Width x 34.25" Length x 2.4" Height; Compact Dimensions: 9" Width x 22" Length x 2" Height; Weight: 2 lbs. PATENT PENDING
Remove the ice with salt and other less dangerous methods
Avoiding an accident caused by low temperatures is the main cause that leads the authorities to remove the ice with salt on the roads, something that you will surely also do at home.
Removing the ice with salt is a very widespread practice in Spain, but it is nevertheless prohibited in other cities of the world more accustomed to low temperatures during winter. There are more recommended alternatives that can help you keep your entrance free of ice to prevent it from becoming a skating rink.
How to remove snow and ice from your home
There are many techniques aimed at removing snow and ice in your home in order to avoid dangerous accidents due to slipping. In Spain, the most used method in both the public and private spheres is salt, but it is not the most recommended. We will talk to you about salt and two other techniques!
Pallas The best way to remove snow from any surface is to use a shovel . The work will be greater, but with it you will avoid throwing products on the ground that could damage its composition and that could be harmful to the animals and plants that inhabit them.
With your shovel you will not remove the ice, but the snow that with low temperatures will end up becoming a slippery surface . This is a preventive action to prevent accumulation during a snowfall from becoming a major problem.
Sand One of the main alternatives to the use of salt and chemical products to promote the thawing of surfaces is sand . It is a relatively simple element to obtain, although its price is much higher than that of salt. By depositing it on any surface, you will achieve better traction, both for your shoes and your car if you have to put your vehicle in or out of the garage and the ramp is icy. Gravel and sand make access much less dangerous for people and cars.
On the other hand, the main problem with the use of sand is that its subsequent disposal is complicated and will require more time to clean your access roads to the house and garage. In addition, during the thaw or rain, it will travel to your drains and can cause blockages in the pipes of your home.
The salt It is the most used way in Spain to melt snow and ice that accumulates on sidewalks or driveways to garages and buildings . Its main advantage is that this mineral is simple to use and, above all, very cheap. Its effect is quick and helps avoid unnecessary accidents due to slipping.
But, salt also has many disadvantages, as it is not as environmentally friendly as it should be. Salt contains ingredients that modify the mineral properties of the soil, which is why salt can affect plants and reduce their absorption of water . But it is not only dangerous for plants, it can also be dangerous for those animals that feed on the vegetables that have grown in this soil that has been sprinkled with a good amount of salt because it increases its concentration of this material.
Salt is very corrosive and is capable of oxidizing metal surfaces , therefore, it is especially harmful to cars that circulate on roads that have been treated with sodium chloride. It is recommended, if you have traveled with your vehicle on tracks where salt has been applied, that you wash it thoroughly when you arrive at your destination to prevent the salt from damaging your car. In addition to your car, the corrosive power of sodium chloride will affect the tiles, stone and wood surfaces of your home. In some northern European cities such as Berlin, the use of salt to dissolve ice and snow is prohibited, so its citizens must resort to other alternative methods.