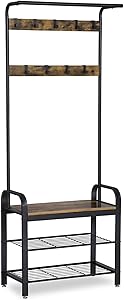
VASAGLE Coat Rack, Hall Tree with Shoe Bench for Entryway, Industrial Accent Furniture with Steel Frame, 3-in-1 Design, Easy Assembly, Rustic Brown and Black UHSR40B
- Something Certain: Some furniture looks good, but isn’t very practical. Others are functional, but look cold and boring. Not this hallway coat rack, however—with rustic brown, warm wood tones, stable shelves, and numerous coat hooks, you get the best of both worlds
- Perfect Design: The strong steel frame and sturdy rustic brown shelf are precisely the elegant mix of styles that give the eye-catching coat stand an individual character, remarkable durability, and high load capacity of up to 6.6 lb per hook and 176 lb for the engineered wood shelf
- All in One Piece: Coat rack, shoe storage, and bench all in one. With 9 hooks and a clothes rail for bags and scarves and 2 metal wire shelves for shoes, you can have a seat and be comfortable while putting on your shoes, making everything handy when you’re in a hurry
- Take Your Time: It seems that we’re always in a hurry before heading out. That’s why we made assembly easy and quick with numbered parts and clear instructions. Take your time when getting ready
- What You Get: A chic hall tree from our DAINTREE Collection with shoe bench, shoe rack, and hanging hooks in one, and an anti-tip kit to ensure a safe home
Shoe rack with cardboard box and hangers
How about making a shoe rack with a cardboard box and hangers? It becomes a great option to leave your shoes at the entrance of the house (and not take the dirt from the street inside) By the way, especially in this period of quarantine that we are living, every care is important. So I did this step by step with great care to you!
Materials
- 2 cardboard boxes
- 4 wooden hangers
- Scissors and white glue
- String (or any string you have)
- screws
How to make shoe rack with cardboard box and hangers
As in the previous posts, I made a video of the whole step by step and posted it on Mania's Instagram. But I'll also post it here so you can see how easy it is
- First, I used pliers to cut the wire ends off the hangers;
- Second, I drilled and joined the ends of the two hangers (I put screws on both sides);
- Then, I made another base using another pair of hangers.
- Then I took the box that will be the shoe rack and cut the top flaps;
- In the meantime, I decided to reinforce the sides and bottom of the box using other pieces of cardboard;
- In order to make it easier when punching the box, I used sheets of paper to make the molds where the holes will be;
- Soon after, I used white glue to glue the fabric around the box;
- Later, I took the paper molds and drilled holes in the box using screws;
- So I attached the bases of hangers to the box by passing the string through the cross-shaped holes;
- Finally, I placed a piece of cardboard in the middle of the box to make a divider.
As a result, you'll have this charming shoemaker for very little money!
In order to give a more beautiful finish, I made a disc of sisal rope and glued it to the sides of the hangers with hot glue.
