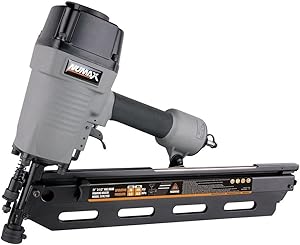
NuMax SFR2190 Pneumatic 21 Degree 3-1/2" Full Round Head Framing Nailer Ergonomic and Lightweight Nail Gun with Tool-Free Depth Adjust and No Mar Tip
- Nailed It: This 21 degree pneumatic framing nailer features a lightweight and durable magnesium body, ergonomic secure handle, and interchangeable trigger for quick fire or single shot function. It's ideal for professional construction contractors and home DIY projects.
- Versatile and Powerful: The framing nailer features depth adjustment and a no mar tip, making it adaptable for different working surfaces. It's perfect for framing, and it can also be used to install subfloors, roof decking, wood fencing, and sheathing.Minimum Recommended Air Delivery SCFM @ 90PSI:2.4
- The Right Tool for the Job: We're committed to providing outstanding value, top tier customer service and long lasting, high quality products. We make nailers and staplers for every purpose, from roofing to siding to flooring and everything in between.
- Quality and Durability: We manufacture tools with the most durable materials under strict quality control guidelines, suitable for professional contractors and do-it-yourselfers alike. Our tools are sold, distributed, serviced, and warrantied in the USA.
- Tough and Dependable: We make an array of durable construction tools and accessories, including staplers and nailers for siding, flooring, framing, finish, and roofing. Compare our products to similar items by Makita, Hitachi, Bostitch, Senco, Paslode, and Dewalt.
DIY: FRAMED NICHE
Guys, do you remember that we showed here how to reuse a frame transforming it into a photo mural? Yeah, a nice solution if what you really need is space for photos. Today we are going to show you an idea a little bolder for reusing frames, but very simple and easy to do.
What we found most interesting about this idea is that a simple frame joined to a simple wooden niche has an incredible result. New face for the well-known niches, which we love, and are super useful when decorating any corner.
Materials:
- – 1 frame (can be a portrait frame)
- – 4 wood tops – MDP or MDF 15mm (width and height will vary according to the size of the frame)
- – Wood glue
- – Nails
- – Sandpaper
- – Hammer
- – Wood paint (in whatever color you prefer)
First you will need to measure the span of the frame you are going to use, both width (X) and height (Y). You will need 2 X-tops and 2 Y-tops. You define the depth, but wall niches are usually no more than 20 cm deep. If they are just decorative, 10 cm is enough.
Most people don't have the tools at home to cut wood, so you can measure the frame and have a local woodworker cut the tops for you. As they won't be big pieces, you can even do it with leftover MDP or MDF.
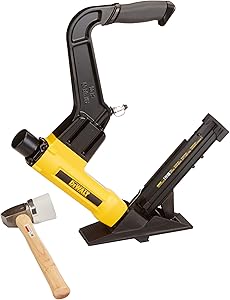
In this step by step, wood glue and nails were used to join the tops and form the niche. In the image you can see that a nail fixing tool was used, a kind of pistol to fix nails, but you can use the good old hammer (for those who are not used to it, be careful not to get hurt). Ah, you can also fix it with screws.
Then just fix the frame in the niche. In this step, wood glue and nails were also used, but I believe that glue alone can be sufficient.
With the framed niche, let's go to the finish. Use spackle or wood putty to correct imperfections and mask nails. After a good sanding, which always contributes to a good finish, and finish by painting with the color of your choice. In this project, the piece was all white, but nothing prevents you from using one color in the niche and another in the frame, use your creativity!
Are you going to say that the niche doesn't look beautiful framed? Make several and with frames of different sizes!