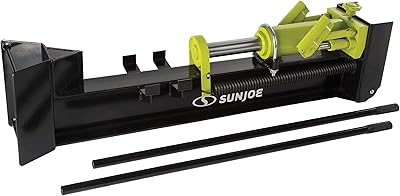
Sun Joe LJ10M 10-Ton Hydraulic Log Splitter, Green
For logs up to 18 in. Long x 8 in. Wide
Powerful hydraulic RAM Builds up to 10 tons of driving force
Log cradle prevents split wood from falling
Durable Steel construction. Other features: wheels for easy portability
Full 2-year
No gas, oil or cords. Wheel size (inch): 2. 48
How to Cut Firewood for Fireplaces?
If we want to live a unique experience lighting and preparing our fireplace, we must start by cutting the wood that we will use to light it. But how can we cut the wood for fireplaces? Stay to discover a few simple, quick and easy steps!
Attention! Would you rather buy your firewood?
First of all, if you are one of those people who prefers to buy firewood and forget about the cutting and storing process, Bingo! We have the best firewood for you (see on Amazon) at the best possible price.Don't hesitate to take a look!
What materials will you need?
Cutting firewood for a fireplace is a somewhat dangerous process in depending on which cases, we deal with all kinds of sharp elements such as axes or chainsaws, therefore, we must bear in mind that our safety will be paramount, so you will need:
Work gloves
Work boots
Safety glasses
Chainsaw (optional)
handsaw
Ax
Methods for Cutting Firewood
There are different methods of cutting firewood, some will involve more effort, others more time, investment in machinery, among others. However, here we explain the most common and most accessible methods so that you can choose which one best suits your needs:
Chopping Firewood With Ax
Chopping wood with an ax has been the most rustic and widespread cutting method in the world since ancient times. If you want to live this experience because you don't have more tools yet. Here are the best tips:
First, you will have to position a block of wood to use as a base to carry out the cutting of the firewood. Bear in mind that if you place the firewood logs on a soft surface or ground, it can be terribly damaged in the event that the ax comes into contact with it.
Next, place the log of firewood that you want to cut on top of the block in the way or support that you are going to use and prepare to execute the cut. Stand with your feet shoulder-width apart and facing the log.
Next, hold the ax correctly with both hands placing your dominant hand on top of your non-dominant hand.
Look at the natural lines in the wood, as these tell you which parts of the wood are easier to cut.
Once we have located these (if there are any) we will prepare to make the cut , you must raise the ax to your head and lower it with a sharp blow.
Pros and Cons of Chopping Firewood with an Ax
Although chopping firewood with an ax is the most rustic and ancient method, today many fire lovers continue to use it. It is a fairly effective cutting method since depending on the ax blade the cut can be done quite cleanly.
However, it is a slow process , in which we will have to dedicate enough time and work to obtain a considerable amount of firewood to keep our fireplace burning. On the other hand, it takes quite a bit of force to make clean cuts, meaning a cut with little force will simply cause the ax blade to get stuck in the log and be difficult to remove.
Therefore, if you have time and want to spend a morning doing this work, you can take it as one more experience. However, if you want to get firewood fast, this is not your best method.
Cutting Firewood with a Manual Saw
The manual saw will allow you to cut the wood for your fireplace in a faster way and without the need for so much physical effort:
Another of the most used tools in terms of cutting firewood is the saw. In the same way as in the previous section, we must find a hard and immovable base where to place the pieces of firewood that we want to cut.
In the case of saws, the continuous shaking will hinder an easy cut, therefore, if we can find two supports that can hold the logs of firewood at both ends, it would be of great help.
Once the logs are attached, we will have to start cutting them. The most optimal thing is to make the cut in the middle since both parts will have a similar size and suitable to light any fireplace
Pros and Cons of Chopping Firewood with a Hand Saw
Cutting with a manual saw will save you more physical effort than any other method, in addition to providing you with a faster cut and being able to create a greater amount of firewood in less time.
However, finding a support base to carry out this cut can be a bit difficult since both ends of the firewood must be perfectly fitted to prevent the log from moving and making it impossible to carry out a clean cut.
In addition, the log that we must cut with this manual saw should not be extremely large or hard as it will be impossible to cut them, the sandpaper will be stuck practically in the middle of the trunk.
Cutting Firewood with an Electric Chainsaw
Finally, the electric chainsaw has been one of the best technological advances for lovers of cutting firewood. Here we leave you an explanatory video so you can see its effectiveness:
We should find a stable base to position the firewood that we want to cut.
Once our trunk is centered, it would be a matter of turning on the electric or gasoline chainsaw and keeping the corresponding safety distance sliding it smoothly and slowly over the piece of trunk that we want to cut.
Pros and Cons of Chopping Wood with an Electric Chainsaw
The electric chainsaw is undoubtedly the best tool par excellence to achieve clean and effective cuts of the firewood that we are collecting. In less than you would have ever imagined, you will already have a large mountain of firewood that you can stack for future uses.
However, the initial investment of these is quite high compared to hand saws or axes. Bearing in mind that you are looking for effectiveness and getting the greatest number of firewood in the shortest time possible, the electric chainsaw is without a doubt the most suitable tool for this job.
If you are a fireplace lover and you love having firewood always available, one of the best investments you will make for the future is to buy an electric chainsaw to cut firewood and have your fireplace always stocked with wood .
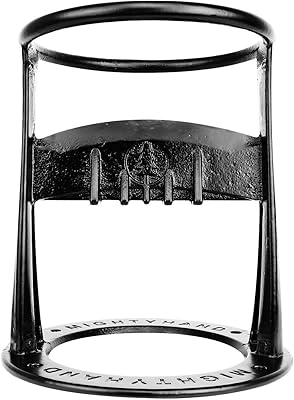
Mighty Hand Kindling Splitter XL, Cast Iron Firewood Cutter | Quick & Sturdy 9”-Dia. Log Splitter, Manual Use for Home, Campsite & More
SET, STRIKE, SPLIT — Make fatwood and firewood in three easy steps. Say “Goodbye” to imprecise log splitter wedges. The wide 9” diameter top ring will help you make quick work out of 8” logs, faster and safer than you could with a dangerous axe, splitting maul or hatchet.
SOLID, STURDY & STABLE — At just 13 lbs, take the Mighty Hand hand wood splitter with you wherever you need to split kindling. From your backyard to the camp site — no mounting necessary.
WORRY-FREE CRACKER — Cast-iron unibody. Extra-wide 11” base with 1¾” lip. This means added stability when cracking wood. You can also anchor the Mighty Hand to any flat surface using the four half-inch bolt holes.
FINGER-FRIENDLY SAFEGUARDS — A wide safety ring keeps your fingers away from the blade. Done splitting wood? Use the vinyl blade cover guard to minimize injury and maintain blade sharpness.
GOLD-STAR SERVICE — New Mighty Hand wood splitter wedges are backed by a 1-year limited warranty. Have questions? Reach out to our expert customer support team, 7 days a week, via email or phone. Our team is fully staffed in the U.S.
Guide to cutting firewood this winter
Cutting and storing firewood can be a challenge if we do not know all the aspects involved, from the species of tree to be felled to the implements to use, in which case we can consider renting tools .
Therefore, if we want to have the best natural heating during Madrid's cold and dry winter, it is important that we read the following Guide to cutting firewood this winter , where we will offer the best tips, techniques and tools.
Arrange everything you need: evaluate tool rental
Before starting the work, it is important to think about everything we need , from the storage space so that the firewood is kept in good condition, the implements we will need, if we will buy or rent tools, and even the time that the work will require.
Once we have all this well analyzed and prepared, we can start with the task, an arduous task but that will become easier depending on our own attitude and disposition .
Handling of firewood: cutting, storage and drying
The other great key to having good firewood is knowing how to get its best performance. For this we must be clear that a firewood that is too humid will burn with great difficulty and will emit less heat during the combustion process.
Likewise, contrary to what is usually thought, a too dry firewood is not favorable , since in this case its combustion will be very fast, there will be a great waste of heat and we will end up wasting everything in a few hours.
Next, we will go on to study the three basic aspects for the correct functioning of the firewood: the cutting of the wood, the storage and the drying process .
When to cut the firewood?
you need these gardening tools this summer to cut firewoodChopping firewood is a science that requires knowing the inner workings of the tree. The most advisable thing is to cut the wood in winter , taking into account that during this period the sap has descended to prepare for the hot season.
In spring and especially in summer, the trees are full of sap, which moistens the wood. That is why it takes a long time to achieve favorable drying.
In short: the tree is cut down in winter and remains that way until spring, when we must divide the wood . We let it dry until the following winter, the perfect time to burn it.
If instead of cutting down the tree on our own, we prefer to buy the firewood either for convenience or because we have enough space to store it, the best way to ensure good conditions for the firewood is to buy it a year in advance .
This gives us two important advantages: first, we give the firewood enough time to dry, and second, it allows us to save because we can buy in volume.
Firewood storage
The storage of firewood requires different care depending on the site. The most important thing is that it is stored in a space that allows air flow and is protected from rain , so that moisture can escape.
If it is stored outside, we must use a waterproof cover, but taking care that air can pass through. We must bear in mind that the firewood must never come into direct contact with the ground.
As for indoor storage, it is important to have a dehumidification and air flow system , in this way we avoid mold and promote drying. In the same way, we will take special care with the appearance of insects that can damage the firewood.
Take into account that if we place the firewood directly on the ground, it can absorb moisture. That is why it is recommended to arrange it on a slightly elevated surface, for example, on pallets.
Firewood drying times
We already cut, divide and store our firewood. What do we do now? Wait for the drying. At this point we have to be especially careful to guarantee the perfect performance of the material. Firewood takes 6 to 8 months to dry.
To get an idea, the wood that we put out to dry in early spring will be ready to be used most effectively when the following winter starts, or even late fall.
The science of chopping wood
Although we already talked about when to cut firewood, in this section we will focus on how, from choosing the best tree to some tips for choosing and using tools, in order to make the process easier and safer.
Choosing the best firewood
DiY San Valentín - Majo Rentals MadridThe most important thing when selecting the tree from which we will extract our firewood is that it is healthy and not rotten . The firewood should not be too hard or too soft ; the ideal is a middle ground.
Hard wood , such as birch or beech, is excellent at generating heat, but high temperatures can damage or burn the stove. In addition, they are consumed very quickly if what we want is to maintain temperatures for a long period of time.
For its part, soft firewood (firs, pines) contains less fuel value, so they provide little heat. Therefore, a mixture of both types of firewood is suggested.
Safe use of tools
In this regard, there are many elements to consider, from the purchase or rental of tools, to the large number of tools that have evolved greatly from the ax and the saw. Later, we will offer a complete catalog of tools for cutting firewood , for now, we will limit ourselves to giving some practical advice.
We must choose a chainsaw that allows us to fell, limb and make cross cuts . Here we must be especially careful, especially if we are not professionals and we are not used to using chainsaws. A bad job could cause damage to the machine or, worse, to ourselves.
As safety must be our premise, we must pay attention to the clothes and utensils we use when cutting firewood. Protective equipment should include a helmet, ear muffs, goggles, appropriate clothing and footwear with safety and protection elements.
The division
After being cut, the firewood should be divided for more practical use. The ax is still the perfect tool for this task. You also need a raised surface on which to place and cut the pieces.
An important tip at this point is not to use too much force when using the ax; but to let the same weight of the ax work alone . In this way we avoid injuring ourselves and getting excessively tired.
When we have to work with larger logs, the ax will be small and we will have to use the chainsaw.
Well, we are ready to cut firewood, dry it, store it and consume it. Now, we will know the main tools used to handle wood.
Tools needed for handling and cutting wood
We already knew the ax and the chainsaw, but believe it or not, it takes a lot of other things to handle the wood safely and get the best pieces of firewood.
The first thing is to have a clean, stable and safe workspace; then, protect your whole body, from head to toe . To guarantee this, we need several things. It is here when we can consider the rental of tools , as a strategy to save money and facilitate work with the latest technology.
Hooks and clips for logs
Prune treeThese tools allow you to save time when handling firewood, as well as protecting your fingers and hands from being crushed. The hooks and clips are made up of one or more claws and a handle.
The hooks drive directly into the wood and make it easy to hold the log for transfer to storage or cutting. The clamps, on the other hand, are articulated , so that when they are hooked on the log, the weight of this squeezes them when lifting it.
When buying them, you should consider that their maximum opening is adequate for the diameters of the wood with which you work. It also ensures that the handle is wide and ergonomic.
Log trestle
The base on which we work is a vital factor of safety, to the point that instability can be the cause of serious accidents . Therefore, you must have a log trestle at the time you go to chop the wood, either manually or mechanically.
In this way we can guarantee that the log will remain horizontal, without the possibility of sliding . The easel can be found in metal or wood, it is convenient that it has fastening hooks and that it is adapted to the diameter of the wood with which you usually work.
The ax
It is a classic that does not go out of style and is the typical representation of the lumberjack. It is recommended to use it with small amounts of dry, white wood . The log is placed in a vertical position and with a good blow of the ax it should be opened.
However, you have to know how to master the technique that can be dangerous if you are not used to it . The most suitable is the so-called splitting ax, with a blade that is sharp on one side to penetrate the wood, and with a widened shape to finish dividing the parts.
Depending on the size of the wood, we could use a short model that weighs no more than 2 kilos (hand ax) if the piece of log is small; or a long model for everything else.
Hammer ax
The ax hammer is the quintessential manual splitter, as it is specially designed to split logs . Its correct use guarantees perfect performance
In terms of appearance, it resembles a normal ax, although it combines two tools: mace and ax . The hammer is perfect for hitting wedges; while the ax side cuts through the wood.
Its weight should also be chosen according to the diameters of the wood that we usually use. It ranges between 2.5 and 4 kilograms for the largest models, while its length is normally 90 centimeters.
Wedges
Wedges are the ideal companions for the ax hammer or hammer, as they will help you to pre-split the most difficult logs . The "breaking" wedges are special for splitting the wood lengthwise; They are made of tempered steel and we can find various types.
On the market we find straight flat-tipped wedges, straight sharp-tipped wedges and helical wedges, the best for splitting wood.
Mace
The mallet is used to strike and sink the wedges. If you don't have an ax hammer, you can combine the mace with an ax . The most efficient mallet should be strong, with a length of approximately 90 centimeters and a weight of between 3 and 4 kilos.
Log saw
Also called a garden saw or bow saw, this tool has a steel frame and a blade with huge teeth, which make it very good for cutting small diameter pieces of firewood , no larger than 20 centimeters.
Thermal or electric saw
It has an electric or thermal motor that drives a circular blade with a diameter of between 40 and 70 centimeters . The logs are placed on a trestle with an adjustable stop that corresponds to the desired cutting length.
Chainsaw
In this case, the principle of operation is the same, since a motor puts into action a support called a sword. The wildcard chainsaw, with a bar less than 18 inches, is used for ordinary tasks.
It is ideal for chopping firewood, cutting branches and even cutting down not very thick trees . It is operated with two hands, and the most powerful models, with more than 2,500 W, require vigilance and extreme care.
Get your tools to cut firewood with Majo Rentals
Having all the utensils to cut firewood, in addition to being very cumbersome, is not always possible due to the high costs. Thinking about it, at Majo Rentals we are experts in the rental of tools in Madrid , for all tasks inside and outside the home.
Our specialists offer you everything you need to reform your spaces , in addition to the professional advice you require for the correct care and operation of the tools.
Rentals MAJO is responsible for the rental of tools and machinery for all types of jobs , from the most everyday to construction, gardening and cleaning works; of course at the best prices.
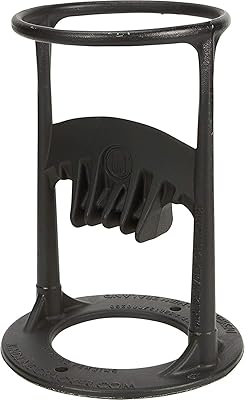
A safe and easy way to make kindling with no moving blade or sharpened object passing by your hands
Splits firewood with less force than a standard axe
6.5in. inside diameter top ring
Made of high-quality cast iron in Australia
Virtually maintenance-free
How to cut firewood from a log
Many people see the sharp wedge at the end of an ax handle and think that cutting wood for firewood is easy. You just have to take the ax, lift it over your head and strike down, right? However, if you don't have the correct technique, you could spend a whole day chopping wood with nothing more than a sore back. What's more, without the correct technique, you could seriously injure yourself. Better to chop wood correctly to be safe, save time and effort, and avoid ailments.
Method 1 Chopping wood with an ax
1 Get ready. Not only will you need logs of the appropriate length (about the length of your forearm) and your trusty ax, but you will also need to use the following safety tools:
work gloves;
work boots;
safety glasses (optional but recommended).
2 Find a block of wood to cut the firewood and put it in an appropriate place. If you don't already have a block to cut, you can choose a large, thick piece of uncut wood. A wide stump is also an excellent base for chopping firewood.
If you choose to use a thick piece of wood, make sure it is knotty, as it will be much more resistant to the force of the ax and will last longer as a cutting block.
Elm wood has particular grains that make it resistant to cuts. If you have a piece of this type of wood at your fingertips, take advantage of it. [1]
You can wrap a recycled tire around the top edge of the chopping block to stabilize pieces of firewood that don't stay vertical when you lay them on the surface. [2]
A cutting block should always give a little; If it has too hard a surface, it could damage your ax or even injure you if the ax is deflected.
3 Put the firewood in the right place. Take the piece of firewood you want to cut and position it so that it remains stable on the chopping block. You may need to make some adjustments to find the perfect position due to natural irregularities that occur during wood growth, such as cracks or knots. The log should be as stable as possible, with the area you are hitting pointing up, where you will begin the cut.
4 Stand in front of the firewood and the chopping block. Make sure there are no branches, loose stones, slippery mud, or anything else on the ground that could cause you to slip. Stand with your feet shoulder-width apart facing the wood and chopping block. [3]
It is important that your legs are separated to the height of your shoulders. A piece of firewood that is not stable or has uneven grains or knots in the wood can cause the ax to twist when you strike. Keeping your legs shoulder width apart is one way to ensure that the ax does not land on your legs or feet.
5 Hold the ax correctly. Take the ax with both hands; Place your dominant hand near your head and your non-dominant hand toward the lower end of the handle. To hit properly, you must allow your dominant hand to move along the handle to your other hand, which should stay in place. In this way, you will have more control and the blow will be stronger. [4]
6 Look at the grain of the wood. Be aware of any knots or branches, as these will make the firewood much more difficult to cut. For knotty cutting, your best bet is to focus on the area between the knots or branches where the grain is smoothest. [5]
Cracks or small cracks in the wood are the ideal place to strike with the ax.
The easiest wood to cut has smooth grain and the grain is consistent and regular.
7 Prepare to strike. Focus on the goal. Place the ax to the side of your dominant hand and lift it over your shoulder in a steady, even arcing motion. [6] Hold the ax firmly before striking and make sure your posture is stable and your legs are shoulder width apart.
Another acceptable technique is to lift the ax directly over your head and then hit the piece of wood.
8 Strike with the ax. Bring the ax down quickly and firmly, allowing your dominant hand to move along the handle, toward the other hand. Focus on where you want to strike until the ax gets there. [7]
Depending on the thickness of the wood and the number of knots it has, you may need to repeat the blow one or more times to cut the wood.
Method 2 Cutting sturdy pieces of firewood with a wedge
one Evaluate what you need. If you are cutting full-size wood, unless the wood has more knots than usual or it is a cut-resistant type of wood (such as elm), you will not need a wedge. On the other hand, if the firewood is hard and you can only make cuts and cracks with the ax, but do not cut it completely, you will have to use other tools. 0 2 Gather your supplemental firewood chopping tools. If you can't do the job with just an ax, you should get a long metal wedge and a mallet. You can get them at a local hardware store, or perhaps borrow them from a neighbor.
3 Identify a central crack or a promising cut. Even if the ax doesn't go through the piece of wood and cut it completely, if you managed to land a few hits, you may have made at least a few deep cuts or a crack in the wood. Find the deepest cut or crack in the firewood. This is where you should cut. [8]
For some particularly large or sturdy pieces, you may need more than one wedge.
4 Insert the wedge. Since the wood will be softer than the wedge, you will probably have no problem placing it in the cut or crack that you chose as a cutting point. If you are trying to cut a particularly hard type of wood, you may need to insert the wedge using a mallet. [9]
5 Prepare to strike with the mallet. Assume the same posture as cutting with the ax: keep your legs shoulder-width apart, place your dominant hand near the head of the mallet, fix your gaze on the wedge, and lift the mallet over your shoulder. [10]
6 Hit with the mallet. Allow your dominant hand to move along the handle, toward your non-dominant hand, which should be fixed, and hit the wedge with a quick, firm movement. [eleven]
In this way, you will need to drive the wedge deeper into the piece of firewood, causing the cut to become a crack or the existing crack to enlarge.
You may need to hit several times with the mallet to be able to drive the wedge even deeper into the wood.
7 Separate the firewood if necessary. Sometimes the wedge breaks the knot and cuts the wood completely. Other times you must manually finish breaking an almost completely cut piece. In some cases, you may need to use your ax carefully to separate uncut pieces.
Method 3 Using a hydraulic log cutter
one Read the manual. Each firewood cutting machine is a little different from the others and if you know its characteristics, as well as the correct way to operate it, you can use it safely. Whenever you use these types of machines, be extremely careful, as a mistake can lead to serious injury. [12]
2 Review security procedures. Before starting the machine, make sure the path is clear of objects, that the deck panels are in place, and that you wear the correct safety gear to operate the machine. [13] In general, these implements are:
relatively tight clothing;
safety glasses;
work gloves.
3 Add fuel or start the machine. Some firewood cutters work like attachments to a tractor. Others are powered by electricity or gas. Do not leave the fuel or the power cord in any place where it can trip you or become entangled with the parts of the machine. [14]
4 Gather the firewood. Once you have read the manual, you will know the procedure to follow to operate the machine. In this way you will know what is the best way to put the firewood in the hydraulic cutter. Collect the pieces of firewood in the most convenient place for the machine.
5 Turn on the cutter. Start the machine and see how it works normally without placing the firewood. Make sure everything appears to be working properly and verify that it is as the manual indicates. [fifteen]
6 Place the firewood in the cutter. Follow the instructions in the manual for placing uncut firewood in the machine and removing it once it is cut. Regardless of the type of gear you use, once you turn it on, always be careful while around. [16]
Tips
Choose the most suitable ax for the job. Identify when you should use a normal ax, a double-edged one, a mallet, a wedge, among others.
Pay attention to the ground and be careful if you see an uneven area. Also, be aware of where the people around you are.
Learn from an adult or someone with experience using axes.
Never stand behind someone while using an ax.
Use a sharp ax. Dull, your tool could slip, bounce and cause a more serious injury than if it were sharp. If you are not sure how to sharpen an ax, ask for help.
When using an ax to chop wood, if you strike by tilting the head of the ax slightly to the side, it will be less likely to get stuck in the chopping block, but small pieces of wood will be thrown out.
Let the ax do the work. In other words, take a quick, controlled strike and relax just before the ax hits the wood. In the last seconds of the hit, you are simply a guide. This will prevent the additional impact of the blow from being transferred to your muscles and you will be able to chop wood for longer.
Warnings
Do not put your hand or fingers on the piece of wood you are going to cut to support it or keep it stable. You could seriously injure yourself or even cut your finger while chopping wood, since to do this, you usually hold the smaller pieces with one hand while using the ax with the other. If you instead hold the piece of wood loosely by the sides, any accident would simply cause you to hit your gloved hand without causing further damage.
Never stand behind or too close to someone while using an ax.
Wear thick gloves, boots or shoes, and goggles.
If you have severe back problems, do not attempt this unless you are completely confident that you have the physical ability to chop wood.
Stand with your legs apart and place the firewood you want to cut in the middle. This way, if the firewood falls or if you miss the target, there is less chance that you will hit yourself and break your leg as the ax continues its course.
Do not use a dull or damaged ax. Before using it, examine the head and handle, as well as the method applied to join them.
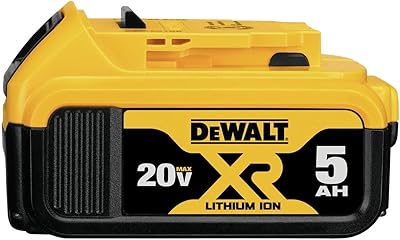
DEWALT 20V MAX XR Battery, Lithium Ion, 5.0Ah (DCB205)
About this item
Compatible with DEWALT 20 Volt MAX tools
Compact, light weight design
Premium XR 5.0 Ampere hour Lithium Ion battery
No memory and virtually no self discharge
Attachable battery pack and charging cradle
Forget the clutter and install your charging system without cables. Plug a charging base into the outlet you always use and put the battery pack in to forget about cords and have a reserve of power wherever you go.
Doubles the battery capacity so you can talk for almost twice as long
Now you can talk, browse and enjoy music and videos on your iPod or iPhone for longer with this compact, lightweight battery with double capacity.
Suction cups for a secure fit
The battery pack uses suction cups to securely adhere to the back of the device. Plus, it's easy to remove when not in use.
Compact and flexible design for ease of use
With the compact and flexible design, you can use your device comfortably while the battery pack is docked and charging.
Recharge your device's battery wherever you are
With the battery pack you can easily recharge your device's battery wherever you go. You just have to connect it to make a comfortable and simple recharge wherever you are.
Power indicator shows you the status quickly
The LED power indicator is discreet and efficient. All you have to do is press a button for it to indicate the status of the battery pack.
Works anywhere - great if you don't have power sources nearby
You can recharge your device's battery with the convenient battery pack even if you are not near any wall or car charger. This smart pack is the main source of power while connected, so that when you remove it your device's battery remains completely full.
Mini USB cable for syncing and charging
The supplied mini USB cable plugs into any USB charging drive, such as a computer or a USB wall or car charger. If you connect it to the computer, you can sync your iPhone or iPod with iTunes.
Works with almost all cases, so you can use your favorite case
The suction cup design easily attaches to the back of iPhone or iPod and most cases so you can use the one you like best. So you can keep using your favorite case on your device and enjoy the benefits of wireless charging and backup power wherever you go.
Contact charging: no need to plug and unplug
Simply place the cordless battery pack on the base to charge both the batteries and the connected device.
Charge with the included wall charger and mini USB cables
There are three ways to charge the dockable battery pack: with the included USB wall charger, via the computer with the supplied USB cable (also used for syncing), or with the Infinergy charging base.
Power available at all times with this compact charging base
Plug the compact base where you normally charge your devices: in the kitchen, the office or on the nightstand. Then simply place the cordless battery pack on the base where you usually put your device.
ChargeOn system for effortless charging
Set up your ChargeOn system for effortless wireless charging and forget about annoying power sources. Plug in a cradle where you normally charge your devices and use the attachable battery pack to free yourself from cords and have backup power wherever you go.
Wireless compatibility for ChargeOn bases
The battery pack has contact points that allow you to charge it by simply placing it on a ChargeOn base, without the need to plug and unplug. Choose a dock for more comfortable wireless charging.
Product will either come in original packaging that is in less than perfect shape and has been opened to inspect contents or will come in non-retail packaging (brown/white box or white/clear bag). REDLINK Intelligence: Our battery circuitry provides optimized performance and overload protection using total system communication between tool, battery and charger
Best-in-class construction: Offers long-lasting performance and the best protection against jobsite, weather and environmental conditions
Fuel gauge onboard: Displays remaining run-time
Versatility: Powers all 175-plus M18 cordless solutions
Compatible with all M18 tools
Battery expansion pack
Blink cameras can operate normally for two years on a pair of AA lithium metal batteries. For indoor (gen 2) and outdoor cameras, the Blink Battery Expansion Pack provides up to 2 years of bonus under normal use, giving you up to 4 years of camera operation. The battery expansion pack is not compatible with Indoor (gen 1), XT, XT2 and Mini cameras.
The Expansion Battery Pack replaces the pair of batteries in your camera with four batteries found on the back cover of your camera.
Note: The reset button on the camera is accessible when the expansion pack is in place, but the Micro USB socket is locked and the serial number QR code label is covered.
To add or re-add a camera with the attached battery extender pack, you must do one of the following:
Please record the serial number of the camera before installation and enter it manually when requested by the application. Remove the battery expansion pack to access the serial number and QR code label when prompted by the app.
Installing the battery expansion pack
1. Remove the back cover and batteries from your camera. You will find detailed instructions here . Align the USB power port with the opening in the expansion battery pack.
2. Place the expansion pack by pressing it evenly over the camera's battery hole. You can press the tab holders or on the four tab locating triangles engraved on the expansion pack until the tabs click into place.
3. Check the fit by separating the two objects. If there is no movement, follow the battery example engraved on the expansion pack (shown here in red) to install the four AA-size non-rechargeable lithium batteries.
4. The battery expansion pack has a notch in the housing that exactly corresponds to a sample on the back cover of the camera. Align the notches and then hold the cover in place while holding the screw bracket. Turn the screw clockwise (to the right) until it is snug and the cap is flush with the surrounding edges.
If you don't use the mounting hole, replace the silicone screw cap, then check the camera operation and the batteries to make sure everything is correct.
For more information on mounting your camera click here .
Remove the battery expansion pack
1. Remove the back of the camera from the expansion pack. You will find detailed instructions here .
2. Remove all batteries from the expansion pack. You can use the opening tool to remove the batteries if necessary. Never use sharp or metallic objects to remove batteries .
3. Squeeze one of the tab holders toward its closest edge and this should release the clip. Repeat this on the other side and then remove the battery expansion pack. Note that you can use the opening tool to pry if you need to, even if you use only the necessary force to release the fixing clips.
4. After inserting a new pair of AA lithium batteries, you can replace the back cover of the camera and fix it with a screw and screwdriver.
The back cover should be flush with the camera housing, so you should not overtighten it. Install the screw cap if you don't use a bracket.
Mounting with the battery expansion pack
With a battery expansion pack and four batteries in place, the camera weighs more and is 'longer' than before. Because of this, gravity has a greater effect on the position of the camera. The right angle adapter included with the camera places weight away from the fulcrum of the mount, which can cause the camera with the battery to drop or slowly change position over time.
When the battery expansion pack is attached, we highly recommend using the bracket directly, without the right angle adapter.