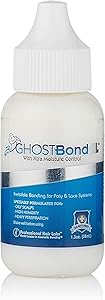
Ghost Bond XL Hair Replacement Adhesive - 1.3oz - Invisible Bonding Glue: Extra Moisture Control - Light Hold For Poly and Lace Hairpiece, Wig, Toupee Systems
- LIGHT HOLD HAIR REPLACEMENT GLUE, ADHESIVE – Our Ghost Bond XL Adhesive is specially formulated for use as a pressure sensitive adhesive and glue for bonding hair replacement systems to skin and scalp. Our products are researched, manufactured and rigorously tested to ensure high-quality, exceptional performance and safety.
- INVISIBLE BONDING FOR POLY & LACE SYSTEMS – Ghost Bond XL Adhesive is safe for use on both poly and lace hair replacement systems and creates an invisible bond after application. This invisible bonding helps to hide your hairline and creates a natural look for your wig or toupee for both men and women alike.
- FORMULATED FOR OILY SCALPS, HIGH HUMIDITY & HEAVY PERSPIRATION – Ghost Bond XL Adhesive by Pro Hair Labs is specially formulated for those with oily skin and scalps, heavy perspiration and those in climates with high moisture and humidity. Our formula also has a higher melting point than other polyurethane and lace front wig and toupee glues, enabling you to rest easy that your hair will remain in place.
- WATERPROOF & OIL-RESISTANT – Peace of mind when wearing a wig or toupee comes when you’re able to go about your day without worrying about your hair system moving or falling off from natural skin oils or wetness. That’s why our cosmetic hair system bonding glue is waterproof and oil-resistant to help ensure your hair looks and feels as natural as possible!
- CONTAINS NO LATEX, HARSH SOLVENTS OR TOXIC INGREDIENTS – Our Ghost Bond XL is designed for those with sensitive skin and scalp, as our formula contains no nasty chemicals, no latex and no toxic ingredients. Also, when removing your hairpiece, using a skin-safe adhesive solvent – such as rubbing alcohol – may result in less skin and scalp irritation, as opposed to other harsh remedies.

How to choose the correct adhesive for Hair Prosthesis?
It is the great and important question if you want to start in this world. In the world of hair prostheses there are different materials used to make the base of the piece. And depending on the base, the laying method may vary. The bases are usually made of fabric or plasticized. Each of them has characteristics that make a specific type of prosthetic adhesive more suitable for them . The correct choice of adhesive for hair prosthesis is very important.
The personal characteristics of the user must also be taken into account . In this case, sweating greatly influences the result that the adhesive can offer. People with heavy sweating will have to use a more powerful denture adhesive .
The ideal is to find the ideal adhesive, which will be obtained through the testing of the different products that exist on the market . Thus the perfect fixation of the capillary system is achieved. We anticipate that the great difference between the adhesives, leaving aside the holding power, is the fact that they have or not a base of tissue, paper or other material between layer and layer of adhesive. Of all those that we present only one, it has no base (it is 100% adhesive).
Roll adhesives for hair prostheses
Yellow sticker
Description: It is an extra strong double-sided adhesive with a breathable effect. It leaves no residue and is quite resistant to sweat (does not come apart easily).
Duration : from 1 to 15 days.
Recommended for users who want a stronger adhesive than usual.
Price: € 13.00
You can buy it here
Red sticker
Description : It is a strong transparent double-sided adhesive. It leaves no residue and is flexible thanks to its paper base.
Duration: from 1 to 10 days.
Recommended for anyone who starts using hair prostheses.
Price: € 14.00
You can buy it here
Blue sticker
Description: is a double - sided adhesive without base, produced 100% with an adhesive film. It does not shine and is ultra-fine.
Duration : from 1 to 30 days.
Recommended for tulle bases or non-laminated clothes and pieces with lace front.
Price: € 15.20
Blue Adhesive Pre-cut into Straight Strips
Description: is a double - sided adhesive without base, produced 100% with an adhesive film. It does not shine and is ultra-fine.
Duration : from 1 to 30 days.
Recommended for tulle bases or non-laminated clothes and pieces with lace front.
Price: € 16.90 (Pack of 36 units)
Blue Adhesive Pre-cut into Curved Strips
Description: is a double - sided adhesive without base, produced 100% with an adhesive film. It does not shine and is ultra-fine.
Duration : from 1 to 30 days.
Recommended for tulle bases or non-laminated clothes and pieces with lace front.
Price: € 16.00 (Pack of 36 units)
Anti-allergic white sticker
Description : It is a very thin and transparent double-sided adhesive. It leaves no residue and is flexible. It is dermatologically tested.
Duration : from 1 to 7 days.
Recommended for people with sensitive scalps and prone to allergic reactions.
Price: € 13.80
White No Shine sticker
Description : It is an extra strong and very resistant adhesive. It is used as a powerful adhesive between the skin and the usual adhesive as it is preferable that it does not touch the hair prosthesis directly.
Duration : from 1 to 30 days.
Recommended for users who require an extra reinforcement in the grip.
Price: € 16.90
You can buy it here
Easy Green sticker
Description : It is a special adhesive for high resistance and fixation hair systems , it is a strong and dull adhesive . It is a double-sided adhesive, one of them adheres to the hair prosthesis or wig and the other to the skin.
Duration: from 2 to 4 weeks.
Its use in lace hair prostheses is more recommended due to its matte finish, but it can be used in any hair system.
Price: € 11.90
Liquid adhesive
Gel adhesive
Description: Strong hold reinforcing adhesive. It is the classic adhesive, one of the first to be used. Currently the No Shine adhesive would perform this function.
Duration : from 1 to 30 days.
Recommended to complement the use of roll adhesive.
Price: € 16.20
Liquid adhesive
Description: Liquid adhesive for normal and anti allergic fastening Dermatologically tested.
Duration: 1 to 3 days
Recommended for the prosthesis frontal tulle area.
Price: € 28.00