BLACK+DECKER 6-inch Random Orbit Waxer/Polisher (WP900)
Random-orbit action assures a uniform finish - fast for the car polisher
Comfortable two-handle design of the variable speed polisher reduces fatigue
10 ft. cord for great mobility
Includes foam applicator for easily applying wax or polish
Includes polishing bonnets for a high-quality finish
Runs on random orbit at 4,400 orbits per minute for a swirl-free finish
10-foot cord accommodates car and boat polishing projects
How to use a polisher in a practical way?
The correct use of the polisher will allow you to take full advantage of this tool to obtain excellent results in your work.
Get excellent results in your work using the polisher correctly. Learn how to use a polisher below.
How to use a polisher? 1. To use a polisher you have to hold it with both hands, one on the handle and the other on the trigger.
2. Ensures that the guard is always facing upward.
3. Position the tool on the side of your body.
4. Run the polisher when it is in the cutting position and always use it horizontally, cutting or grinding with the edge of the wheel.
5. When finished, it must be detached from the material worked, and only then turn it off, so that the disc does not jump or damage the surface.
In what tasks to use a polisher? Its use will depend on the characteristics of the project and the type of polisher.
As it is used in construction work and in industries, its use is aimed at cutting, roughing and polishing materials such as steel, ceramic and concrete.
Bench grinder: Its main function is to sharpen instruments such as chisels, brush blades, scissors, and also to remove rust.
Recommendations for use and maintenance for polishers Use tips - As a general rule, you must always change and tighten the disc with the polisher unplugged, for this change you must use a wrench that comes in the tool kit.
- Replace with the recommended diameter and type disc.
- Do not use worn discs.
Security advice - Wear a bib, ear plugs, goggles or a face mask, a mask depending on whether a lot of dust comes out, and leather gloves.
- Do not plug it into multiple.
- Keep the ventilation ducts clean and clear.
- The operator must be located outside the projection of the particles.
Maintenance tips - Upon reaching 300 hours of intense use, it is appropriate to carry out a general revision and maintenance of the tool, which should include: cleaning, greasing and replacement of parts and pieces that may have reached the end of their useful life, as could happen with coals. and, in some cases, bearings.
- In the case of bench grinders, new wheels sometimes need regrinding to make them round.
- To keep the tool in proper condition, you must use the accessories and parts for the specific model you have.
- Using accessories of different sizes or handmade, not only affect the performance of the polisher, it can also represent serious safety risks for those who use it.
- Store the equipment in dry environments.
- Periodically clean the ventilation grills to avoid overheating the engine.
DEWALT Thickness Planer, Two Speed, 13-Inch (DW735X)
Purchase includes one stationary 13" Planer, in/out feed tables with fasteners (attached to the base of the Planer base), extra blades and dust hose adapter. Stand is not included.
Three knife cutter head of the thickness planer delivers 30% longer knife life and makes knife change faster and easier
Two-speed gear box of the wood planer allows users to change feed speed to optimizing cuts per inch at 96 or 179 CPI
Fan-assisted chip ejection vacuums chip off of the cutter head and exhausts them out of the machine
19-3/4-inch cast aluminum base is 2 times more rigid than a standard 10-inch base and folding tables
Automatic carriage lock reduces the movement that causes snipe without the need for manual engagement by the user
Material removal gauge and extra large thickness scale deliver accurate cuts with every pass
Thickener and Desempenadeira Planers, know the differences
The Thickening and Desempenadeiras Planers have similar names, but they are used for different functions and still complement each other. How about knowing or remembering the difference between two essential pieces of equipment for working with wood?
The planer's basic function is to thin the wood, reducing it until reaching the desired dimensions required by the project. There are Manual Planers commonly used in joinery and carpentry, and Electric Planers that facilitate this process, as they require less effort from the professional.
Among the equipment models that form the basis for a joinery, the Desempenadeiras and Thickeners Planers are fundamental, as they will transform the raw wood into the ideal format for what the project requires.
But despite similar names, they are two devices with different functions, and they are what we are going to talk about today in this post!
understand the differences
The Planer Desempenadeira or Desempeno is a machine to produce a flat surface along the length of a wooden board that is warped. The configuration of a Desempenadeira Planer consists of a table with width and length according to the capacity specified by the manufacturer to fix the piece of wood to be thinned. The wood slides across the machine table, passing through the center where there is an opening in which the tool that will carry out the thinning is fixed. An important part of the straightening process is to use the correct setting of the machine so that there is no waste of wood.
The Planer Desengrossadeira or Desengrosso is used to adjust the thickness of a piece of wood, leaving it with a constant gauge. It will level out, remove thickness and thin out the natural wood, making it have the same shape as the base used as a reference.
Thickness alone will not be able to straighten a piece of wood, as it follows the twist of the warped piece. Consequently, if we pass the warped piece directly into the thickening, it will only reduce the thickness of the wood and will not give the desired finish, removing the irregularities of the piece, but without straightening.
Which one to choose for my workshop?
The ideal is to have both machines to offer professional jobs, as the planer will uniform the surface of the worked piece and the thickness will copy the reference face, equaling the thickness along the length, leaving both equal and level. That is, a straight edge cannot be used to create a board of uniform thickness along its length. For this task, after straightening a face, we use the Thickener.
To meet this need, there are some models of Thickening Planers and Desempenadeiras on the market in the same equipment. In this case, they are combined with the workpiece passing under the same rotating blade for thickening, but in the opposite direction.
Remember that it is very important to use Personal Protective Equipment (PPE), such as gloves, apron, glasses, ear protectors and even a mask (to prevent wood chips from hurting your face).
At FG stores , you can find models of portable Planers Thickeners and Smoothers, equipped with a motor with carbon brushes, without transmission by belts and brakes, being more accessible and useful in workshops in general.
Now that you know the differences between these two Planer models, how about finding out more about other essential woodworking equipment? Click and learn more about Tupia: main models and their functionalities .
Planer: know how to use it!
You can make woodworking with a planer in an easy way!
Did you buy a planer and already want to create or renovate many wooden things with it? So, you need to first prepare the place, the equipment and take some steps to work safely! Do you want to know how to do all this in a very practical and easy way? So, come with me and I'll tell you!
Invest in the ideal bench
If your planer is a hand, electric or bench plane, you will first need to prepare a place to work with it. Since, the workbench suitable for making joinery or carpentry is very firm and can withstand weight, knocks and larger pieces.
Its ideal height is between 85 and 98 centimeters, about 50 centimeters wide and between 1.5 to 2 meters wide. Thus, you can cut large or small pieces with plenty of space and safety! Always check if it is well fixed and retained because otherwise, your objects may be crooked later, ok?
work safely
Before starting work, always wear safety equipment. Goggles are essential because while you use the planer, splinters and wood chips can fly.
Another essential accessory is the glove , ok? With it, you don't run the risk of skinning or cutting your hands or even ending your day with splinters in your fingers. In fact, it has gloves for carpentry and carpentry, which are made of nylon and neoprene that are super resistant, antiperspirant and do not let your hand slip. Oh and they don't cover your fingers, which serves to give you more control and firmness in the grip of the planer.
The breathing mask is also very safe because wearing out the wood or finishing it creates a lot of sawdust. And the best part is that it has its own mask for carpentry, ok?
Prepare the bench according to the planer
Before starting to move the piece, make sure it does not have tacks, nails , staples or screws . Remove any of these items or remnants of resin, paint and varnish . Also keep an eye out for knots in the wood, which are ripples that can peel off and splinter. Then, to avoid accidents, moisten a cloth, pass the piece, sand from the center outwards. This way, everything will be in the right way before using the planer!
If you are going to use the manual planer type , secure the pieces to the bench, okay? This prevents them from escaping! Smaller pieces should be securely fixed to the countertops with their own clamps before you start using the planer. That way you don't run the risk of them slipping or jumping on you. Oh, and it's very important to work with the planer using both hands to give it better support, ok?
If it is a bench planer, the piece must first be fitted to the planer, with the correct guides, before you start the work.
In the case of the electric bench planer, the blades must always be placed all at once and mounted upwards. If your electric planer has support, you should use a protective cover for it, which serves to hide the blades. Always use a guide above the machine to move the piece of wood without it slipping or bent. Cool huh? Then you need to adjust the blade and depth manually to move the part.
The electric planer may have buttons for automatic depth adjustment
In the electronic planer you do this process automatically, using the buttons. Easy, right?
Then the preparation is ready! Now, just get to work. Always do this towards the wood. And to see which is the right direction of the piece, see which side of the wood that slips effortlessly when you run the planer on it.
Ah, to make cleaning easier after work, there's an electric planer with a suction adapter for a sawdust bag, which you can buy separately. It collects sawdust as it falls, cutting down on dust and mess.
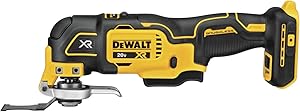
DEWALT 20V Max XR Oscillating Multi-Tool, Variable Speed, Tool Only (DCS356B)
The 3-speed selector of DEWALT 20V tools allows users to choose their speed setting based on application.
Brushless motor of DEWALT oscillating tool delivers up to 57% more run time over brushed
Dual-Grip variable speed trigger of DEWALT cordless tools gives users ultimate speed and application control
Universal accessory adapter for use with most oscillating tool accessory brands. Oscillations/min: 0-13,000/ 0-17,000/ 0-20,000 OPM
Quick-Change accessory system allows blades and attachments to be changed quickly without wrenches
Bright LED illuminates dark work surfaces for accurate cutting
Difference between oscillating tool and rotating tool
A typical deconstruction worker or craftsman will have a variety of tools for a project. While hand tools and power tools can make up the majority of tools used in the course of limitless home improvement and DIY projects, it's important to understand that tools can take many different forms. It is important to understand that various tools can be used for a specific application. While some tools work better than others, some may be more secure than others. For example, an angle grinder can be an important tool for removing large amounts of material quickly and effortlessly, but you can also use a bench angle grinder for more subtle shapes.
We're here to talk about the two most common power tools used for a different set of applications - an oscillating tool and a rotating tool. While the two are quite similar, considering they are cast in the same mold and are useful for all of your sculpture projects, they are surprisingly different. While an oscillating tool is a multi-purpose tool used for precision cutting in tight places, including plunge cuts, a rotary tool is not needed very often, but it is useful for smaller or more detailed jobs. With the right accessories, an oscillating tool or a rotating tool might be all you need for most sculpting projects.
What is an oscillating tool? An oscillating tool is an easy-to-use, all-in-one power tool used for quick and accurate work of traditionally hand-crafted jobs. The multiple tool was developed over 20 years ago and was originally marketed as a hobby tool, but now it can do many things. As the name suggests, the multi-tool can sand, cut, sculpt, polish, sculpt, scrape and grind almost anything when equipped with various attachments, although it is ideally used as a detail sander. It's a new type of tool that generates tens of thousands of oscillations per minute, with the vibrating head rotating 3 degrees back and forth, using a variable speed controller, making it one of the safest power tools available.
What is a rotary tool? A rotating tool is not needed very often, but it makes a big difference in a wide range of applications. Changing things is what a rotary tool is really good at. They are also useful for smaller or more detailed work. It is a power tool with a small, powerful, high-speed motor and a rotating tip that accepts a wide range of bits designed for many different tasks such as grinding, shaping, sanding, cutting and smoothing. With the right accessories, a rotating tool can be extremely useful for all your DIY sculpting projects. They are known for their incredible precision, only when in the hands of a handyman or professional craftsman. In the right hands, a rotating tool can work wonders.
Difference between oscillating tool and rotating tool
Basics of rotary and oscillating tool An oscillating tool is an easy-to-use, all-in-one power tool used for quick and accurate work of traditionally hand-crafted jobs. It is a battery-powered multipurpose power tool that can work with a variety of accessories. A rotary tool, on the other hand, is a power tool with a small, powerful, high-speed motor and a rotary tip that accepts a wide range of bits designed for many different tasks. While a rotary tool isn't needed very often, it can work wonders in the right hands.
Occupation An oscillating tool generates tens of thousands of oscillations per minute and its vibrating head rotates back and forth three degrees, making it one of the safest power tools available. One of its strengths is its ability to compensate for the angle of the tooling in relation to the handle, which is very useful in close quarters. A rotary tool has a small, powerful, high-speed motor with a chuck to accept a variety of bits. Unlike a drill, a rotary tool is designed to tolerate lateral forces on the drill.
Attachments A multi-purpose oscillating tool can accept a wide variety of accessories such as sanders, blades, rasps, scrapers and grinders, making it an all-purpose power tool. The most useful multi-tool attachments for woodworking are hook-and-loop sanding heads, thin-blade saws, and scraper blades, although they are better known as detail sanders. With the right accessories, a rotating tool can be extremely useful for all your DIY sculpting projects. It can accept different accessories like engraving bits, router bits, cutting bits, milling bits and sanders.
Uses A multi-swing tool was originally designed for home improvement and construction tasks, but over time it has gained popularity as a popular woodworking and craft tool due to its precise accuracy and ability to work in tight spaces. It can sand, cut, sculpt, polish, sculpt, scrape and grind almost anything when equipped with a variety of attachments. A rotary tool can work wonders when held in the right hand and can be used for a variety of applications such as sanding, cutting, grinding, shaping, polishing and smoothing.
Oscillating x Rotary tool summary
Well, the right tool makes all the difference in the right hands. With the right accessories, both power tools can do almost any job. While an oscillating tool is a multi-purpose tool used for precision cutting in tight places, a rotary tool is not needed very often but is useful for smaller or more detailed jobs. A multiple oscillating tool, as the name suggests, can sand, cut and grind almost anything when equipped with a variety of attachments. A rotary tool is a high-performance power tool that is just as good as a multi-tool and can be useful for jobs that would require a high level of precision.
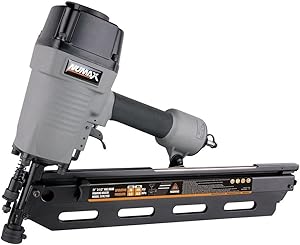
NuMax SFR2190 Pneumatic 21 Degree 3-1/2" Full Round Head Framing Nailer Ergonomic and Lightweight Nail Gun with Tool-Free Depth Adjust and No Mar Tip
Nailed It: This 21 degree pneumatic framing nailer features a lightweight and durable magnesium body, ergonomic secure handle, and interchangeable trigger for quick fire or single shot function. It's ideal for professional construction contractors and home DIY projects.
Versatile and Powerful: The framing nailer features depth adjustment and a no mar tip, making it adaptable for different working surfaces. It's perfect for framing, and it can also be used to install subfloors, roof decking, wood fencing, and sheathing.Minimum Recommended Air Delivery SCFM @ 90PSI:2.4
The Right Tool for the Job: We're committed to providing outstanding value, top tier customer service and long lasting, high quality products. We make nailers and staplers for every purpose, from roofing to siding to flooring and everything in between.
Quality and Durability: We manufacture tools with the most durable materials under strict quality control guidelines, suitable for professional contractors and do-it-yourselfers alike. Our tools are sold, distributed, serviced, and warrantied in the USA.
Tough and Dependable: We make an array of durable construction tools and accessories, including staplers and nailers for siding, flooring, framing, finish, and roofing. Compare our products to similar items by Makita, Hitachi, Bostitch, Senco, Paslode, and Dewalt.
DIY: FRAMED NICHE
Guys, do you remember that we showed here how to reuse a frame transforming it into a photo mural? Yeah, a nice solution if what you really need is space for photos. Today we are going to show you an idea a little bolder for reusing frames, but very simple and easy to do.
What we found most interesting about this idea is that a simple frame joined to a simple wooden niche has an incredible result. New face for the well-known niches, which we love, and are super useful when decorating any corner.
Materials:
– 1 frame (can be a portrait frame)
– 4 wood tops – MDP or MDF 15mm (width and height will vary according to the size of the frame)
– Wood glue
– Nails
– Sandpaper
– Hammer
– Wood paint (in whatever color you prefer)
First you will need to measure the span of the frame you are going to use, both width (X) and height (Y). You will need 2 X-tops and 2 Y-tops. You define the depth, but wall niches are usually no more than 20 cm deep. If they are just decorative, 10 cm is enough.
Most people don't have the tools at home to cut wood, so you can measure the frame and have a local woodworker cut the tops for you. As they won't be big pieces, you can even do it with leftover MDP or MDF.
In this step by step, wood glue and nails were used to join the tops and form the niche. In the image you can see that a nail fixing tool was used, a kind of pistol to fix nails, but you can use the good old hammer (for those who are not used to it, be careful not to get hurt). Ah, you can also fix it with screws.
Then just fix the frame in the niche. In this step, wood glue and nails were also used, but I believe that glue alone can be sufficient.
With the framed niche, let's go to the finish. Use spackle or wood putty to correct imperfections and mask nails. After a good sanding, which always contributes to a good finish, and finish by painting with the color of your choice. In this project, the piece was all white, but nothing prevents you from using one color in the niche and another in the frame, use your creativity!
Are you going to say that the niche doesn't look beautiful framed? Make several and with frames of different sizes!
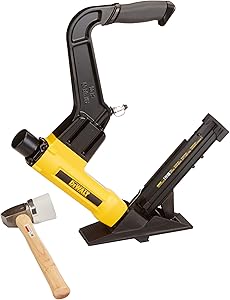
Lightweight at 10.6 lbs for better balance and control
Optimized for the most popular solid flooring fasteners, 15.5ga Staples and 16ga “L” Cleat Nails
Interchangeable, Non-marring base plates adjust to all sizes of flooring
Ergonomically designed with longer handle and comfortable rubber grip for ease of use
Lower CFM requirements for less compressor run-time
Can I use a nail gun to install a wooden floor?
Nail guns cut down on time and labor by replacing the old "swing-a-hammer" technique with automated nails. You can use certain types of nail guns to install a hardwood floor, but practice on scrap wood first to ensure you master the correct technique. You can use three types of guns on a hardwood floor: a floor nailer, a finish nailer or a floor and mallet nailer. Framing nail guns are not suitable due to the size and configuration of the nail.
The nailing process End hardwood planks fit end and side by side with a tongue and groove set. After installing the first plank in the corner of a room, each subsequent plank will snap together to form a smooth floor. The edge of the plank's groove faces the wall, and the tongue side faces outward; this is the part where you will insert your nails. The nails you use should have little or no heads so they will sink slightly below the surface of the wood and will not prevent a tight fit when you install the next row of planks. For the first course of planks, a hammer and a set nail may be needed for the face-to-nail.
Nailer flooring One of the best guns to use to install a hardwood floor is a pneumatic floor nailer or stapler. Made specifically to fit over the top edge of the board and the tongue, this fires a headless nailing nail through the tongue and into the sub-base or floor joist underneath. When positioned correctly, making a mistake with this nailer is difficult.
Finish Nailer Not everyone keeps a floor nailer around because it only has one use. If you are handy with a nail finish gun, you can use it to install a hardwood floor. A nail finish gun, designed for trim work, shoots an almost headless nail that doesn't mar the wood surface look, which makes an effective finishing nailer for installing hardwood floors as well. To use this nailer, position the nail shoe on the wooden tongue at a 15-degree angle downward and inward, toward the plank. Depress the shoe nails, keeping the nailer carefully in place, and pull the trigger. Use finishing nails that are long enough to run through the subfloor, if any, and at least 1/2 inch to the floor joists.
Floors and Mallet Nailer Even power nailers became common in the flooring industry, a manual floor nailer and hammer were standard, and it still does a good job today. Like the pneumatic floor nailer, the manual nailer keeps the nails paving and features a nail shoe shaped that fits snugly over the edge of the plank and tongue. After positioning the nailer, tap the cap by nailing it with the mallet to shoot a nail, staple or staple floor through the tongue. Flooring and mallet nailers can use gravity and a spring system to drive the nails, or they can employ compressed air to shoot the nails when you hit the lid by nailing with the mallet.
How do I choose the best floor nail gun?
When trying to choose the best nail gun for floors, it's important to identify the features that are most important to you. Most floor nail gun options are available in both air and fuel operated models. The pneumatic nail gun requires an air compressor as well as air hoses to operate in any job site. The fuel-powered weapon has the advantage of being cordless, however, the initial cost is generally higher than an air-powered weapon. After cost, the most common and important characteristics for many people are the weight, type and style of nails used, as well as other uses to which the weapon can be attributed.
The first thing you need to decide when looking for the best floor nail gun for any job is whether or not you want an air-powered model or a cordless style. The air-powered floor nail gun is almost always cheaper than a wireless gas-operated model; however, you have other considerations that will accompany the air-powered model. Unless you work for a company that has a large air compressor available at each job site, along with a connecting manifold, you will also need an air compressor and multiple air hoses to reach all areas of a job site. of works if you decide to buy an air. motorized nail gun. Furthermore,
When you factor in all the additional expenses associated with an air-powered floor nail gun, you may find that a wireless gas-powered model is much more to your liking. This style of floor nail gun uses an interchangeable fuel cartridge that injects a small amount of fuel into a chamber at the top of the nail. This fuel is ignited by a small electrical charge from a rechargeable battery inside the nail gun. This floor nail gun model uses no hoses or cables and is typically good for firing over 1,000 nails from each replaceable fuel container.
Other considerations that should be made to ensure you are purchasing the best floor nail gun are the style of nails used with the gun, along with other uses for the gun. Most nail guns use a straight nail clip or a large round nail roller. The nail roller will require fewer refills, although it weighs more than the straight nail clip. Also, to get the most for your money, you can choose to purchase a floor nail gun that can be used for other types of nail work as well as flooring.
Fixing the wooden floor
The drilling for the passage of nails and screws must be done with a drill. The hole can be in the surface, in the case of screws only, or in the male insert for nails or screws. In case of installation on beams, the hole must not reach the subfloor. When the floor is installed on joists, the screw must be fixed on the floor surface, provided it is rough as shown in the figure below.
Of the types of screws and nails found, the use of those made with galvanized steel is recommended, as they are more resistant to moisture and consequently to deterioration.
Mixed fixation
Mixed fixing consists of installing the wooden floor using adhesive and nail or adhesive and screw. This system is used when the piece of wood has a very accentuated warpage and is installed directly on the subfloor. In this case, the screw must be used to provide greater security in fixing.
On rough floors, with dimensions from 9.5cm in width and 2.0cm in thickness, glue, screws and 8.0mm dowels must be used, respecting a spacing of 40.0 to 50.0cm between the screws in the male fitting.
On varnished floors that are 9.5cm wide and 1.8cm thick, glue, screws and 6.0mm dowels must be used. In this case, the spacing between the screws is variable, depending on the specific situation of the installation.
For this type of fixation, it is important to emphasize that the dimensions of the floors will define the type of material to be used.
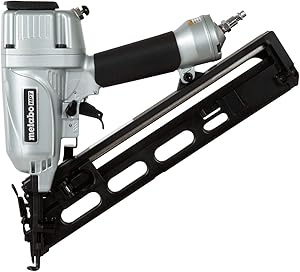
Metabo HPT Finish Nailer Kit, 15 Gauge, Pneumatic, Angled, Finish Nails 1-1/4-Inch up to 2-1/2-Inch, Integrated Air Duster, Selective Actuation Switch, 5-Year Warranty (NT65MA4)
AWARD: Rated the Pro Preferred Nailer for 7 years running (2014 - 2020) by Builder and Developer Magazine
FASTENERS: 15-gauge nails from 1-1/4-in Up to 2-1/2-in In length
APPLICATIONS: Ideal for installing crown and base moldings, window and door casings, chair rails, cabinets, exterior trim and staircases
TRIGGER: Easily switch from either sequential or contact nailing with a simple flip of the switch
DEPTH ADJUSTMENT: Tool-less depth of drive dial adjusts for flush fastening into varying materials for improved control and a professional finish
LIGHTWEIGHT: Only 4.2 lbs, this finish nailer minimizes user fatigue, while increasing maneuverability
EXHAUST PORT: 360-Degree fully adjustable exhaust port directs air exhaust away from the user or work piece
What is a Nail Finishing Gun?
A finishing nail gun is an electric tool that triggers the finishing nails. It is used to quickly attach finishing pieces such as moldings and panels. Most of these tools are air powered and can drive several nails per minute, making them a basic tool for finishing carpenters.
There are many types of nails used during construction, including roof nails, frame nails, and finishing nails. Structure nails are longer and heavier than finishing nails, both because they contribute to the structural strength of a building and because they are guided by thicker pieces of wood. These nails often require an entirely separate and more powerful tool. Tools that provide different cartridges for finishing and finishing nails - and that have adjustable power controls - are available, but can be more expensive.
Finishing nails can be shorter and thinner because they are used to secure non-structural finishing pieces. These nails should, in fact, be thinner than framed nails, because a heavier nail can cause a finishing piece to crack or chip. Finishing pistols are specifically made to shoot these smaller nails. The nails are driven with enough force to secure the trim, but they are not so powerful that the surrounding wood is damaged.
Most finishing nail guns are air powered, meaning they are connected to an air compressor separated by a hose. These compressors are available in different sizes and powers. The compressor uses an electrical supply to generate air pressure, which is forced through the hose to the gun. When the trigger is pulled, air pressure forces the nail into the wood.
Finish carpenters, who are carpenters who specialize in finishing jobs such as cabinets, trim pieces, and decorative panels, often use a finishing nail gun, especially when they are installing many finishes at once. Using a nail gun is faster, allowing them to complete more jobs in the same amount of time. Using a finishing nail gun also eliminates the marks or dents that a hammer can leave on the wood.
This tool also drives the nail deep enough so that the nail head is recessed below the surface of the finish piece, the desirable position for applying putty and paint. To create this same effect manually, a carpenter would need to carry and use a hammer and a set of nails, a tool specially designed to place the nail head below the surface. This means holding the nail and hammering it most of the time, then putting the nail in and hammering the rest. A finishing nail gun, on the other hand, simply requires the carpenter to hold the barrel in the desired location on the wall and pull the trigger.
As with any power tool, care must be taken when operating a finishing nail gun. Nails should not be loaded when the pistol is depressed, nor should the barrel be pointed at anyone or anything that could be injured or damaged. Air pressure must also be properly relieved whenever the tool is not in use.
What is a finishing nail?
When installing the baseboards, a medium sized finish nail such as 10d is often used.
Many different types of nails are used in manufacturing and carpentry. A finishing nail, made of steel wire, is a specific nail used to hide the presence of the nail. With its small head and diameter, a finishing nail is much smaller and easier to hide than a larger nail.
Instead of the wide, flat head that common nails have, finishing nails have small barrel-shaped heads with a recess at the top. This allows them to be inserted in addition to a larger nail. This size and shape also helps the finishing nail remain invisible in the final project.
Finishing nails are often used in building interior projects. This can include moldings, wainscoting, joinery, furniture, cabinets and panels. Finishing nails are also very useful for small projects like wooden jewelry boxes.
One thing to keep in mind when using a finishing nail is not to drive the nail fully embedded into the project. Doing this will usually create a large kickback in the design by the hammer. Instead, there is a precise technique that artisans use to fully insert finishing nails.
After the carpenter drives a nail almost flush with the surface of the project, he places the tip of another nail into the dimple itself. Then the head is inserted fully into the surface, creating a small hole. This hole can then be filled with plaster, wood glue or other filler compound. If the final product is to be left outdoors, and is made of wood, the hole can even close itself due to swelling due to bad weather.
When selecting a finishing nail, a carpenter or workman will base their choice on a few different requirements. This can include nail size, steel wire gauge, head diameter, number of nails needed per pound, and nail length. Each finishing nail should be three times the length of the thickness of the wood it will be used on to ensure proper cohesion.
Nail size is usually measured by the term pennyweight, an archaic word that refers to how much 100 nails cost. Symbolized by “d”, these sizes are most common in sizes 2d through 10d, as well as 12d, 16d and 20d. Finishing nails used in fine woodworking projects usually require the use of the small 2d size. A medium sized finishing nail such as 10d is often used for baseboards.
WHICH NAIL TO USE FOR WOOD AND ROOF INSTALLATIONS
For most repair projects, fasteners, nails and screws are required. And there are plenty of each type to choose from! Following are some of the most common types of nails and screws and advice on selecting the most appropriate one.
nails The easiest way to fasten two pieces of wood together is with nails. They are manufactured in many shapes, sizes and metals to make almost any type of fastening. Nails are generally made of steel, but there are also other types – aluminum, brass, nickel, bronze, copper and stainless steel – for use where corrosion may occur. In addition, the nails are manufactured with a protective coating – galvanized, paint or asbestos to prevent rust and increase their power to hold the materials together.
Common Nails : Used in medium construction services, this type of nail has a thick head and can be driven into hard materials. Common nails are made of wire and cut to length and come in a variety of sizes.
Small nails : Lighter and smaller in diameter than common nails, these nails are designed for light construction and home use.
Finishing nails : These are lighter nails than common nails and have a small head (headless nails). Generally, they are used when you don't want the head to stick out.
Roof nails : Usually galvanized, these nails (roof nails) have a much larger head than common nails. This helps to prevent damage to the roofing material.
Masonry Nails : There are three types of masonry nails designed for use in concrete and cinder block: round, square and ribbed. Masonry nails should not be used where a lot of strength is needed. In brick, stone or reinforced concrete, superbly threaded screws must be used. Corrugated fasteners : used in joints where effort is not important. Fasteners are placed at right angles to the joint.
WEN 61721 18-Gauge 3/8-Inch to 2-Inch Pneumatic Brad Nailer
Shoot 18-gauge brads ranging from 3/8 to 2 inches in length
Operate at 60 to 115 PSI with the 1/4-inch NPT air inlet fitting
Features a depth adjustment wheel, a nail gauge, a rotatable exhaust, and a quick release 106-nail capacity magazine
Hassle-free nose latch makes clearing jammed nails quick and easy
NOTE: nails and case not included. Pneumatic nailer, need air compressor to drive
2 Types Of Brad Nailers Explained
Brad nails are commonly used for home improvement projects. In fact, a brad nailer is a popular tool in any DIY kit. It is primarily used to attach 18 gauge nails (which have a distinct rectangular head) in various home repair projects. It is a more convenient option compared to manual nail hammering.
1. Brad Nailer Pneumatic
2. Electric Brad Nailer
Brad's nails are commonly used for home improvement projects. In fact, a brad nailer is a popular tool in any DIY kit. It is primarily used to attach 18 gauge nails (which have a distinct rectangular head) in various home repair projects. It is a more convenient option compared to manual nail hammering. In addition, it helps to considerably reduce working time, as it allows you to work faster and ensures a cleaner finish. Brad nails are used mainly for fastening furniture pieces together, attaching trims to cabinets and other small carpentry projects.
There are two types of brad nails on the market: an electric nail and a pneumatic nail. Given below is brief description about both brad nails.
1. Brad Nailer Pneumatic Pneumatic nails work using compressed air. This compressed air is fed by the light hose. This hose powers the compressor and powers the weapon. Pneumatic nails are a popular choice of tools because they allow the worker to work efficiently without wasting time. It also allows for a professional and elegant finish, even when the task at hand is complex (eg adding trim to cabinet). That said, when using a pneumatic nail, it's important to keep some safety issues in mind. Pressurized air is responsible for a high accident rate and therefore it is essential to handle the instrument with care.
When it comes to choosing a pneumatic nail, there is a variety in terms of available sizes as well as operating methods. You need to choose the one that best suits your building needs. The instrument itself consists of the gun, an air hose, batteries and a cartridge. Also, there are certain issues that need to be considered before opting for a brad pneumatic nailer. A pneumatic nail may seem like an economical option, but over time, your maintenance costs (oil inspections, hose replacements, etc.) will add up. 2. Electric Brad Nailer The alternative to a pneumatic nail is an electric nail. As the name suggests, the electric nailer is powered by an electric motor. It's this electric motor that powers the gun and drives the nails. An electric nail is usually a heavier machine by default, as the bulky motor increases its overall weight. However, despite the light volume, the electric preacher is very effective to work with. It gets the job done much more quickly and efficiently than a manual attempt.
Like the pneumatic nail, the electric nail also requires the same set of safety precautions. The nailer gun is known to cause injuries when mishandled. That's why it's crucial to always have a first aid kit handy.
The electric nailer may seem like a more expensive option when its prices are compared to the pneumatic variety; However, this cost difference balances out in the long run. Over time, the electric press instrument proves to be more cost-effective as it only needs a limited amount of maintenance.