Linenspa 2 Inch Gel Infused Memory Foam Mattress Topper, Twin
Two inches of ultra plush memory foam that conforms to your curves and hugs you to sleep; Materials: 100 percent polyurethane memory foam, gel beads
Infused with temperature regulating gel beads that capture and dissipate heat to help prevent overheating
Comfortable memory foam distributes weight evenly to align the spine and alleviate pressure points
Available in plush 2 inch and 3 inch profiles; The 3 inch topper will hug your body more than the 2 inch topper
A comfortable and affordable way to rejuvenate an old mattress, soften a hard mattress, and prolong mattress life; Backed by a 3 year warranty
Mattress Topper Buying Guide
We always put mattress covers on top of our mattresses and under the bottom sheet. Some people think that toppers are just accessories. Experienced wearers know that the right topper will not only make you feel comfortable, it will also affect your temperature in bed. How to choose the right one for you?
duck feather and down If you want to make your mattress more comfortable without replacing it, you can choose duck feather and down mattress because they are slimmer which can help create more padding. And duck feathers and mattress covers protect and extend the life of your mattress.
You can get a good night's sleep to get used to duck feathers and mattress covers because they produce a slight 'ruffle' during the night.
goose feather You can choose goose down if you want to keep warm and cozy in winter. The goose feather is extremely soft. And, goose feather mattresses can regulate your body temperature due to natural feather padding. You can sleep peacefully without feeling excessively hot or cold.
Silk You can choose silk mattress topper if you are looking to give your mattress a bit of a makeover.
Silk mattress toppers can not only regulate your body temperature, but it also ensures that you are sleeping at a comfortable temperature through the night.
Silk mattress topper, lighter in weight, can make you feel cool in summer.
There You can choose fleece mattress if you like to be nice and cozy but also comfortable at night.
Wool provides up to 25% more deep, regenerative sleep during the final phase of rapid eye movement (REM) than traditional flat or synthetic bedding, according to one study.
Your body repairs and regrows tissue and strengthens your immune system in the REM stage. The longer or deeper the sleep you are getting in this REM stage, the more recovery and rest time your body will be getting.
memory foam Memory foam shaping your body, supporting your frame while you sleep. Memory foam mattress toppers can reduce stress and relieve strain on muscles, back pain and joint pain. You can choose the non-allergenic viscoelastic foam filling if you want to find a suitable filling that will not disturb your allergies.
Antiallergic If you don't want to be bothered by your allergies, you can choose specially designed hypo-allergenic mattress covers that can protect against dust mites and bacteria.
To guarantee antibacterial protection, the filling of this mattress uses hollow fiber that has been specially treated. Not only can allergies rest, but it also helps to ventilate the topper.
This topper can be worn all year round. It can be easily mounted to your mattress using corner straps.
INNOMAX Thermal Guardian Quantum Solid State Waterbed Heater, Full Watt
State-of-the-art Ultra sensitive electronic control that holds the temperature to 1/8 degree of set point ensures accurate temperature sensing
Certified to the standards of the Underwriter's Laboratories (UL) #1445 for Waterbed Heaters
Full Watt Solid State Waterbed Heater for use with minimum 9” depth waterbeds in rigid side box or wood waterbed frames
Larger pad with 64-gauge Thermal Fused Duraflex vinyl Unique double mount control
EMF Reduced Circuitry Design Comprehensive 5 year limited warranty
State-of-the-art Ultra sensitive electronic control that holds the temperature to 1/8 degree of set point ensures accurate temperature sensing
Certified to the standards of the Underwriter's Laboratories (UL) No.1445 for Waterbed Heaters
Water mattress
Sleeping well is essential for our health, so choosing the right mattress is very important to keep our minds and bodies healthy. And there are so many models that it is sometimes difficult to choose, but who has never thought about what it would be like to have a waterbed? It is very popular in the United States, Canada and Northern Europe, and gives a unique feeling to the wearer.
The waterbed, contrary to what many believe, is not a modern invention. It was one of the first specimens to be created, around thousands of years before the present Era. The Persians invented it so that they could lie on warm water until they fell asleep, then they were carried by their servants to rocking mattresses, where they were rocked to sleep for good. At Westwing you will find the main tips to make your home comfortable at all times of your day.
Water Mattress Structure The structure of a waterbed these days is not as simple as many people think. The waterbed can have a rigid (usually wooden) or soft (with medium or high density foam) side, but in both cases, the four sides form a protective box where a leakage protector is placed. water, and inside this a vinyl reservoir where the liquid will be stored. Over this structure, a washable lining is still used to protect this entire internal structure.
At the bottom of a bed with a water mattress is placed a heat conducting system that keeps the liquid at the temperature desired by the bed users. It is also important to note that no water can be placed inside the mattress, as it must be treated with specific products .
And to put an end to that impression given in the cinema that they are too “soft”, it is possible to reduce the undulations of the mattress to almost zero, if inside the reservoir there is a water stabilization system.
Water Mattress: Advantages and Disadvantages There are many divergent opinions about the quality of waterbeds, let's see some advantages:
The waterbed is extremely comfortable, as those who lie on it feel the impression that they are almost “floating”.
According to studies, it is the only mattress model that allows full body support without excessive pressure points, that is, it does not cause pain .
Pleasant temperature, to the owner's taste, thanks to its heating system. Perfect for a great nights sleep.
In the field of disadvantages, the waterbed can be very difficult to handle, due to the weight of the liquid and its mechanism. Furthermore, according to some specialists, as this mattress does not provide correct support for the body (a more rigid base), it is indicated for sporadic, recreational and therapeutic uses, that is, only occasional cases, not for everyday use.
Therefore, when choosing a waterbed for your home, it is important to think carefully and especially consult your doctor to see if it is possible to use it daily. Feel floating with this amazing model for your room!
Zinus 6 Inch Green Tea Memory Foam Mattress / CertiPUR-US Certified / Bed-in-a-Box / Pressure Relieving, Narrow Twin
Green Tea-infused Memory Foam With a Soft, Poly Jacquard Cover
THE RIGHT COMBINATION - Our special recipe for rejuvenating rest? Refreshing green tea and moisture-absorbing Activ charcoal infused into pressure-relieving memory foam that cradles your shape so you awake free of aches and pains and fresh as a daisy
PRESSURE-RELIEVING FOAMS - 1 inches conforming memory foam and 5 total inches durable, high density base support foam; ideal for back sleepers and average-weight sleepers
CERTIPUR US CERTIFIED - Highest quality foam is CertiPUR US Certified for durability, performance, and content
EXPERTLY PACKAGED - Our technology allows this mattress to be efficiently compressed into one box that’s easily shipped and maneuvered into the bedroom; simply unbox, unroll and this mattress does the rest, expanding to its original shape within 72 hours
Worry-free 10 year limited warranty included; twin mattress supports a maximum weight of 250 lbs, while all other sizes can support up to 500 lbs
NOTE: Mattresses typically take 72 hours to expand. They may take longer in some cases. Other factors, like cold weather, can also affect decompression times. The dimensions are 75 x 30 x 6 inches.
How to choose the ideal mattress for a bed?
A very recurrent question on websites and online search tools is: how to buy a mattress? Since we spend a third of our lives lying down, recovering energy for the next day, the mattress we sleep on should be as important as a good breakfast or exercise. With that in mind, we've put together a very detailed shopping guide with the steps needed to choose a good mattress!
Although the brand is an important factor in the decision, as well as the trust you have in it, it is necessary to pay attention to other aspects as well. So in this guide we will separate the steps into 5 mattress characteristics: size , comfort , density , structure and differentials . Zoom in more detail below:
Mattress Size Mattress size varies according to the profile and budget of the person who will sleep on it. Another limiting factor is the ideal type of bed: it is suggested to choose a mattress 2 cm smaller than the size of the traditional bed, which does not apply to the box bed, as the mattress must follow the same measurements for a perfect fit.
It is also important to remember that the ABNT (Brazilian Association of Technical Standards) determines that the size of the product can vary by up to 2cm in manufacturing measurements, and that is why some brands manufacture exclusive measurements, such as Ortobom , which provides more comfort and space for your customers. We will list below the most sold sizes in Brazil, followed by measurements and indicated audience:
Child
From cribs to children's beds, the mattresses that vary the most in size are those from the beginning of life. In the case of berths, the minimum size is usually 0.60 x 1.30 m. For older children, the measurements can reach 0.70 x 1.50 m, depending on the size of the bed.
Not married
Designed for those who sleep alone, the dimension is 1.88 x 0.78 m (Length x Width), and can vary by 10 cm, reaching 0.88 m in width, depending on the bed. The ideal type of bed for the thinnest single mattresses is bunk beds or narrower beds.
Widow
The intermediate version between the single mattress and the double mattress is popularly called the “widow”. This type of mattress is narrower, is 10cm less wide compared to a double, and provides more comfort for those who sleep alone and even for a couple. The size is usually 1.88m x 1.28m.
Couple
For two people and smaller spaces, the double mattress is ideal. Dimensions are 1.88 x 1.38 m (Length x Width).
Queen Size
Wider and longer than a double bed, the Queen Size , translated as "queen size", is perfect for the couple who like more space or who have children in the family. It's ideal for tall people too, over 6 feet tall, who don't fit the mattresses above. Its measurements are 198 x 158 cm (Length x Width).
King Size
Made for tall, wide people and large families, the King size is the largest mattress available on the market. It is very spacious and can be found in 2 different sizes: the King Size , with 1.98 x 1.86 m, and the Super King Size, with 2.03 x 1.93. Comfort of the Mattress
Another very common question is: what is the most comfortable mattress ? The types of comfort vary according to the raw material from which the mattress is made, in addition to the spring structure. Below we will mention the different raw materials used for each type of comfort, and for which profile it is suitable.
Extra-soft comfort The extra-soft mattress is suitable for bedridden people, but under medical supervision. It is not suitable for those who have a previous condition in the spine, as the lack of rigidity makes the body curved. Usually this type of mattress comes with double layers of springs or layers of memory foam in large quantities, increasing comfort even more. The purpose of memory foam mattresses is to mold themselves completely to the body, not causing pressure against the weight, but totally absorbing the person's body into the mattress.
Soft Much like extra-soft mattresses, soft ones also cause the body to sag and are not suitable for anyone. They are suitable for singles, preferably children and teenagers, who weigh less than an adult. Generally, the soft mattress loses support over time, and the rotation (changing the mattress of position) becomes mandatory, in case it starts to cause pain in the body. It is also worth remembering that the most common springs in this type of mattress are the bonnel and individually bagged . We'll talk about the different types of springs below in the Mattress Structure section .
Comfortable/Average
The comfortable/medium mattresses are a version of the soft spring mattresses with a smaller amount of viscoelastic and a larger amount of latex. This type of structure makes the mattresses have a greater uniformity when in contact with the body weight and that they last longer. Integral latex mattresses (100% natural latex) from some brands are comfortable and of high quality and durability. They are recommended for tall and/or broad couples or adults.
Firm comfortable Comfortable firm mattresses are the top sellers for couples, as they are more resistant and provide balanced comfort. Most firm comfort mattresses use high-density polyurethane foam supported by individually bagged springs, such as LFK and Miracoil springs, for example. This type of mattress lasts longer due to Inmetro certification that guarantees the quality of the foams used, added to the good quality springs. These factors make the firm comfortable mattress have a longer service life. Despite having a high cost, the quality is also superior when compared to other types of comfort.
Firm
Many physiotherapists recommend the use of firm mattresses for those who have scoliosis and low back pain problems. These mattresses, made of polyurethane foam, are the most sold types in the Brazilian market for having a more affordable price and the appeal of being semi-orthopedic mattresses, which are good for the spine . We know today that having a little comfort is even recommended to keep our spine healthy. Some brands use spring mattresses for firm comfort, but add a wooden box to the pillow top to make it more supple.
Extrafirm The extra-firm mattresses are made with wood sheet and/or Styrofoam (EPS), and give the feeling of sleeping on the floor. This type of comfort is for those who are already used to this hardness, considering that some studies reveal that this type of comfort does not bend in important points of the body, such as hips and shoulders.
Mattress Density When shopping for foam mattresses , it is important to be aware of density related to your weight and height. The definition of density, when we talk about mattresses, is the amount in kilograms of foam per cubic meter. In other words, for a mattress of density 33 , or D33, 33 kilos of raw material were needed for each cubic meter. It is important to know how to choose the density to prevent a person of greater weight from sinking, deforming the mattress or compromising health.
Choosing density is not a difficult task, and there are online calculators that will tell you the ideal mattress based on your weight and height. Every biotype table comes with a referential asterisk of “preferably”, as this is not an absolute truth and does not take into account more than one weight on the mattress. If you want your mattress to last longer, consider taking a mattress with a comfort that suits your body and with a high density. Below are the 8 types of density available on the market:
Mattresses with D18 AND D20: newborns weighing up to 15 kilos.
Mattresses with D23 : people up to 50 kg and up to 1.70 in height or people from 51 to 60 kg between 1.71 and 1.80 in height.
Mattresses with D26 : suitable for people from 51 to 60 kilos up to 1.70 in height or people from 61 to 70 kilos between 1.51 to 1.90 in height.
Mattresses with D28 : suitable for people from 51 to 60 kg and up to 1.50 in height, people from 71 to 80 kg between 1.61 to 1.90 in height or people from 81 to 90 kg above 1.90 in height .
Mattresses with D33 : for those who are 71 to 80 kg between 1.51 to 1.60 in height, people from 81 to 90 kg between 1.61 to 1.80 in height, people from 91 to 100 kg from 1, 81 and above 1.90 in height or people from 101 to 120 kilos above 1.90 in height.
Mattresses with D40 : suitable for people from 91 to 100 kg between 1.61 and 1.80 in height, people from 101 to 120 kg between 1.71 and 1.90 in height or people from 121 to 150 kg above 1, 90 tall.
Mattresses with D45 : for people from 101 to 120 kg between 1.61 and 1.70 in height or people from 121 to 150 kg between 1.71 and 1.90 in height.
Still in doubt about choosing mattress density ? In the Biotype Table , from the National Institute for the Study of Rest (INER), we can identify the most suitable density for all people:
Mattress Structure The mattresses are made in different structures and have listed above some of them, such as foam , Bonnel spring , bagged spring and Verticoil spring . Here we will explain to whom they are indicated, their characteristics, differentials and cost.
Foam The foam mattress is very popular and the cheapest compared to other structures. It has no metal or wooden structures, just polyurethane foam. It has a greater range of models, which serves a larger audience with significant differences. It is important to pay attention to price, quality and density. The latter has already been addressed here, mainly in the INER biotype table, which indicates the ideal model based on its weight and size. Ah, it is usually indicated for those looking for more firmness in supporting the body, not softness.
Springs After foam, the spring mattress is one of the most sought after. This yes is indicated for those looking for softness; it still has greater strength in supporting heavy bodies. Spring mattresses have a different relationship with density, and the subtypes differ by the maximum supported weight, as listed below: Pocket Bag Springs
The pocket springs, pocket springs or , using a manufacturing technology in which each spring acts individually. With this they do not interfere in one person's region if the other moves on the other side. Therefore, they are ideal for couples or those people who move around a lot in their sleep.
Bonnel or Prolastic Springs :one of the cheapest spring mattress types, theBonnel modelsare a structure formed by several hourglass-shaped carbon tempered steel springs, connected to each other. Despite providing a firm, comfortable, and durable base, they are often noisy, as the pressure when moving causes their entire length to move. This can be a problem for those who share a bed (or an irrelevant detail for those who are deep sleepers).
Nanolastic spring:thenanolastic springhas the same characteristics as Bonnel springs, with the difference that it has a smaller carbon molecule. Depending on the brand and manufacturer, this can make a difference in noise reduction.
Superlastic spring :like the nanolastic, the superlastic spring has a structure very similar to the Bonnel spring, with the difference in the shape of the wire, which is spiral. This factor makes them firmer and support more weight, up to 150 kg. However, the same noise and motion issues are present in this model.
Verticoil spring :also a variation of the Bonnel spring, theVerticoil springis distinguished by having more springs per square meter, which reduces the "scale" effect. Remembering that the noise still remains.
Hot Melt Spring: the Hot Melt springs are distinguished by hot melt adhesive track (or thermoplastic) glue the foam springs and coatings, providing better quality, longevity and less odor to products. The adhesive is used in a liquid state and re-solidifies on cooling, allowing for better adhesion to the springs.
Mattress Differentials In addition to all the above factors that integrate different mattress models, they can still come with considerable differentials. Let's mention some extra features that can stand out when choosing, contributing to an even better sleep:
Pillow Top, Euro Pillow and Orto Pillow
Pillow top means “pillow cover” and is an extra layer on top of the mattress. It is usually made of a different material than the one used in the mattress body, with a higher resilience foam. The different types of foam are: polyurethane, gel, viscoelastic and hyper AMX. It differs from Euro Pillow in that it is thinner. Already Ortho Pillow has comfort firmer and reinforces the support of the mattress, helping to reduce pressure points. These layers provide reinforcement to the mattress and ensure its durability.
Orthopedic The orthopedic mattresses used to be wooden and stiff. However, today, one of the best mattresses for back problems is the Orthopedic Premium Mattress, by Ortobom. It is a technological evolution of the classic orthopedic wooden mattresses, with Ecobambu fabric composed of fibers extracted from bamboo. This gives greater strength and helps not to retain heat. It is also a firm mattress and has a comfort foam layer that slightly follows the body's curvatures.
MULTIFUNCTION CABINET: Match perfectly with other WLIVE storage towers; This chest of drawers is great for closets, bedrooms, nurseries, playrooms, entryways and more
SUFFICIENT STORAGE SPACE: Drawers are great for organizing your clothes, blankets, scarves, socks and other accessories; Wood top provides hard surface for displaying lamps, clocks, books, glasses etc.
STURDY STRUCTURE: Strong steel frame and water-resistant wood top offer stable support and ensure years of use; High-quality non-woven fabric drawers is easy to clean
5 DRAWER CHEST: Features 5 removable foldable drawers; Easy pull handle helps open and close the drawers simply; 4 adjustable plastic feet protect your floor from scratches
EASY ASSEMBLY: Easy to assemble with hardware included; Overall dimension: 39.4" L x 11.8" W x 21.3" H
Drawer organizer: How to choose the best in 2021?
Welcome to Sweetest Home. In today's article, we're going to talk about an item that can be the ultimate solution to end that mess that insists on appearing in the drawers at the slightest carelessness: the drawer organizer.
Ideal for keeping organized, optimizing the use of space, and making items in the drawer easier to see, they can be very useful in the bedroom, living room, office or kitchen. Follow us on this reading and check out the best product options, in addition to the features you should pay attention to in order to make the best drawer organizer choice for your home.
First, the most important
There are thousands of drawer organizer options. To choose the ideal one, some factors must be considered. Define what will be the place of use, and choose according to the style you want and the size you need.
Model, size, material and quantity of dividers are some of the main features to be evaluated when purchasing a drawer organizer.
Prices are quite varied. Fluctuations occur according to the material, model and brand chosen, as well as other details. You can find simple organizers for less than R$10. More complete or modular versions can cost more than R$100.
The best drawer organizers: The ideal for every situation Messy drawers are a torment. To solve the problem, the list of types and varieties of organizers available in the market is quite large. If you have no idea where to start when choosing, we'll introduce you to some of the most popular drawer organizer designs to inspire you.
A multi-purpose version with adjustable dividers
A functional option for office items
Flexible option for organizing clothes and accessories
A multi-purpose version with adjustable dividers Ideal for organizing drawers in closets, closets and dressers. Each package has 5 partitions, which can be mounted according to your needs. To fit the dividers, break the small barrier at the ends with scissors. Once the pieces are in place, this small barrier will serve as a lock. To adjust the length of the divider, cut the thinnest part completely.
A functional option for office items he Acrimet Drawer Organizer is made of polystyrene, perfect for keeping the drawer organized. Available in different colors, it has a depth of 27 mm, and several divisions. Easily organizes pencils, paper clips, ruler, memo paper, business cards, and other objects. The modern design allows you to use it inside the drawer or on the table.
Flexible option for organizing clothes and accessories The VB Home Drawer Organizer Beehive is made of transparent PVC with a black bias. Kit comes with 4 Units of 11 niches each. Ideal for socks, panties, underwear, socks, baby shoes, keys and office supplies. Measuring 8.5(W) x 10(H) x 35(L) cm, it fits perfectly in any drawer model and is also a good choice for shelves and shelves.
Buying Guide It doesn't matter if the drawer is for socks, clothes, lingerie, silverware, makeup, baby clothes or random items. All we have to do is locate an item in a hurry and the drawer becomes a mess! To avoid this eternal cycle of organizing, not finding things and messing everything up, the drawer organizer is the ideal solution.
Stay with us to learn everything about this product that will guarantee that everything has its place in the drawer, without mess and confusion.
What are the advantages of the drawer organizer?
Available in a multitude of colors, materials and shapes, organizers are a practical and inexpensive option for tidying up your drawers. They can be used in a multitude of spaces, such as the kitchen, living room, bedroom, baby or children's dresser, office, and wherever you like.
In addition to the logical advantage of putting the items inside the drawers in order, the drawer organizer facilitates the visualization of items, preventing a mess from being made in search of a specific piece.
They also save you time, as you don't have to rummage through the drawer until you find what you're looking for.
Another great advantage of drawer organizers is that they optimize the internal space of the drawers, and even help to group categories of items or sundries, once again, making your routine of storing and locating items more practical.
Check the table below for some advantages and disadvantages of investing in a drawer organizer:
Benefits
Practical and versatile
Available in different versions, models and materials
There are options in all price ranges
Optimize interior space in drawers
Disadvantages
Cheaper versions can be fragile
Stronger materials are more expensive
How best to use the drawer organizer? There are several factors that can be responsible for how quickly the vast majority of people easily lose control over the arrangement of drawers. To make the organization last much longer, the use of organizers and some tidying tips make a difference. See tips:
Divide the drawers into areas with the help of organizers , so the same drawer can accommodate different types of items without them mixing with each other;
Establish a pattern , separate by type of garment, and make subdivisions by color, day or night clothes, material or season. This makes it easier to find and know where to store what goes;
Set aside the top drawers for commonly used items. The ones at the bottom can be used less frequently;
Choose the correct organizer for each item , for bras, for example, the organizer must not only optimize space, but preserve the integrity and shape of the pieces, which are delicate;
For offal, prefer organizers with many dividers so that items can be separated by categories;
Do not stack items in the organizer. Each piece must be visible and accessible, without having to move other items to remove them.
How much does the drawer organizer cost? Drawer organizer values vary widely according to model, material and product design. It is possible to find simpler versions for less than R$ 10 More complete models, in more resistant materials and different designs, can have much higher prices.
Where to buy the drawer organizer? You can buy your drawer organizer at brick-and-mortar stores that offer home utilities, such as Havan, Etna, Tok Stok, and more. Office-specific models can be found in chains such as Kalunga and Lojas Americanas. It is also possible to purchase online, taking advantage of all the convenience and variety that e-commerce sites such as Amazon and Mercado Livre offer.
Purchasing Criteria: Factors to Compare Drawer Organizer Types Now that you have general information about the drawer organizer, let's introduce some features you should be aware of when comparing product models and types. In addition to the design of the organizer, you must pay attention to the following characteristics:
Model
Material
Number of partitions
Size
For the avoidance of doubt, check out the details of the characteristics:
Model The organizer model should be chosen according to the type of item to be stored, the proportions of the drawer, and personal preferences regarding style and design. It is worth choosing the model in materials and colors that match the decor style of each environment.
For children's rooms, bet on light colors and washable materials. Thus, you will have a more harmonious and organized space, and will be able to maintain all the necessary cleanliness for the environment. Kitchen organizers and cooking utensils also need to be washable, as in this environment the risk of dirt is much higher.
The main organizer models are:
No dividers: Consist of baskets or boxes, and can be useful to compose the organization of drawers with other pieces or loose items;
With fixed dividers: Can be custom-made or sold as standard. They are ideal for all purposes, although the size of the dividers determines which type of item will fit best;
With customizable dividers: The most versatile version of the organizer, it can adapt to any space and need;
Beehive: Ideal for those who need multiple partitions, and for small items such as underwear, accessories, belts, ties, socks, etc.
Material Drawer organizers can be made from a variety of materials, the most common being wood, rigid and malleable plastics, fabrics and acrylic, among other possibilities. Drawer organizers made of more malleable material are best suited for clothing drawers.
Thus, the pieces can be accommodated without excessive pressure being exerted on them, causing marks and creases. In the office, living room or kitchen, prefer the more rigid organizers. They will be more efficient at accommodating and containing objects and trinkets, keeping everything in its place.
Number of partitions The amount of drawer organizer dividers will depend a lot on the model and size of the product. The arrangement and size of the dividers also vary from model to model.
Models with larger dividers tend to be more versatile.
Models with larger dividers tend to be more versatile, as they allow you to accommodate different types of clothes, shoes, papers, among other items. Models with smaller dividers are better for separating offal and individual items such as belts, lingerie, socks, etc.
The more tabs your organizer has, the more you can target the division of items.
Size Before purchasing your drawer organizer, it is essential to take steps to ensure that the product has a size and depth compatible with the drawer where it will be used. As the organizer is available in a wide range of sizes, finding the ideal version for your needs should be no problem.
In addition to choosing according to the measures of the inner area of the drawer, take into account the measures necessary to hold the items you intend to organize. If necessary, divide the items into more than one organizer, to prevent the excess of items from impairing the visualization and ordering of objects or parts.
MAGINELS Children Wardrobe Kid Dresser Cute Baby Portable Closet Bedroom Armoire Clothes Hanging Storage Rack Cube Organizer Large Blue 6 Cube & 1 Hanging Section
【THE DELIVERY TIME】Dimensions: 29.1"(W) x 14.6"(D) x 58.3"(H). 1 hanging section and 6 storage cubes offer you extra space for all kinds of outfits and belongings.
【PORTABLE & DURABLE CLOSET】MAGICAL PANELS are light and thin, but provide greater weight capacity than the other normal portable storage. High quality resin composite materials with steel frame ensure each cube or hanging section to support up to 22 lbs. Not like the fabric cloth closet, resin materil will never be hurt by sunlight.
【SMART & HASSLE-FREE ASSEMBLY】MAGICAL PANELS and multi-angle connectors are easily attachable to each other, it is much easier than installing normal wooden furnitures. Our doors are more convenient than the zippers applied for other normal portable wardrobes. Doors can be tied together by cable ties we provide, and the doors feature a hole handles for air circulation.
【CUSTOMIZABLE STRUCTURE】MAGICAL PANELS allow you can to make customizable designs for different space or rooms. But please note you have limited parts only for the design we advertised, please contact us if you need more parts for your customized design.
【HASSLE-FREE MAINTENANCE】Warranty: 1 Years.If you have any problems during the period, such as missing parts, damage, installation problems, you can contact us by message or email,we will solve the problem for you for free. So don't hesitate any more, choose the most useful wardrobe for your kids.
How to Build a Closet
Have you ever wondered how you could make cabinets in your kitchen, bathroom or office? Knowing how to make them can save you hundreds of dollars. Having beautiful cabinets at home can make a big difference, but most carpentry shops charge by the square meter. Start with Step 1 below to learn how to make your own cabinets and cut their price in half.
Steps
1 Plan the closets. The standard depth is 60 cm, with the furniture itself measuring 57.5 cm to allow for a 2.5 cm flap on the top bench. The standard height is 90 cm, with the cabinets being about 86 cm to make room for the counter material. For overhead cabinets, add approx 60 cm to the countertop height. Any space left between that distance is the ceiling is free for the overhead cabinets. The width can measure from 30 to 150 cm. Always consider the size of doors you want and can buy when planning that dimension. [1]
2 Cut the sides. Make the side pieces using plywood, MDF or a suitable laminate 2 cm thick. Since the sides won't be seen, the appearance of the material doesn't matter, only the strength and durability. These panels will be 86 cm high and 57.5 cm wide. Pin the two sides together and use a jigsaw to cut a 3 x 14 cm indent in one of the corners, which will be your lower front corner. [two] Air locker measurements should reflect your personal tastes. The standard depth is around 30 and 35 cm. The height depends on where you want to place them and the height of the ceiling. Indentation is unnecessary in this case.
3 Cut the background. The bottom piece will be 60 cm deep, but the width will depend on the dimensions of the kitchen. This measurement must include the width that will be added by the side pieces on both sides. Again, for overhead cabinets, the depth will be between 30 and 35 cm, not 60 cm. You must cut two of these pieces for each air locker.
4 Cut the front and back frames. Use a 19 x 140 mm plywood and cut two pieces to the width of the bottom panel. Skip this Step if you are making aerial lockers. [3]
5 Cut out the top two gussets. Cut two more pieces of the same width to keep the top ends together. Skip this Step if you are making aerial lockers. [4]
6 Cut the front frames. They will be mounted as a frame and will make up the main part of the cabinets, which is visible. Therefore, they must be made with a wood that you find beautiful. Good sizes, depending on the part of the face and the style you want, include 19 x 38 mm, 19 x 64 mm and 19 x 89 mm. [5]
7 Join the frames from the base to the bottom. Align and glue them so that one flat side is flush with the bottom edge and the other 3 inches from the front edge. Then, using butt joints, thread a screw through the base of the cabinet to the edge of the frames. Drilling guide holes is a good idea. [6]
8 Join the sides to the bottom. Glue and then secure, again with butt joints, the side frames to the base and bottom frame, fitting the indentation into the gap formed. All edges must fit snugly. Clamps and angle measurement tools can make this task easier. [7]
9 Secure the side panels. Then glue and secure (with more butt joints) the back panel so that it is flush with the wall. The top panel should be placed so that it is close to the workbench after it is placed. [8]
10 Nail the back panel. Measure and screw a 1.5 cm thick plywood board into place. A thicker one will be needed for overhead cabinets, such as a 2cm MDF. [9]
11 Strengthen the joints. Now, strengthen all joints with corner braces and screws. [10]
12 Install shelves. Measure, mark and level the positions of at least four corner supports (two on each side). Then slide the shelves. In the air lockers, wait a little longer.
13 Add the front frames. Mount them in a single unit, like making a frame. You can use flat joints or leave them squared. Dowel or box and tenon joints should be used, according to your skill level, to join the pieces together. Nail and chamfer the nails to secure the full face to the cabinet. [11]
14 Position the cabinets. Put them in the right place. Screw through the back panel to the wall studs to secure the furniture in place. Overhead cabinets may need more support, such as L-brackets that can be covered by a stool if you plan to place heavy items such as dishes inside them. [12]
15 Install the ports. Place them on the front frames as recommended by their manufacturers. You can also install drawers, which is a bit complex and not recommended for beginners. [13]
Tips All blades of used equipment must be sharp and securely in place before use.
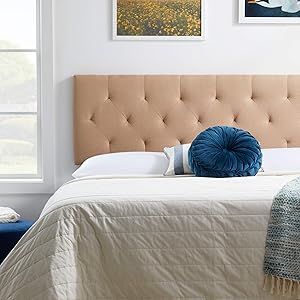
LUCID Mid-Rise Upholstered Headboard-Adjustable Height from 34” to 46” Platform, Twin/Twin XL, Beige
Polyester
Upholstered with gorgeous linen-inspired fabric and available in Beige, Black, Charcoal, Cobalt, Pearl, and Stone color options
Frame is made of solid Siberian Larch wood for high quality construction
Headboard fits most bed frames or bases and comes with pre-drilled legs, modification plates, and optional wall mounts
Headboard height adjusts in 2-inch increments ranging from 34 inches to 46 inches to accommodate most bed frames and bases
Backed by U. S. lifetime limited warranty, spot clean only
How to make a headboard in modules step by step
Making a bed headboard with modules can seem difficult, after all you will need to combine the suede fabric with foam, MDF/MDP/Plywood or Ferrule, staples and other materials, in addition to, of course, precise measurements when fixing it on the wall of your home.
But don't worry, today we'll be talking in this article all the details of how to make a headboard in modules, which will definitely open your horizons.
The experience happened there on our dear YouTube channel Youtube.com/comodofacilonline and at the end of this article will be the complete video of how we set up and fixed a complete headboard from outside to outside with 3 meters.
In addition to the entire step by step of this headboard, we will also be talking a little more about the materials used and sizes of box beds so that you have at least an idea of how to take the measurements for the manufacture of your headboard.
Any questions leave your comments!
What are the standard sizes of box beds in Brazil? In Brazil there are the following models and patterns of box beds:
Single bed box;
Standard model double box bed;
The double box bed model queen;
And king box double bed.
Single box bed
The box single bed can be found in two standard sizes in stores, one of 88 x 188 centimeters ( Width x Length ) and the other of 93 x 207 centimeters . However, in cases where it is tailor-made, especially for apartments, it may not follow these standards very much.
How to make a silverware holder with tinned glass!
Single beds over 2 meters in length are known as the “American Standard”. These beds, despite being larger, where the tendency is to give way to the environment, are more reinforced and suitable for heavier adults.
Standard model double box bed The single bed box or standard model has a measurement of 138 x 188 centimeters (1.38 x 1.88 meters). Today this model is hardly used anymore, because for a little more money it is possible to take a queen bed.
But the choice of pattern ends up being a “requirement” in smaller rooms, where it is necessary to take into account that it will still be necessary to put a wardrobe in the same room and, when possible, one or two nightstands.
Queen model double box bed The Queen Size box bed model is currently the most sold, as it is the middle ground between the simple and the “luxury” model, the King Size. Its standard measurement is 158 x 198 centimeters.
King model double box bed King Size double box beds have a measurement of 193 x 203 centimeters. They are very spacious and comfortable, very suitable for those couples who like to sleep sprawled out * . But the bedroom does not always have enough space, considering the rest of the furniture.
*Usually a couple is composed of one person who sleeps sprawled out and another who sleeps in the rest of the room, HAHAHAHA.
Bedding box made to measure Today it is common to manufacture the beds to measure, where there are models that are wall-to-wall, mounted inside the room itself. Carrying your headboard you can have a standard measure or according to the need of your room.
What is the standard size used for headboards? Headboards are usually a few centimeters wider than the width of the beds, as to make the modules easier to divide, they are usually rounded.
The width is close to the size of the bed, since the height is normally from 60 to 90 centimeters, but it can vary according to your needs.
We recommend that the headboard starts an inch or two below the nightstand, also behind the bed and not flush with it.
Single Bed Box: The width of the headboard is 90 cm;
Standard double box bed: The width of the headboard is 140cm;
The Queen Box Bed: The width of the headboard is 160 cm;
Double King Box Bed: The width of the headboard is 200 cm.
What are the most common materials used to make module headboards?
We already mentioned some of the most used materials in headboards at the beginning of this article, but now we'll be talking a little more about them. The materials are:
Wood conglomerates such as MDF, MDP, plywood or ferrule (a type of plywood);
Fabrics like suede, but some also use corino, leather and other fabrics that the staples hold well;
Foam with densities between 20 and 23;
Screws;
Bobby pins;
And upholstery glue.
Materials used to make capitone headboards
In the case of capitone headboards, which are those with buttons, in addition to the materials above, buttons (obviously) and tapestry thread (a firmer thread) of the same color as the fabric are also used.
How to make a beautiful and cheap necessaire!
How to make a headboard in step-by-step modules? The footage will vary as per your need. There are headboards that fill the entire wall behind your box bed and others of standard size for box beds for singles, standard doubles, queens and also kings. If it is the case of a standard bed, use the footage mentioned above to define the purchase of materials and the size of modules.
1. Headboard materials in modules
MDF to fix the modules (it will be the back of the headboard, the one that will be fixed to the wall);
Ferrule or plywood to make the modules (any thickness);
suede fabric;
Foam with density 20, 21, 22 or 23 (maximum);
Drill with masonry drill (used to fasten the fastener to the wall);
Screwdriver (used to fix modules and fasteners to the MDF sheet);
Tapestry stapler;
Bobby pins;
tapestry glue;
Screws;
Bushings (for wall fasteners);
Measuring tape;
Scissors;
Wall fasteners, typically 2 pairs per headboard is used;
materials for making a box bed headboard modules
2. How to do it?
The materials you will buy are all cut. It is possible to buy yourself a “raw” sheet of MDF, MDP or Virola and cut manually, but I don't advise, because usually the measure is out of order and it is necessary that the cuts are 100% so that they fit.
Foam is possible to buy in the measurements as well. Measure the size of your headboard, you can follow the standard measures mentioned above (only for the width) or take the measure you think is necessary, going from floor to ceiling, wall to wall or whatever you like.
Based on this measurement, you will need a MDF sheet in the full size of this measurement, it can be MDP as well, and modules in ferrule or plywood that cover the entire area of this sheet. Example:
Your headboard is 1.60 x 90, so you will need a 1.60 x 0.90 MDF sheet and nine ferrule sheets cut into 0.40 x 0.30 (rectangular module). These nine plates cover the entire headland area. But this is just an example, you can make rectangular modules of this and other measures, as well as square modules.
The foam must be in the same quantity and size as the ferrule/plywood sheets. Example:
If your headboard has 9 modules of 0.40 x 0.30 cm, then you will need 9 foams of 0.40 x 0.30 cm.
3. Fabric
As for the fabric, you should buy enough footage to leave the foam thickness + 2 centimeters. Example:
The foam you bought is 5 centimeters thick, so each cut of fabric should have 7 centimeters (5 of the foam + 2) left on each side of the module. In the example of modules 0.40 x 0.30 and 5cm foam, the fabric should measure 0.54 x 0.44cm (7cm more for the sides, totaling 14cm and 7cm more for the length of each side, totaling another 14cm).
Usually 1 meter more fabric is enough. Optimize the cut, fabrics usually have a standard width measurement, check if there will be less in length or width and then cut.
How to Make Homemade Slime!
Reserve a strip of 5 centimeters of fabric to “frame” the MDF sheet where the modules will be fixed, this gives a very nice finish.
Putting fabric around the headboard Tip: We quote MDF for the back plate as it is a firmer material. But depending on the thickness of your ferrule/plywood (minimum 6mm) it is possible to use the same material for the clamping plate and for the modules.
After everything was properly cut, it was time to assemble the modules.
4. Assembling the modules Take one ferrule unit and one foam unit. Apply glue to the ferrule and carefully glue the foam. Fit it perfectly, as normally it will not move anymore after the first contact with the glue. Allow to dry for 10 minutes.
Putting glue on the headboard ferrule Bedside modules kit how to make Take a unit of the fabric you cut and then place it on a flat surface, preferably the floor, with the front of the fabric facing down (the matte side face up).
Then support the wood/foam joint, with the foam facing the “back” of the fabric. The wood stays up. Place the module in the very center of the fabric so that it protrudes on all sides equally.
Suede fabric for box bed headboard Then force the module down, crumpling the foam evenly from the outside, diagonally. Fold the fabric over the wood with your other hand and then place two staples in the center of the module.
Always staple horizontally, as the vertical staple slips from the fabric and it becomes wrinkled.
Fixing module in fabric So:
forcing module head down Or with help:
stretching fabric side bed headboard module
Repeat this process on all sides, stapling only the middle.
Headboard staple detail After the means are stapled, pull the end of the fabric in each corner and staple it to the wood, making a corner. Do this on all four corners.
stretching fabric from the corner of the headboard module
stapled corners module headboard
Tip: Always force the foam down before stapling.
5. Stapling Then align the fabric along the sides and staple. Make sure everything is lined up, as the foam and fabric can curl up, making the module look ugly.
stapling fabric headboard module
staple fabric headboard modules
If you see that it has become misaligned, you may need to remove the staple, align, and staple again.
6. Finishing Finally fold the “ears” of the fabric in the corners and finish the module with two more staples. Maybe to get the corners right, it's necessary to cut some fabric, but be careful, don't cut too much.
Cutting leftover fabric headboard module
tidying the corner of the headboard module
Tip: To make it easier we recommend that this stapling process (that word doesn't even exist) be done in two. One goes up on the knee module to force the foam down well, even more on high density foams, and the other places the clamps.
Another tip: We mention suede which is the most common fabric and the most suitable. But you can use leather, leather, rubber, and other firm fabrics that won't release the staple.
So you have a beautiful module ready. Repeat the process with everyone else.
Headboard stapled module module ready headboard bed box After all modules are ready, place the fabric strip making a frame on the wall/modules fixing plate. This will give a really nice finish. Frame with fabric headboard How to fix the modules and fix the headboard to the wall? To fix the modules it is very simple, place one well in the “corner” of the larger plate and then place two screws on the sides of the module, but backwards (going from the larger plate to the module).
You must use a screw large enough to cut through the thickness of the MDF sheet and some of the ferrule.
aligning module on headboard fixing plate
screwing headboard module
module fixed on the mdf sheet
detail fabric finish frame headboard
headboard result fixed modules
Don't use one too big it can hurt you if you hit your head too hard on the headboard. (͡° ͜ʖ ͡°)
Fixing the headboard to the wall Now to fix the headboard on the wall which is more difficult. You will first need to take measurements on the wall.
There will be several measurements, but at first we need to identify two, the height at which the headboard will be in relation to the floor and the distance between the sides of the wall. Usually the bed is in the middle of the room, but sometimes the bed is propped up, so these measurements will vary.
measuring headboard height
Identify how high the headboard will be, make a sign with a pencil. Then measure this risk up to the height of your headboard.
If it is 0.90cm, make another line with the pencil at 0.90cm after this first point. Repeat this process at both ends (step back 10cm) from where the headboard will be.
taking measurements wall headboard modules
With the height where your headboard will be identified, make another line from top to bottom, with 0.15 or 0.20 cm, this will be the point where your fixator will be on the wall and on the plate.
Then drill the holes with the drill, insert the plugs, place a fastener with the socket facing up and then screw it on.
Headboard module tip stick without dirt Tip 5 (I got lost on which tip it is): Cut the bottom of a PET bottle and tape it under where you're going to stick it, so it doesn't make a mess.
Do the same process with the other fixer To place the fastener on the MDF sheet, take the measurement of the distance from the side where your headboard will be (you may need to mark where it will be from the distance from the wall) then take the measurement between axes of the fasteners.
On the plate, mark this distance and then the meterage from the limit (height) to the fastener, which in this case was 0.15cm or 0.20cm.
Headboard fastener After placing the first fastener on the plate, place the measuring tape right on its axis and then according to the measurement you took, mark where the second fastener will be.
PS: The fastener on the MDF sheet must be screwed with the insert facing down.
So it's just a top-down fit on the wall and be happy.
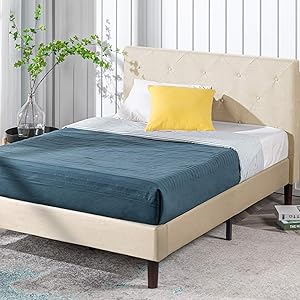
ZINUS Shalini Upholstered Platform Bed Frame / Mattress Foundation / Wood Slat Support / No Box Spring Needed / Easy Assembly, Beige, Full
Velvet Fabric Upholstery With Steel Framework
GOOD LOOKS, CONFIDENT STYLE - With its easy-as-pie assembly, sturdy construction and elegant diamond pattern stitching, the Shalini stands the test of time and makes a stunningly chic addition to your bedroom
DURABLY DESIGNED - Interior steel framework and dense foam padding add comfort and longevity; twin size supports a maximum weight capacity of 350 lbs, while all other sizes can support up to 700 lbs
NO BOX SPRING NEEDED - Durable wood slats support and extend the life of your latex, memory foam or spring mattress without the need for a box spring; for the twin and full sizes, slats are spaced 2.7 inches apart, and for other sizes, slats are spaced 3.2 inches apart
EASY ASSEMBLY – Everything you need is efficiently packed into one box and shipped straight to your door; all parts, tools and instructions are conveniently located in the zippered compartment of the headboard for easy, two-person assembly in under an hour
Worry-free 5 year limited warranty included; mattress sold separately
Included components: Headboard, Foundation, Wood Slats
How to Make a Wooden Bed
Do you like to leave the mattress on the floor, without any structure? Does your bed have a fragile metal frame? Have you ever thought about making a wooden frame? It can really add a nice touch to the room and it will eliminate that annoying metal squeaking sound, but be aware that it doesn't come cheap. This article shows you in a simple way how to build a wooden frame that can be modified to any size or height you want.
Method 1 Standard queen size bed
1 Buy all the necessary materials. See the list in the "Materials Needed" section for more details. The goal is to build a frame that fits a queen size mattress (1.5 m wide x 2 m long). Also, you will have to go to the building supply store to buy three basic things:
Fittings for the bed rails.
Wood.
Screws for wood.
2 Assemble the supports for the bed rail. This part is essential for making a firm connection between all the cross members of the frame. Attach the metal brackets to the end of the side beams that join the bed feet and check that all connections are secure. [1]
Sometimes these brackets can be difficult to find in hardware stores. Not being able to find it there, take a look on the internet.
Bed rail mounts are usually sold in a four-piece package.
In place of the pegs, you can use eight large wood screws, which make the bed very secure. These screws are easier to find than rail fittings. [two]
3 Connect the support rails. Screw the rails into each side rail and remember to space the screws about 12 inches apart for maximum weight support.
4 Make the support blocks. Cut a groove in the block and support beam. The groove should have a centered groove of 4 cm x 9 cm, with the largest measurement following the widest part of the block.
5 Attach the support blocks. Attach each support block to the center of the headboard and frame feet with screws as shown in the picture.
6 Connect the sleepers. Connect them to the foot of the bed using the metal supports on the sleepers.
7 Add support pallets. Place them between the two support blocks.
8 Place the plywood surface onto the mattress. Put the plywood over the support rails and the slats, but detail: it needs to fit inside the bed frame. Once this is done, the mattress can be placed.
9 Make final adjustments with the mattress to finish. The adjustments made, the bed is ready! Enjoy!
Method 2 Platform bed
1 Gather materials and tools. You will need a circular saw, some basic L-shaped supports, wood screws, some MDF or plywood, and some pieces of lumber. In the case of wood, you will need:
Two pieces of 2 mx 5 cm x 10 cm.
Five pieces of 1.5 mx 5 cm x 10 cm.
Eight pieces of 50 cm x 5 cm x 10 cm.
Two pieces of 2 mx 5 cm x 30 cm.
Four pieces of 1.5 mx 5 cm x 30 cm.
2 Make the base frame. Using standard joints, take the screws and secure the 2 mx 5 cm x 30 cm board and two 1.5 mx 5 cm x 30 cm boards to create a 1.5 mx 2 m box.
3 Fit the base inserts. Put in the remaining 1.5 mx 5 cm x 30 cm boards, divide the box space into three and use the screws to secure the fittings. Then set the complete base aside.
4 Create the platform frame. Again using standard joints, take the screws and secure two 2 mx 5 cm x 10 cm and two 1.5 mx 5 cm x 10 cm boards in a 2 mx 2 m box. [3]
5 Add platform fittings. Place the remaining 1.5 mx 5 cm x 10 cm planks, divide the space in the box into four sections and use the screws to secure the fittings. [4]
6 Add platform supports. At this point, you will add the 50 cm x 5 cm x 10 cm boards between the fittings, placing two in each section. Keep them evenly spaced, but misalign them so that the sections to the left and right of the center have the brackets at the same level. Fasten these boards with screws too.
7 Strengthen corners and joints. You need to reinforce the inner corners of the base and platform with "L" brackets, you can add them around some of the other inner joints to strengthen the joints.
8 Add the plywood surface. Outline and cut the plywood so that it fits against the deck surface. It will probably take two pieces to cover the platform. Secure the plywood to the internal grooves with the screws so that the screws themselves do not pop out as the platform will be exposed.
9 Paint the bed frame. Sand the wood and then paint or dye the bed any color you like.
10 Make final adjustments. Arrange the platform on top of the base in the final position. You can secure the platform to the base with some strategically placed "L" brackets, but this is optional. Just place the double or queen size mattress on top of the platform and the bed is ready!
Method 3 Multifunctional bed
1 Get the materials. You will need two 5cm x 10cm square shelves, several centimeters of Velcro, a hacksaw, wood screws, 24 basic L-shaped angles (with mounting screws) and wood containing the following cut sizes:
Four pieces of 95 cm x 5 cm x 25 cm.
Six pieces of 70 cm x 5 cm x 25 cm.
Four pieces of 40 cm x 2.5 cm x 25 cm.
2 Create the support boxes. You will use the wood to build two shelves that will balance the weight of the bed with the shelves that will serve as a headboard. The boxes will be made by connecting two 95 cm x 5 cm x 25 cm sections to two 70 cm x 5 cm x 25 cm sections in a 95 cm x 80 cm box. Secure the boards using screws – three at each connection – placing an "L" bracket in the center of the joint at each corner. [5]
3 Place the center support. Another 70 cm x 5 cm x 25 cm piece of wood is centered and connected in the same way to create two sections in each box. Secure the center bracket with an "L" angle bracket on each side, both top and bottom.
4 Add shelves (optional). When you want to have shelves at the head of the bed, you can easily add them using 40 cm x 2.5 cm x 25 cm pieces of wood. Adjust the shelf to the desired height and secure the bottom with the "L" angles – two on each side.
5 Put a lining at the back of the headboard. Draw the shelf markings on a plywood and cut the lining with a jigsaw. Nail it with a hammer or pneumatic nail.
6 Add the feet to the headboard supports. You will likely want to place feet on the headboard brackets to keep them from scratching the floor or the headboard from moving. You can easily find these felt feet in many home supply stores.
7 Paint all shelves to match. With the shelves made, paint them the same color, giving preference to laminated spray paint specific for wood.
8 Place the plywood on the headboard. Cut a 95 cm x 2 m piece of plywood. With the two support shelves facing outward and the headboard shelves in between, nail the plywood bottom and top corners of the headboard with two nails.
You can glue a non-slip mat, like the ones that are under the mats (optional). Image titled Build a Wooden Bed Frame Step 28 9 Adjust shelves if necessary. Adjust them so they are flush with the sides of the headboard. Image titled Build a Wooden Bed Frame Step 29 10 Put the finishing touches. Shelf spaces are for various things, like adding baskets, drawers or just normal doors. They are available in many colors. Ready! Enjoy the new bed! This bed should only be used by children as it does not support much weight.
Tips
Modify the placement of the wood in the corners and to create a wonderful four-post bed! A large diameter and turned feet are all you would need to change to make the bed look amazing.
Sand the rough edges to make the bed frame more pleasant.
Drill pilot holes before screwing in any parts.
Paint the wood in a color you like to make it look more pleasant.
You can apply glue to the joints and finish with nails. Thus, the joints will be stronger. Remove excess glue and lightly sand before varnishing the wood. [6]
Necessary materials
Eight sets of support fittings.
Four pieces of wood 10 cm x 10 cm x 50 cm to make the four support legs of the bed.
Two pieces of wood measuring 5 cm x 15 cm x 1.5 m to make the headboard and foot of the bed.
Six 5 cm x 10 cm x 20 cm pieces of wood for the support blocks.
Two pieces of wood 5 cm x 15 cm x 2 m to make the side rails.
Two pieces of wood 5 cm x 15 cm x 2 m to make the support rail.
Three pieces of wood 5 cm x 15 cm x 2 m to make the pallets.
Two 1 mx 1.5 mx 2 cm plywood linings.
A box of 5 cm wood screws.
A box of 3 cm wood screws if they do not come with the bed rail fittings.