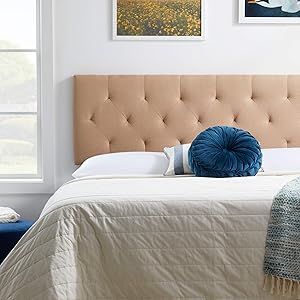
LUCID Mid-Rise Upholstered Headboard-Adjustable Height from 34” to 46” Platform, Twin/Twin XL, Beige
- Polyester
- Upholstered with gorgeous linen-inspired fabric and available in Beige, Black, Charcoal, Cobalt, Pearl, and Stone color options
- Frame is made of solid Siberian Larch wood for high quality construction
- Headboard fits most bed frames or bases and comes with pre-drilled legs, modification plates, and optional wall mounts
- Headboard height adjusts in 2-inch increments ranging from 34 inches to 46 inches to accommodate most bed frames and bases
- Backed by U. S. lifetime limited warranty, spot clean only

How to make a headboard in modules step by step
Making a bed headboard with modules can seem difficult, after all you will need to combine the suede fabric with foam, MDF/MDP/Plywood or Ferrule, staples and other materials, in addition to, of course, precise measurements when fixing it on the wall of your home.
But don't worry, today we'll be talking in this article all the details of how to make a headboard in modules, which will definitely open your horizons.
The experience happened there on our dear YouTube channel Youtube.com/comodofacilonline and at the end of this article will be the complete video of how we set up and fixed a complete headboard from outside to outside with 3 meters.
In addition to the entire step by step of this headboard, we will also be talking a little more about the materials used and sizes of box beds so that you have at least an idea of how to take the measurements for the manufacture of your headboard.
Any questions leave your comments!
What are the standard sizes of box beds in Brazil?
In Brazil there are the following models and patterns of box beds:
- Single bed box;
- Standard model double box bed;
- The double box bed model queen;
- And king box double bed.
- Single box bed
- The box single bed can be found in two standard sizes in stores, one of 88 x 188 centimeters ( Width x Length ) and the other of 93 x 207 centimeters . However, in cases where it is tailor-made, especially for apartments, it may not follow these standards very much.
How to make a silverware holder with tinned glass!
Single beds over 2 meters in length are known as the “American Standard”. These beds, despite being larger, where the tendency is to give way to the environment, are more reinforced and suitable for heavier adults.
Standard model double box bed
The single bed box or standard model has a measurement of 138 x 188 centimeters (1.38 x 1.88 meters). Today this model is hardly used anymore, because for a little more money it is possible to take a queen bed.
But the choice of pattern ends up being a “requirement” in smaller rooms, where it is necessary to take into account that it will still be necessary to put a wardrobe in the same room and, when possible, one or two nightstands.
Queen model double box bed
The Queen Size box bed model is currently the most sold, as it is the middle ground between the simple and the “luxury” model, the King Size. Its standard measurement is 158 x 198 centimeters.
King model double box bed
King Size double box beds have a measurement of 193 x 203 centimeters. They are very spacious and comfortable, very suitable for those couples who like to sleep sprawled out * . But the bedroom does not always have enough space, considering the rest of the furniture.
*Usually a couple is composed of one person who sleeps sprawled out and another who sleeps in the rest of the room, HAHAHAHA.
Bedding box made to measure
Today it is common to manufacture the beds to measure, where there are models that are wall-to-wall, mounted inside the room itself. Carrying your headboard you can have a standard measure or according to the need of your room.
What is the standard size used for headboards?
Headboards are usually a few centimeters wider than the width of the beds, as to make the modules easier to divide, they are usually rounded.
The width is close to the size of the bed, since the height is normally from 60 to 90 centimeters, but it can vary according to your needs.
We recommend that the headboard starts an inch or two below the nightstand, also behind the bed and not flush with it.
- Single Bed Box: The width of the headboard is 90 cm;
- Standard double box bed: The width of the headboard is 140cm;
- The Queen Box Bed: The width of the headboard is 160 cm;
- Double King Box Bed: The width of the headboard is 200 cm.
What are the most common materials used to make module headboards?
We already mentioned some of the most used materials in headboards at the beginning of this article, but now we'll be talking a little more about them. The materials are:
- Wood conglomerates such as MDF, MDP, plywood or ferrule (a type of plywood);
- Fabrics like suede, but some also use corino, leather and other fabrics that the staples hold well;
- Foam with densities between 20 and 23;
- Screws;
- Bobby pins;
- And upholstery glue.
- Materials used to make capitone headboards
- In the case of capitone headboards, which are those with buttons, in addition to the materials above, buttons (obviously) and tapestry thread (a firmer thread) of the same color as the fabric are also used.
How to make a beautiful and cheap necessaire!
How to make a headboard in step-by-step modules?
The footage will vary as per your need. There are headboards that fill the entire wall behind your box bed and others of standard size for box beds for singles, standard doubles, queens and also kings. If it is the case of a standard bed, use the footage mentioned above to define the purchase of materials and the size of modules.
1. Headboard materials in modules
- MDF to fix the modules (it will be the back of the headboard, the one that will be fixed to the wall);
- Ferrule or plywood to make the modules (any thickness);
- suede fabric;
- Foam with density 20, 21, 22 or 23 (maximum);
- Drill with masonry drill (used to fasten the fastener to the wall);
- Screwdriver (used to fix modules and fasteners to the MDF sheet);
- Tapestry stapler;
- Bobby pins;
- tapestry glue;
- Screws;
- Bushings (for wall fasteners);
- Measuring tape;
- Scissors;
- Wall fasteners, typically 2 pairs per headboard is used;
- materials for making a box bed headboard modules
- 2. How to do it?
- The materials you will buy are all cut. It is possible to buy yourself a “raw” sheet of MDF, MDP or Virola and cut manually, but I don't advise, because usually the measure is out of order and it is necessary that the cuts are 100% so that they fit.
Foam is possible to buy in the measurements as well.
Measure the size of your headboard, you can follow the standard measures mentioned above (only for the width) or take the measure you think is necessary, going from floor to ceiling, wall to wall or whatever you like.
Based on this measurement, you will need a MDF sheet in the full size of this measurement, it can be MDP as well, and modules in ferrule or plywood that cover the entire area of this sheet. Example:
Your headboard is 1.60 x 90, so you will need a 1.60 x 0.90 MDF sheet and nine ferrule sheets cut into 0.40 x 0.30 (rectangular module). These nine plates cover the entire headland area.
But this is just an example, you can make rectangular modules of this and other measures, as well as square modules.
The foam must be in the same quantity and size as the ferrule/plywood sheets. Example:
- If your headboard has 9 modules of 0.40 x 0.30 cm, then you will need 9 foams of 0.40 x 0.30 cm.
- 3. Fabric
- The foam you bought is 5 centimeters thick, so each cut of fabric should have 7 centimeters (5 of the foam + 2) left on each side of the module. In the example of modules 0.40 x 0.30 and 5cm foam, the fabric should measure 0.54 x 0.44cm (7cm more for the sides, totaling 14cm and 7cm more for the length of each side, totaling another 14cm).
- Usually 1 meter more fabric is enough. Optimize the cut, fabrics usually have a standard width measurement, check if there will be less in length or width and then cut.
How to Make Homemade Slime!
Reserve a strip of 5 centimeters of fabric to “frame” the MDF sheet where the modules will be fixed, this gives a very nice finish.
Putting fabric around the headboard
Tip: We quote MDF for the back plate as it is a firmer material. But depending on the thickness of your ferrule/plywood (minimum 6mm) it is possible to use the same material for the clamping plate and for the modules.
After everything was properly cut, it was time to assemble the modules.
4. Assembling the modules
Take one ferrule unit and one foam unit. Apply glue to the ferrule and carefully glue the foam. Fit it perfectly, as normally it will not move anymore after the first contact with the glue. Allow to dry for 10 minutes.
Putting glue on the headboard ferrule
Bedside modules kit how to make
Take a unit of the fabric you cut and then place it on a flat surface, preferably the floor, with the front of the fabric facing down (the matte side face up).
Then support the wood/foam joint, with the foam facing the “back” of the fabric. The wood stays up. Place the module in the very center of the fabric so that it protrudes on all sides equally.
Suede fabric for box bed headboard
Then force the module down, crumpling the foam evenly from the outside, diagonally. Fold the fabric over the wood with your other hand and then place two staples in the center of the module.
Always staple horizontally, as the vertical staple slips from the fabric and it becomes wrinkled.
Fixing module in fabric
So:
forcing module head down
Or with help:
- stretching fabric side bed headboard module
- Repeat this process on all sides, stapling only the middle.
After the means are stapled, pull the end of the fabric in each corner and staple it to the wood, making a corner. Do this on all four corners.
- stretching fabric from the corner of the headboard module
- stapled corners module headboard
- Tip: Always force the foam down before stapling.
5. Stapling
Then align the fabric along the sides and staple. Make sure everything is lined up, as the foam and fabric can curl up, making the module look ugly.
- stapling fabric headboard module
- staple fabric headboard modules
- If you see that it has become misaligned, you may need to remove the staple, align, and staple again.
6. Finishing
Finally fold the “ears” of the fabric in the corners and finish the module with two more staples. Maybe to get the corners right, it's necessary to cut some fabric, but be careful, don't cut too much.
- Cutting leftover fabric headboard module
- tidying the corner of the headboard module
- Tip: To make it easier we recommend that this stapling process (that word doesn't even exist) be done in two. One goes up on the knee module to force the foam down well, even more on high density foams, and the other places the clamps.
Another tip: We mention suede which is the most common fabric and the most suitable. But you can use leather, leather, rubber, and other firm fabrics that won't release the staple.
So you have a beautiful module ready. Repeat the process with everyone else.
Headboard stapled module
module ready headboard bed box
After all modules are ready, place the fabric strip making a frame on the wall/modules fixing plate. This will give a really nice finish.
Frame with fabric headboard
How to fix the modules and fix the headboard to the wall?
To fix the modules it is very simple, place one well in the “corner” of the larger plate and then place two screws on the sides of the module, but backwards (going from the larger plate to the module).
You must use a screw large enough to cut through the thickness of the MDF sheet and some of the ferrule.
- aligning module on headboard fixing plate
- screwing headboard module
- module fixed on the mdf sheet
- detail fabric finish frame headboard
- headboard result fixed modules
Don't use one too big it can hurt you if you hit your head too hard on the headboard. (͡° ͜ʖ ͡°)
Fixing the headboard to the wall
Now to fix the headboard on the wall which is more difficult. You will first need to take measurements on the wall.
There will be several measurements, but at first we need to identify two, the height at which the headboard will be in relation to the floor and the distance between the sides of the wall. Usually the bed is in the middle of the room, but sometimes the bed is propped up, so these measurements will vary.
- measuring headboard height
- Identify how high the headboard will be, make a sign with a pencil. Then measure this risk up to the height of your headboard.
If it is 0.90cm, make another line with the pencil at 0.90cm after this first point. Repeat this process at both ends (step back 10cm) from where the headboard will be.
- taking measurements wall headboard modules
- With the height where your headboard will be identified, make another line from top to bottom, with 0.15 or 0.20 cm, this will be the point where your fixator will be on the wall and on the plate.
Then drill the holes with the drill, insert the plugs, place a fastener with the socket facing up and then screw it on.
Headboard module tip stick without dirt
Tip 5 (I got lost on which tip it is): Cut the bottom of a PET bottle and tape it under where you're going to stick it, so it doesn't make a mess.
Do the same process with the other fixer
To place the fastener on the MDF sheet, take the measurement of the distance from the side where your headboard will be (you may need to mark where it will be from the distance from the wall) then take the measurement between axes of the fasteners.
On the plate, mark this distance and then the meterage from the limit (height) to the fastener, which in this case was 0.15cm or 0.20cm.
Headboard fastener
After placing the first fastener on the plate, place the measuring tape right on its axis and then according to the measurement you took, mark where the second fastener will be.
PS: The fastener on the MDF sheet must be screwed with the insert facing down.
So it's just a top-down fit on the wall and be happy.
No comments:
Post a Comment