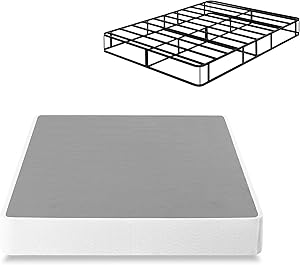
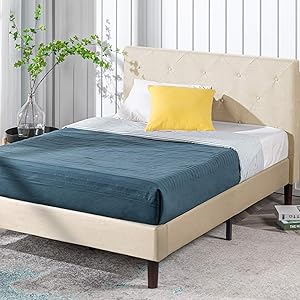
ZINUS Shalini Upholstered Platform Bed Frame / Mattress Foundation / Wood Slat Support / No Box Spring Needed / Easy Assembly, Beige, Full
- Velvet Fabric Upholstery With Steel Framework
- GOOD LOOKS, CONFIDENT STYLE - With its easy-as-pie assembly, sturdy construction and elegant diamond pattern stitching, the Shalini stands the test of time and makes a stunningly chic addition to your bedroom
- DURABLY DESIGNED - Interior steel framework and dense foam padding add comfort and longevity; twin size supports a maximum weight capacity of 350 lbs, while all other sizes can support up to 700 lbs
- NO BOX SPRING NEEDED - Durable wood slats support and extend the life of your latex, memory foam or spring mattress without the need for a box spring; for the twin and full sizes, slats are spaced 2.7 inches apart, and for other sizes, slats are spaced 3.2 inches apart
- EASY ASSEMBLY – Everything you need is efficiently packed into one box and shipped straight to your door; all parts, tools and instructions are conveniently located in the zippered compartment of the headboard for easy, two-person assembly in under an hour
- Worry-free 5 year limited warranty included; mattress sold separately
- Included components: Headboard, Foundation, Wood Slats

How to Make a Wooden Bed
Do you like to leave the mattress on the floor, without any structure? Does your bed have a fragile metal frame? Have you ever thought about making a wooden frame? It can really add a nice touch to the room and it will eliminate that annoying metal squeaking sound, but be aware that it doesn't come cheap. This article shows you in a simple way how to build a wooden frame that can be modified to any size or height you want.
Method 1 Standard queen size bed
1
Buy all the necessary materials. See the list in the "Materials Needed" section for more details. The goal is to build a frame that fits a queen size mattress (1.5 m wide x 2 m long). Also, you will have to go to the building supply store to buy three basic things:
- Fittings for the bed rails.
- Wood.
- Screws for wood.
2
Assemble the supports for the bed rail. This part is essential for making a firm connection between all the cross members of the frame. Attach the metal brackets to the end of the side beams that join the bed feet and check that all connections are secure. [1]
- Sometimes these brackets can be difficult to find in hardware stores. Not being able to find it there, take a look on the internet.
- Bed rail mounts are usually sold in a four-piece package.
- In place of the pegs, you can use eight large wood screws, which make the bed very secure. These screws are easier to find than rail fittings. [two]
3
Connect the support rails. Screw the rails into each side rail and remember to space the screws about 12 inches apart for maximum weight support.
4
Make the support blocks. Cut a groove in the block and support beam. The groove should have a centered groove of 4 cm x 9 cm, with the largest measurement following the widest part of the block.
5
Attach the support blocks. Attach each support block to the center of the headboard and frame feet with screws as shown in the picture.
6
Connect the sleepers. Connect them to the foot of the bed using the metal supports on the sleepers.
7
Add support pallets. Place them between the two support blocks.
8
Place the plywood surface onto the mattress. Put the plywood over the support rails and the slats, but detail: it needs to fit inside the bed frame. Once this is done, the mattress can be placed.
9
Make final adjustments with the mattress to finish. The adjustments made, the bed is ready! Enjoy!
Method 2 Platform bed
1
Gather materials and tools. You will need a circular saw, some basic L-shaped supports, wood screws, some MDF or plywood, and some pieces of lumber. In the case of wood, you will need:
- Two pieces of 2 mx 5 cm x 10 cm.
- Five pieces of 1.5 mx 5 cm x 10 cm.
- Eight pieces of 50 cm x 5 cm x 10 cm.
- Two pieces of 2 mx 5 cm x 30 cm.
- Four pieces of 1.5 mx 5 cm x 30 cm.
2
Make the base frame. Using standard joints, take the screws and secure the 2 mx 5 cm x 30 cm board and two 1.5 mx 5 cm x 30 cm boards to create a 1.5 mx 2 m box.
3
Fit the base inserts. Put in the remaining 1.5 mx 5 cm x 30 cm boards, divide the box space into three and use the screws to secure the fittings. Then set the complete base aside.
4
Create the platform frame. Again using standard joints, take the screws and secure two 2 mx 5 cm x 10 cm and two 1.5 mx 5 cm x 10 cm boards in a 2 mx 2 m box. [3]
5
Add platform fittings. Place the remaining 1.5 mx 5 cm x 10 cm planks, divide the space in the box into four sections and use the screws to secure the fittings. [4]
6
Add platform supports. At this point, you will add the 50 cm x 5 cm x 10 cm boards between the fittings, placing two in each section. Keep them evenly spaced, but misalign them so that the sections to the left and right of the center have the brackets at the same level. Fasten these boards with screws too.
7
Strengthen corners and joints. You need to reinforce the inner corners of the base and platform with "L" brackets, you can add them around some of the other inner joints to strengthen the joints.
8
Add the plywood surface. Outline and cut the plywood so that it fits against the deck surface. It will probably take two pieces to cover the platform. Secure the plywood to the internal grooves with the screws so that the screws themselves do not pop out as the platform will be exposed.
9
Paint the bed frame. Sand the wood and then paint or dye the bed any color you like.
10
Make final adjustments. Arrange the platform on top of the base in the final position. You can secure the platform to the base with some strategically placed "L" brackets, but this is optional. Just place the double or queen size mattress on top of the platform and the bed is ready!
Method 3 Multifunctional bed
1
Get the materials. You will need two 5cm x 10cm square shelves, several centimeters of Velcro, a hacksaw, wood screws, 24 basic L-shaped angles (with mounting screws) and wood containing the following cut sizes:
- Four pieces of 95 cm x 5 cm x 25 cm.
- Six pieces of 70 cm x 5 cm x 25 cm.
- Four pieces of 40 cm x 2.5 cm x 25 cm.
2
Create the support boxes. You will use the wood to build two shelves that will balance the weight of the bed with the shelves that will serve as a headboard. The boxes will be made by connecting two 95 cm x 5 cm x 25 cm sections to two 70 cm x 5 cm x 25 cm sections in a 95 cm x 80 cm box. Secure the boards using screws – three at each connection – placing an "L" bracket in the center of the joint at each corner. [5]
3
Place the center support. Another 70 cm x 5 cm x 25 cm piece of wood is centered and connected in the same way to create two sections in each box. Secure the center bracket with an "L" angle bracket on each side, both top and bottom.
4
Add shelves (optional). When you want to have shelves at the head of the bed, you can easily add them using 40 cm x 2.5 cm x 25 cm pieces of wood. Adjust the shelf to the desired height and secure the bottom with the "L" angles – two on each side.
5
Put a lining at the back of the headboard. Draw the shelf markings on a plywood and cut the lining with a jigsaw. Nail it with a hammer or pneumatic nail.
6
Add the feet to the headboard supports. You will likely want to place feet on the headboard brackets to keep them from scratching the floor or the headboard from moving. You can easily find these felt feet in many home supply stores.
7
Paint all shelves to match. With the shelves made, paint them the same color, giving preference to laminated spray paint specific for wood.
8
Place the plywood on the headboard. Cut a 95 cm x 2 m piece of plywood. With the two support shelves facing outward and the headboard shelves in between, nail the plywood bottom and top corners of the headboard with two nails.
You can glue a non-slip mat, like the ones that are under the mats (optional).
Image titled Build a Wooden Bed Frame Step 28
9
Adjust shelves if necessary. Adjust them so they are flush with the sides of the headboard.
Image titled Build a Wooden Bed Frame Step 29
10
Put the finishing touches. Shelf spaces are for various things, like adding baskets, drawers or just normal doors. They are available in many colors. Ready! Enjoy the new bed!
This bed should only be used by children as it does not support much weight.
Tips
- Modify the placement of the wood in the corners and to create a wonderful four-post bed! A large diameter and turned feet are all you would need to change to make the bed look amazing.
- Sand the rough edges to make the bed frame more pleasant.
- Drill pilot holes before screwing in any parts.
- Paint the wood in a color you like to make it look more pleasant.
- You can apply glue to the joints and finish with nails. Thus, the joints will be stronger. Remove excess glue and lightly sand before varnishing the wood. [6]
Necessary materials
- Eight sets of support fittings.
- Four pieces of wood 10 cm x 10 cm x 50 cm to make the four support legs of the bed.
- Two pieces of wood measuring 5 cm x 15 cm x 1.5 m to make the headboard and foot of the bed.
- Six 5 cm x 10 cm x 20 cm pieces of wood for the support blocks.
- Two pieces of wood 5 cm x 15 cm x 2 m to make the side rails.
- Two pieces of wood 5 cm x 15 cm x 2 m to make the support rail.
- Three pieces of wood 5 cm x 15 cm x 2 m to make the pallets.
- Two 1 mx 1.5 mx 2 cm plywood linings.
- A box of 5 cm wood screws.
- A box of 3 cm wood screws if they do not come with the bed rail fittings.
- Handsaw.
- Drilling machine.
- Sandpaper.
- Ink (optional).