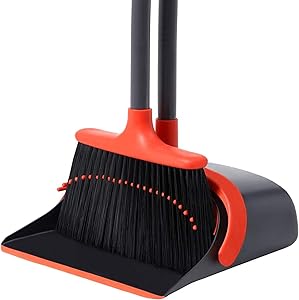
Broom and Dustpan Set, Dustpan and Broom Set, Long Handle Broom with Dustpan, Broom and Dustpan Combo for Office Home Kitchen Lobby Floor Use,Upright Standing Dustpan Broom Set
High-Quality: Broom/dustpan handle is made of high-quality stainless steel which is not easy to rust and break. Upgrade 52" long broom handle allow you to Stand upright for comfortable sweeping instead of bending over .
Efficient and Large Area Cleaning: This dustpan broom combo set is made of soft and heavy duty broom bristles which can effectively grab dust and dirt, full sized lobby broom head and large-capacity dustpan perfect for sweeping large areas.
Saving Space: Dustpan locks in open position for easy emptying , can easily dispose of dustpan's contents into the garbage. compact dustpan broom set design lets you hang the broom and dustpan together on the wall. It is a great way to save storage space .
Dustpan Teeth and Flexible Lip: Built in comb teeth for easy to scrape off the hair and rubbish of the broom silk into dustpan , no need to drag by hand, easy to clean human hair/pet hair and dust on the broom, a flexible rubber lip that conforms to surfaces so dust is not swept underneath it.
Satisfaction Service: in case any problem or you are not satisfied, please tell us without hesitation, we will try our best to solve your problem .
This is the most efficient way to sweep the floor, according to Science
If you don't like to do housework or if you don't have time for it, believe me, this story can greatly optimize your time. That's because there is a much more efficient way to sweep the floor and that few people have knowledge about, at least that's what scientists guarantee.
The big secret of cleaning, as you'll see, is strategizing. That's right, it's not enough just to pick up the broom and sweep the floor in a disorderly way.
To save effort and time, you first need to realize the environment that needs cleaning and intelligently divide it up. The place where you start sweeping the floor also counts a lot, especially when it comes to picking up the garbage, you know?
And, if you think cleaning ends there, you are mistaken (and cleaning your house very poorly). As you will see, there is no point in sweeping the floor without completing the job in order to ensure that even the smallest piles of dust disappear.
But, of course, no one needs to spend a lot of time on this kind of task. Below, in the list, is the step-by-step straight of how you should do to have a more efficient and faster cleaning.
This is the way you should sweep the floor:
1. A good broom
It all starts with choosing a good broom for the job.
It's no use picking up the one in the corner of the pantry, with its old, tangled bristles. Brooms like this only add to the effort and spread the dust even more across the floor.
2. Draw a strategy
It seems silly to say that, but having a strategy when sweeping the floor is important. This keeps you from working more.
So, choose a starting point and keep the same direction until you leave the room. Never start in the middle, as your effort to clean the whole place will be much greater.
Another good tip is never neglect the corners, so that dirt does not accumulate.
3. Divide quadrants
The best way to keep the pace of work, in fact, is to divide the room into quadrants.
From there, just start sweeping each quadrant of the corner, always bringing the dust into the middle of each section, using short, steady movements.
4. Don't be discouraged
No sweeping up all at once, taking the trash to the exit! You must finish each room by collecting the litter pile with a shovel.
And, to collect the rest of the garbage that is under the shovel, it can be easily cleaned with the help of a paper towel, ok?
5. Don't leave anything behind
As soon as you pick up the trash, make sure no dust is left behind by wiping the room with a damp cloth.
6. Ready
Once that's done, just make sure no one steps on the floor until it dries and that's it. You've just done a nice cleaning on your floor, which will stay clean for a lot longer.
And so, have you ever done something like this “technique”? Do you think it can really be valid when it comes to saving your time and making the service more efficient? Be sure to comment!
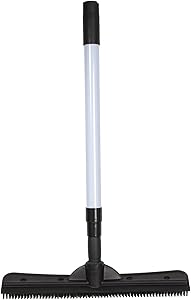
FURemover Broom, Pet Hair Removal Tool with Squeegee & Telescoping Handle That Extends from 3-5', Black & Yellow
INNOVATIVE AND VERSATILE CLEANING TOOL: Carpets, rugs, tile, windows and more – the Compact FURemover Broom gets your surfaces cleaner.
FUR REMOVER: The 100% natural rubber attracts pet hair like a magnet to easily remove fur from carpets, rugs, hardwood, and linoleum like regular brooms can never do.
BUILT IN SQUEEGEE EDGE: Cleans windows, showers, and windshields with ease. Works great to wipe away liquid spills on tile, concrete, or any hardwood surface such as patio decks or interior flooring
TELESCOPIC HANDLE: Easily adjust the handle length to suit any user. Handle extends from 3 inches to 5 inches
SUPER EASY CLEANUP: Simply wash away excess cat hair and dog hair on the rubber broom bristles by using soapy water to sanitize and renew. Natural rubber is easy to clean and requires little maintenance.
Included Components: Pole, Broomhead
How to get your pet's smell and fur out of your home
Animals are unanimous when it comes to companionship and cuteness, especially when it comes to dogs and cats. But having a pet , in addition to the benefits that everyone knows, can be a lot of work. The daily contact calls for some special care so that everyday problems do not appear. Quite common in everyday life, two of them are: the bad smell and the amount of hair that pets leave around the house.
Pet care at home
Here are some simple tips to remove the smell and hair left by your pet at home.
Take care of your dog and cat's hygiene To keep your house organized, the first step is to keep your pets clean. Contrary to popular belief, the smells that animals leave around the house come from themselves, which is why it is so important to regularly bathe your dog and cat.
Combing them frequently is a benefit for us and for them, as the hairs don't stick and fall out as much. In addition, the hygiene of other parts of the body, such as the mouth and ears, are essential for your pet's health.
sweep, vacuum and circulate There are 3 verbs that every pet owner should know. This trio simultaneously helps with both problems, as sweeping the floor causes the hair to spread less and, consequently, the smell. The most suitable brooms are rubber ones, as they create static electricity that makes the hairs to be extracted more easily.
Vacuuming furniture, rugs, carpets, among other things, helps to reduce dust and also to reach the hair that collects in the corners. Opening the windows is a simple movement that initiates a flow of air in the environment, alleviating the odor of animals (which are even more intense in winter).
Pet care at home
Use the right products There are numerous products on the market that combat the two problems mentioned in the post, but only a few of them are really effective. To ensure the quality of the merchandise, it is recommended to test it before distributing it throughout the house. Also check for proper use of it: whether it is for the floor, rug, or other purposes.
Many people tend to use homemade mixtures that, combined with everyday substances, do the same job as traditional products found in commerce. The tip is, for both the products and the solutions, to use them with care and moderation, as no one wants a house that is clean and, at the same time, stained.
at washing time Curtains, pillows, rugs and other household items smell like your pet even if you don't want to. Their contact with these objects leaves a characteristic odor, which can also be felt in your pet's bed and blankets. It is important to keep these items always clean, as in addition to reducing the smell, it also prevents the accumulation of dust, bacteria and hair, which are concentrated in your animal's resting place.
Training Your life can be simpler if your partner knows what he can and cannot do. That's why it's important that you teach your pet some ways, especially with regard to the place of needs and where he should or shouldn't be.
Getting your pet used, for example, to sleeping in the same place and not climbing on furniture, prevents its fur from spreading around the house. Instructing him to always go back to the same place to pee prevents the odor from taking hold throughout the house. If this is not possible, there are products on the market, such as Pipi Dog or hygienic mats , which encourage animals to take care of their needs in the chosen place and help you to keep the environment cleaner and more fragrant.
Pet care at homeAlso check out this article about pets in the apartment. Homemade tricks to remove the smell of urine: 1. Use a paper towel to soak up the pee. 2. Mix a pint of water, lemon juice and a spoonful of baking soda or alcohol vinegar. 3. Dip in a cloth and wipe on the spot. 4. Apply another damp cloth to rinse.
Tip to remove the smell of carpet and sofa: 1. Mix warm water, vinegar and baking soda. 2. Place in a spray bottle and rub over affected surfaces. 3. Vacuum the rug and sofa.
How to remove the smell from the floor in your home or apartment: At Home 1. Make a solution of alcohol, water and disinfectant. 2. Soak a cloth and wipe the floor.
From the backyard 1. Wash the floor with detergent and water. 2. Repeat the same process at home.
How to remove the smell of fabrics: 1. Mix a liter of water with half a cup of vinegar, a tablespoon of baking soda, ¼ cup of alcohol and a tablespoon of fabric softener. 2. Spray on fabrics and clothing. 3. Wash normally.
To remove hair from clothing or fabric: Adhesive Roller 1. Purchase an Adhesive Roller (contains an adhesive material that, upon contact with the surface, adheres the hairs to the roller). 2. Iron your clothes from top to bottom.
Masking Tape 1. Wrap the tape around your hand, glue side out. 2. Rub over fabric. Tissue or moistened cloth: 1. Get a tissue, paper towel or cloth. 2. Wet it with water. 3. Pass over clothing and repeat the movement, always in the same direction.
Any tip that helps to solve these problems is always welcome and, therefore, we have separated a Vine from Purina , a company that produces animal feed, which helps you and does not require many materials: just a rubber glove is enough to remove the hair from her pussy from the pillow. The Lopes adds: gloves that have texture are even more efficient, especially if you add a little water in them!
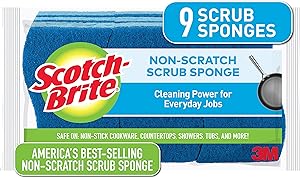
Safe on non-stick cookware, countertops, showers and tubs
Scrubbing fibers made from 100% recycled content
Selling scrub sponge brand
Long-lasting and durable
Clean in the dishwasher and reuse
Available in multiple pack sizes
Look for Scotch-Brite Extreme, Heavy Duty, and Gentle Scrub Sponges, too
KITCHEN SPONGES: HOW TO CORRECTLY USE THEM TO WASH DISHES
For many people, the worst housework is washing the dishes . To make this moment easier, TudoGostoso's blog has already published some articles with amazing tips for you to wash the dishes faster and 3 tips to clean a burnt pan . Today we are going to talk about kitchen sponges and give some tips for washing dishes properly . Check out!
Kitchen sponges: see how to use it correctly
What is each side of the sponge for? Most sponges have two sides: the green side, which is an abrasive fiber, and the yellow side, which is supersoft foam. And know: each one has a purpose. Used incorrectly, they can scratch your household items and even damage them. See what they are for:
Green side: Use the green side to clean utensils that are very dirty, such as cutlery, tins, grills, and barbecue utensils . Avoid using in non-stick pans and glass jars. By no means use it on porcelain with painted decorations, as it can even deform the paintings. For these cases, it is recommended to use only a damp, degreasing cloth .
Yellow side: Use the soft side of the sponge for the rest of utensils such as glass cups, stainless steel pans, non-stick pans and plastic containers.
Different kitchen sponges In addition to the traditional kitchen sponge, you can also find other types of sponge on the market. Check out some of the models below:
Steel wool: One of the biggest mistakes is using steel wool to clean food crusted pans. For these cases, the best thing to do is to soak the pan for a while and then try to wash it with a common sponge. Steel wool should be reserved for cleaning resistant products such as barbecue grills and skewers. It is also widely used outside the kitchen to clean and remove excess materials such as plaster.
Sponge saves nails: there is a model of the traditional sponge made to protect the nails. It's really horrible that I just made my nails look nice and, on the first wash of dishes, they get all ugly and peeling. To save people from this problem, it is possible to find a sponge with a perfect fit for your fingers.
Soft sponge : This sponge is designed to be used on delicate surfaces such as stove glass and kitchen tiles. Unlike the traditional one, it doesn't have the green side of abrasive tape.
Tips for washing dishes The sponge absorbs a lot of fat when washing the dishes, so let's give you 2 tips that will help you a lot at this time!
1) Always wash glasses first They tend to be less greasy than dishes and pans full of food. If you leave it to wash for last, they will have all the fat in the food. An extra tip is to use a sponge just for cups.
2) Wash the sponge Even if you change your sponge weekly, it should be washed every time you use it. To do this, add a little detergent and rub one end into the other to remove excess grease.
Mr. Clean Magic Eraser Extra Durable, Cleaning Pads with Durafoam, 10 Count
Mr. Clean Magic Eraser extra durable scrubber is 4x stronger with DURAFOAM cleaning performance vs. The leading all-purpose bleach Spray
This cleaning scrubber is tough on dirt, all around the house! Surface cleaner, wall cleaner, bathtub cleaner, bathroom cleaner, oven door cleaner, erases marks on light switches, doors & much more!
The Mr. Clean Magic Eraser provides a powerful clean with water alone.
No harsh chemicals added.
Magic Erasers are also available in extra durable, kitchen, and original forms
Find out how to clean tile floors and get rid of stains
The tile floors are known to be very beautiful and easy to clean, however, it appears as a stain or dirty you need to know how to clean the tile floor and leave it as new. In this article, we'll give you tips for cleaning matte and glossy ceramics, helping you to get rid of dirt quickly and easily.
That's because the stained floor draws attention and causes that discomfort right away, even if your house is clean and scented . For this reason, the floor deserves special attention in cleaning and maintenance.
Learn how to clean matte tile floors
Remember that each type of stain needs the use of a suitable product.
Therefore, for grease or sauce stains on matte ceramic in environments such as the kitchen or service area, a homemade mixture of vinegar and water is ideal.
Therefore, make a mixture of one part vinegar to four parts of water and apply the mixture on top of the stains. Afterwards, let it act for 10 minutes and, if the stain persists, scrub with a stiff bristle brush until the stain is removed. After that, clean with water and detergent.
To clean the frosted ceramic floor in the bathroom, use a little bleach in the mixture with water and vinegar. Thus, it prevents the proliferation of fungi and bacteria, in addition to preventing mold. But remember to dry the room well.
And now, see how to clean the shiny tile floor
And when we have shiny tile floors? For stains, follow the same procedures taught for frosted ceramic in kitchens, bathrooms and service areas.
But to avoid scratching the floor when getting rid of stains, use a sponge, damp cloth, broom, or soft-bristled brush. And, do not use baking soda or abrasive products to keep the ceramic shiny and avoid scratching.
See how to remove stains and grime from ceramic floors
Do you know when day-to-day cleaning is no longer effective, and the tile floor is still dirty and grimy? Let's teach another homemade recipe to eliminate this dirt.
First, make a mixture of 1 liter of water, 200 ml of white vinegar, 1 tablespoon of baking soda and 1 tablespoon of neutral detergent. Before applying the mixture, shake it and then apply it to the stained or grimy spot.
So, use a broom or brush to scrub where it's dirtiest, or leave it on for at least 10 minutes before scrubbing. Dry with a cloth and you're done.
Learn how to routinely clean your tile floor
Routine cleaning is also preventive cleaning, as it helps to prevent the appearance of stains and grime on the floor. Now we are going to teach you how to clean the tile floor on a daily basis.
First, use a mop or sponge, cloth or soft broom to dust off the floor. Then, wipe with a damp cloth with some product indicated for your type of floor.
In short, it's simple and easy, isn't it? But it makes all the difference over the years , and tile floors will always be as good as new.
Lugar Certo is full of tips on organizing and cleaning houses and apartments, as well as decorating and DIY tips. Everything you are looking for is here.
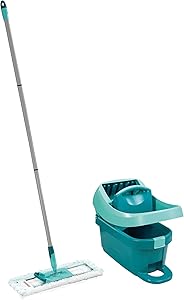
Leifheit Click System Wiper Press Profil XL, Mop and Bucket with Wringer Set Cleaning Tools, Turquoise/Silver
Cleaning has never been easier with this hassle-free Leifheit mop and bucket with wringer set.
Removable microfiber head and wringing device offers absorbency and mess-free cleaning.
Ideal for tile, hardwoods, laminates, and other smooth flooring options.
Crafted from steel and durable plastic to ensure stability and reliability through regular use.
Measurements- Handle 57.5" H, Mop Head 18" Long, Bucket 15.25" H x 8" L x 11" W
How to Clean Dirty Floors: Step by Step for Each Type
Your floor is very dirty and you don't know what else to do? Dr. Lava Tudo has separated tips on how to clean grimy floors so that you can get rid of that bothersome dirt once and for all.
After all, there's nothing better than arriving home and finding everything clean, shining with that clean smell . However, even keeping a routine of cleaning the house daily , it is common to find stains resulting from the day to day.
Arriving with a dirty foot from the street, dropping certain substances, accumulating fat… the list is endless. The floor is one of the most affected areas and it can beat that despair: how to clean dirty floor?
Importance of cleaning the floor correctly
how to clean grimy floor
Your floor may be clean, but it may not look clean. This situation is very common when he is dirty. But, the importance of solving this problem is not just aesthetic.
A well-kept floor is the guarantee that your porcelain , parquet or any other material that covers your floor has a long life, that the finish remains in perfect condition and that it doesn't need to be replaced anytime soon.
It is common for centuries-old houses to draw attention for their well-kept floors. It is worth remembering that several domestic workers were dedicated to this on a daily basis, a time that is no longer common nowadays. Therefore, check out practical tips that will facilitate this care in your home!
What is the best product for cleaning grimy floors?
If you're reading our article, you probably have this question. Did we get it right? Homemade products offer good value for money. We are talking about: detergent, vinegar, bicarbonate, alcohol, among others. So read on and discover homemade tips to end this headache using these items.
How to clean grimy floors with baking soda?
As an alternative to traditional cleaning products, baking soda has a lot of potential to make your grimy floor shine again. Learn this tip and test it at home!
Then mix the baking soda with a little hydrogen peroxide. Leave on for a few minutes and then scrub away the dirt with a soft brush or clean microfiber cloth. Then just remove the excess. And don't forget to test it first on a small area of your floor, huh?!
How to remove stains on the floor?
Stains on the floor always look bad. But rest assured, we brought a tip that solves most cases, using only 2 ingredients: salt and lemon.
Squeeze the lemon onto the floor until the stain is completely covered. Then sprinkle some salt on it. Let the 2 products act for a few minutes. Now, with a soft brush or sponge, gently rub the spot. Finally, wipe off with a dry cloth and remove the excess.
Miraculous Dirty Floor Cleaner Recipe
If you were looking for a miracle recipe for the best cleaning of grimy floors, you've just found it! Oh, and don't worry! All the ingredients are probably already in your house. Let's go to the list of materials needed:
1 grater;
1 bowl;
1 liter of hot water;
soap shavings;
200 ml of fabric softener;
100 ml of alcohol;
200 ml of vinegar.
Procedures:
Take the soaps, preferably the ones that are old, that you no longer use, and rub them on the grater. Put the zest into the bowl and pour in hot water until it dissolves. Add the other ingredients and mix well until smooth. If the floor cleaner has become too concentrated, add water. Store in a plastic bottle so you can use it whenever you need it!
To use the product, dilute 2 scoops of it in a bucket of water. Moisten a clean cloth in the mixture, apply to the floor, making gentle movements and spreading the mixture. Finally, remove the excess.
How to clean grimy floors with baking soda and vinegar?
Are you familiar with the dynamic duo vinegar and bicarbonate? These 2 products together have a huge cleaning potential ! And when we talk about cleaning grimy floors it couldn't be different. See, then, how to make this homemade mix:
You will need:
1 plastic pot;
400 ml of water;
5 tablespoons of neutral detergent;
100 ml of vinegar;
50 ml of alcohol;
2 tablespoons of baking soda;
1 tablespoon of salt.
Procedures:
Put all the ingredients in the plastic pot and mix until it forms a very homogeneous mixture. Apply to the floor, testing in a small area beforehand, and let it work for a few minutes.
Rub the product with a soft microfiber cloth all over the floor, making gentle movements. Finally, rinse and remove excess mixture.
Tips on how to clean grimy floors of different types
Each floor requires a different type of cleaning. Passing a broom and a damp cloth is almost universal, but some care is needed so that a certain type of floor is not spoiled and maintain its beauty, without soiling.
Some people have a habit of mixing cleaning products such as chlorine, bleach and disinfectants and soaking the floor. This can be fatal to the floor and make it more easily damaged.
In general, always avoid very strong products and follow the instructions for use on the packaging. Here's what not to do when cleaning your floor.
Also, check out the tips below on how to clean grimy floors properly.
Homemade product to clean grimy ceramics
How to clean grimy ceramic flooring
There are specific cleaning products to be applied to ceramics and porcelain. The tip is to read the labels and look for the one that best suits your situation. This floor allows the use of specific cleaning products. In rooms such as the bathroom and kitchen, where the presence of grease is a constant, degreasing and disinfectant mixtures are ideal.
To avoid grimy floors, thorough cleaning of the floor is important. To do this, mix detergent and water and apply to the floor with a broom. It is important to rub on the grout, as they are more prone to soiling. Then wipe off the solution with a wet cloth and dry the floor with a damp cloth.
How to clean wooden flooring
how to clean grimy wood floor
The wood brings a sense of warmth to the house, but it requires constant care and careful attention. Whether hardwood, hardwood or parquet, none of them can have much contact with moisture, as this spoils the wood, leaves it rotten and has many stains.
Therefore, cleaning should be done more often throughout the week, using a broom with soft bristles or a vacuum cleaner. Avoid piassava brooms!
After sweeping the environment, wipe with a damp cloth with water. Once a week you can dilute a little disinfectant specific to the area in the water. This will allow for deeper cleaning.
In both cases, the important thing is to dry well. So use two cloths. One wet to clean and one dry to remove moisture. This is the key to cleaning and not ruining the floor!
How to Clean Dirty Stone Floors
how to clean grimy stone floor
When the coating is made of stone, the surface is therefore more porous. If the stone is light, it's much easier for it to get grimy and lose all the beauty and class that this floor can give your home.
Using only water and neutral detergent, try to brush with a material with more rigid bristles, this way you can remove dirt that accumulates without using aggressive products.
Marble floor cleaning product how to clean grimy marble floor
Overall this is an easy-to-clean floor, although it is a porous material. Strong or greasy products should be avoided as they will keep the grimy from coming off. In fact, they can contribute to dirtying.
If you want to clean your marble, and learn how to clean white floors in general, the ideal solution is to put a spoonful of coconut detergent in a liter of water, use a cloth with the mixture and then another to dry.
From time to time, it's worth calling a professional company so that you can take care not to get dirty, especially if the floor is white !
How to Clean Dirty Laminate Flooring
how to clean grimy laminate flooring
Laminate flooring can be the terror for those who don't want to see any kind of stain on the floor. Lamination facilitates the accumulation of fat and the fixation of liquids that fall on it. This is the kind of floor where just a damp cloth will not solve the situation.
A tip for these cases is to mix vinegar, alcohol and water in a spray bottle, adding drops of detergent. After gathering these materials, just sprinkle them on the floor and wipe them with a microfiber cloth. This cloth is ideal for its softness.
How to clean non-slip grimy floor
First of all, avoid using bleach to clean the non-slip floor so that it is not damaged.
Remove excess dust and coarser dirt with a broom. Now mix in a bucket of water, a little disinfectant and mild detergent. Apply over the entire surface of the floor and let it act for a few minutes.
Use a broom in a circular motion to remove the remaining dirt and rinse off the excess mixture.
How to get the grime off the bathroom floor?
To learn how to clean grimy bathroom flooring and get it clean again, you will need:
2 liters of water;
200 ml of liquid soap or neutral detergent;
Essence to taste;
250 ml of bleach.
Mix all ingredients well and apply on the bathroom floor. If necessary, also apply on tiles. Scrub well with a broom and don't forget about the corners or grouts where you can use an old toothbrush. Wait for about 15 minutes before rinsing off all the excess mixture and you're done!
Take special care when handling bleach, which can stain clothes. Also, don't forget to wear gloves to avoid the strong smell this product can leave on your skin.
professional floor cleaning
After all these tips, you already know how to clean grimy floors. However, you may have noticed that it is not easy and that this type of cleaning deserves dedication.
Therefore, it is worth considering a professional cleaning service from a company that specializes in the service. In addition to saving your work, you save time and are sure that the result will be as expected. Dr. Lava Tudo, for example, has the ideal solution for each type of floor.
The guarantee of a better job is due to the use of innovative and specific machinery and products for each purpose. The company assesses the situation and performs the ideal procedure, in the shortest possible time.
When deciding to hire a company, instead of risking doing it yourself in the few moments of free time, you guarantee the hygiene of your home and you are sure that the products and care applied to your floor are the best to prolong the result. , without interfering with its useful life.
Medpride Medical Vinyl Examination Gloves (Large, 100-Count) Latex Free Rubber | Disposable, Ultra-Strong, Clear | Fluid, Blood, Exam, Healthcare, Food Handling Use | No Powder
Medical Exam Vinyl Gloves – Designed for handling bodily fluids, or for food service use, our latex-free gloves help provide reliable protection
Thick, Heavy-Duty Resilience – Crafted with a 4 mils thick PVC, these versatile medical gloves are stronger than nitrile or latex while still giving you the dexterity and control you need for needles or equipment.
Commercial or Industrial Use – These vinyl medical exam gloves can be used by emergency personnel, home or hospice care, lab technicians, elder care specialists, veterinarian and medical staff, and dental professionals.
Various Sizes Available – These power free exam gloves are 9.5” long, can be worn on either the right or left hand, and fit men and women equally. They also come in small, medium, large, and x-large sizes for more versatility.
Bulk Box Order – You’ll receive a total of 100 total gloves to suit any office or service need. And because they come in compact, stackable boxes, they’re easy to store, and they’re also disposable for quick, safe, and simple clean up.
Cleaning glove: which is the best and how to sanitize it
During the coldest winter days, washing dishes, cleaning the house and doing other household chores becomes a lot more difficult, doesn't it? The good news is that there is a tool that can help a lot: the cleaning glove. In addition to protecting your hands against cold water - ensuring more comfort - it is essential to avoid contact with heavy cleaning products, such as bleach and other abrasives. But remember that it is important to choose the right type of glove for each task, ok? Check out tips on how to choose the best glove for each objective and then sanitize it properly.
How to choose protective gloves? In order not to make a mistake when choosing gloves, it is very important to take into account the household task you will be performing at the time. This is because there are gloves made of different materials (latex, neoprene, PVC etc.) that are indicated for different purposes.
Heavy cleaning glove If you intend to do a heavy cleaning (handling bleach and abrasive products), our suggestion is to use gloves with reinforced thickness. They are waterproof, insulate well from contact with toxic products (they ensure good protection for hands and nails) and are also easy to wash.
Quality heavy cleaning gloves, in particular, have an anatomical shape, which ensures more comfort and flexibility, and a non-slip texture that is essential for safety during handling. Available in P, M or G versions, they are versatile, highly resistant and durable. It is worth purchasing at least one pair of this model to use for washing floors, tiles, bathroom fixtures, oven, grill, gutters and pipes.
Dishwashing glove Did you know there are gloves for washing dishes? Some people are allergic to detergent (and other cleaning products) and therefore need to use this item of protection for even the simplest household tasks.
Quality ceramic gloves, for example, have an interesting differential: in addition to being non-slip, they ensure maximum sensitivity to the touch - that is, they allow the person to hold and feel the objects well during the wash, avoiding possible accidents. These gloves also have a tighter fit, which promotes greater flexibility and comfort during movement, especially in the wrist region.
Because they have an internal lining with cotton flakes, Qualitá dinner gloves ensure even more comfort and are much easier to put on and take off - as they don't stick to wet hands. They are available in P, M or G versions and are used to wash all types of kitchen utensils. It pays to have at least two pair in the pantry!
Multipurpose glove You know those gloves you use for just about everything - taking care of the garden, the bathroom, washing the floors, walls and so on? They also need to be strong and meet certain requirements to ensure safe handling.
Quality multipurpose gloves, in particular, are waterproof, very resistant, flexible and super easy to wash. Like the heavy cleaning ones, they have an anatomical shape that ensures a good fit in your hands. The comfort is due to the internal lining made with cotton flakes, which also make it very easy to put on and take off your gloves. They are recommended for handling garbage, garden dirt (such as leaves and branches), washing floors, tiles, stoves, cabinets, countertops, bathroom and other daily tasks.
How to sanitize cleaning gloves? After using cleaning gloves, it is very important that you sanitize them and take proper care so that they last a long time. To start with, it is recommended to wash your still-gloved hands with soap and water (rubbing the area between your fingers as well). Then rinse and dry with a paper towel.
To improve cleaning even more, apply a little alcohol gel, rub and then remove the gloves from your hands by pulling them by the cuff. Allow them to dry well and then store them in a well-ventilated place to prevent mold. Taking these hygiene cares always after use, you can bet that cleaning gloves will always be well maintained!
Swiffer Heavy Duty Refills, Ceiling Fan Duster, 11 Count
Swiffer 360 Degree Dusters TRAP + LOCK up to 3x more dust & allergens. vs. feather duster, common inanimate allergens from cat and dog dander & dust mite matter
Specially coated fibers grab onto dust & don't let go
Uniquely designed to Trap + Lock dust from every direction.
Compatible with all Swiffer Dusters short handle or Swiffer Dusters extendable handle. Note: Product is only the refills for Swiffer Dusters and does not include the handle
Great for dusting electronics, dusting furniture, knick-knacks in your home or office, blinds, ceiling fans, and even your car interior
How to dust off furniture and objects
Everyone knows that dust is not good for your health . But not everyone knows the tips on how to remove dust from the house in a very simple , easy way that will improve your home environments by 100%, as well as the air you breathe while you're at home, while watching a movie in the sofa while sleeping.
We don't know what your reaction is when you see a piece of furniture with that fine layer of dust, but ours is to go running and get a dry cloth or a duster to finish it. Or is it better to use the vacuum cleaner? Or should we use a damp cloth? Calm calm. We will address these and other common questions in this article, which will teach you how to dust off the furniture in your home. 1st tip: keep an eye on the duster It helps, of course, to spread the dust elsewhere 🙂If your goal is just to remove the dust that is visible on a piece of furniture to hide it somewhere else, the duster is a great ally! So, if you're asking yourself “should I use a duster to dust off at home?”, our answer is, “only if you're in a hurry and don't really want to clean”.
Well, but “how am I supposed to dust off furniture then? Give me a help!”. We give you the next tips. We like to help you whenever you need
2nd tip: remove objects from their place It's easier to dust off furniture if you remove obstacles in your path first. Decorative objects, remote controls, plant vases, picture frames, various souvenirs that we accumulate, all of this ends up making your job more difficult. The tip here is to remove everything first, wipe them all with a dry, lint-free cloth, and leave everything in one place (on the sofa, on the table, inside a box - just be careful not to break anything , OK?). Afterwards, your path will be clear for the cloth you will pass. We recommend a microfiber cloth, as it absorbs dust particles better.
3rd tip: start from the top down Gravity can be seen as an ally in these cases, if you know how to work with it. So, whenever you're dusting off your furniture, always start with what's highest. If you have shelves, the top shelves come first. If you have shelves on the walls, too. The tendency is for the dust to float a little around the room, but it will descend and fall to the floor – so sweeping and mopping the floor is always the last task, ok?
4th tip: use suitable materials to remove dust The mystery of perfect cleaning is the perfect cleaning material. Therefore, make sure you have the ideal cloths to remove dust from objects and furniture. We already recommend the microfiber cloth here, which holds up to 7 times its own weight and, therefore, holds more particles. But if you don't have one of these in your house, no problem! You can take care of the furniture with other cloths, but prefer the ones that do not lint for a quicker cleaning. To dust off furniture, one idea is to use a very clean cloth dampened with water, as the dust will stick to the cloth instead of flying around the room and falling into another space you've already cleaned. After that, go back with a dry cloth to remove excess dust, water or marks that may have remained on the surface.
5th tip: don't forget the corners Dust off surfaces is easy. The tricky thing is to remove the dust that accumulates in places that no one sees: inside cupboards, in door corners, on baseboards or inside sliding door partitions, under the bed and sofa, behind your furniture, on top of the closets, on the curtain rods. Ufa! The list is huge of places where we can find dust hidden in the house, so the secret is to set aside a day for a complete cleaning, those of removing everything from the place to ensure that neither dust nor dust share the house with you.