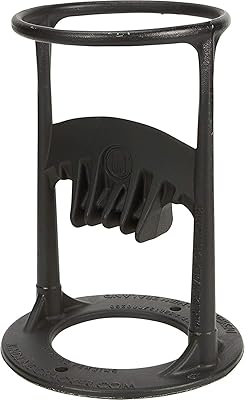
Kindling Cracker Firewood Splitter - Kindling Splitter Wood Splitter Wood Splitting Wedge Manual Log Splitter Wedge(Limited Edition)
- A safe and easy way to make kindling with no moving blade or sharpened object passing by your hands
- Splits firewood with less force than a standard axe
- 6.5in. inside diameter top ring
- Made of high-quality cast iron in Australia
- Virtually maintenance-free

How to cut firewood from a log
Many people see the sharp wedge at the end of an ax handle and think that cutting wood for firewood is easy. You just have to take the ax, lift it over your head and strike down, right? However, if you don't have the correct technique, you could spend a whole day chopping wood with nothing more than a sore back. What's more, without the correct technique, you could seriously injure yourself. Better to chop wood correctly to be safe, save time and effort, and avoid ailments.
Method 1 Chopping wood with an ax
1
Get ready. Not only will you need logs of the appropriate length (about the length of your forearm) and your trusty ax, but you will also need to use the following safety tools:
- work gloves;
- work boots;
- safety glasses (optional but recommended).
2
Find a block of wood to cut the firewood and put it in an appropriate place. If you don't already have a block to cut, you can choose a large, thick piece of uncut wood. A wide stump is also an excellent base for chopping firewood.
- If you choose to use a thick piece of wood, make sure it is knotty, as it will be much more resistant to the force of the ax and will last longer as a cutting block.
- Elm wood has particular grains that make it resistant to cuts. If you have a piece of this type of wood at your fingertips, take advantage of it. [1]
- You can wrap a recycled tire around the top edge of the chopping block to stabilize pieces of firewood that don't stay vertical when you lay them on the surface. [2]
- A cutting block should always give a little; If it has too hard a surface, it could damage your ax or even injure you if the ax is deflected.
3
Put the firewood in the right place. Take the piece of firewood you want to cut and position it so that it remains stable on the chopping block. You may need to make some adjustments to find the perfect position due to natural irregularities that occur during wood growth, such as cracks or knots. The log should be as stable as possible, with the area you are hitting pointing up, where you will begin the cut.
4
Stand in front of the firewood and the chopping block. Make sure there are no branches, loose stones, slippery mud, or anything else on the ground that could cause you to slip. Stand with your feet shoulder-width apart facing the wood and chopping block. [3]
- It is important that your legs are separated to the height of your shoulders. A piece of firewood that is not stable or has uneven grains or knots in the wood can cause the ax to twist when you strike. Keeping your legs shoulder width apart is one way to ensure that the ax does not land on your legs or feet.
5
Hold the ax correctly. Take the ax with both hands; Place your dominant hand near your head and your non-dominant hand toward the lower end of the handle. To hit properly, you must allow your dominant hand to move along the handle to your other hand, which should stay in place. In this way, you will have more control and the blow will be stronger. [4]
6
Look at the grain of the wood. Be aware of any knots or branches, as these will make the firewood much more difficult to cut. For knotty cutting, your best bet is to focus on the area between the knots or branches where the grain is smoothest. [5]
- Cracks or small cracks in the wood are the ideal place to strike with the ax.
- The easiest wood to cut has smooth grain and the grain is consistent and regular.
7
Prepare to strike. Focus on the goal. Place the ax to the side of your dominant hand and lift it over your shoulder in a steady, even arcing motion. [6] Hold the ax firmly before striking and make sure your posture is stable and your legs are shoulder width apart.
- Another acceptable technique is to lift the ax directly over your head and then hit the piece of wood.
8
Strike with the ax. Bring the ax down quickly and firmly, allowing your dominant hand to move along the handle, toward the other hand. Focus on where you want to strike until the ax gets there. [7]
- Depending on the thickness of the wood and the number of knots it has, you may need to repeat the blow one or more times to cut the wood.
Method 2 Cutting sturdy pieces of firewood with a wedge
one
Evaluate what you need. If you are cutting full-size wood, unless the wood has more knots than usual or it is a cut-resistant type of wood (such as elm), you will not need a wedge. On the other hand, if the firewood is hard and you can only make cuts and cracks with the ax, but do not cut it completely, you will have to use other tools.
0
2
Gather your supplemental firewood chopping tools. If you can't do the job with just an ax, you should get a long metal wedge and a mallet. You can get them at a local hardware store, or perhaps borrow them from a neighbor.
3
Identify a central crack or a promising cut. Even if the ax doesn't go through the piece of wood and cut it completely, if you managed to land a few hits, you may have made at least a few deep cuts or a crack in the wood. Find the deepest cut or crack in the firewood. This is where you should cut. [8]
- For some particularly large or sturdy pieces, you may need more than one wedge.
4
Insert the wedge. Since the wood will be softer than the wedge, you will probably have no problem placing it in the cut or crack that you chose as a cutting point. If you are trying to cut a particularly hard type of wood, you may need to insert the wedge using a mallet. [9]
5
Prepare to strike with the mallet. Assume the same posture as cutting with the ax: keep your legs shoulder-width apart, place your dominant hand near the head of the mallet, fix your gaze on the wedge, and lift the mallet over your shoulder. [10]
6
Hit with the mallet. Allow your dominant hand to move along the handle, toward your non-dominant hand, which should be fixed, and hit the wedge with a quick, firm movement. [eleven]
- In this way, you will need to drive the wedge deeper into the piece of firewood, causing the cut to become a crack or the existing crack to enlarge.
- You may need to hit several times with the mallet to be able to drive the wedge even deeper into the wood.
7
Separate the firewood if necessary. Sometimes the wedge breaks the knot and cuts the wood completely. Other times you must manually finish breaking an almost completely cut piece. In some cases, you may need to use your ax carefully to separate uncut pieces.
Method 3 Using a hydraulic log cutter
one
Read the manual. Each firewood cutting machine is a little different from the others and if you know its characteristics, as well as the correct way to operate it, you can use it safely. Whenever you use these types of machines, be extremely careful, as a mistake can lead to serious injury. [12]
2
Review security procedures. Before starting the machine, make sure the path is clear of objects, that the deck panels are in place, and that you wear the correct safety gear to operate the machine. [13] In general, these implements are:
- relatively tight clothing;
- safety glasses;
- work gloves.
3
Add fuel or start the machine. Some firewood cutters work like attachments to a tractor. Others are powered by electricity or gas. Do not leave the fuel or the power cord in any place where it can trip you or become entangled with the parts of the machine. [14]
4
Gather the firewood. Once you have read the manual, you will know the procedure to follow to operate the machine. In this way you will know what is the best way to put the firewood in the hydraulic cutter. Collect the pieces of firewood in the most convenient place for the machine.
5
Turn on the cutter. Start the machine and see how it works normally without placing the firewood. Make sure everything appears to be working properly and verify that it is as the manual indicates. [fifteen]
6
Place the firewood in the cutter. Follow the instructions in the manual for placing uncut firewood in the machine and removing it once it is cut. Regardless of the type of gear you use, once you turn it on, always be careful while around. [16]
Tips
- Choose the most suitable ax for the job. Identify when you should use a normal ax, a double-edged one, a mallet, a wedge, among others.
- Pay attention to the ground and be careful if you see an uneven area. Also, be aware of where the people around you are.
- Learn from an adult or someone with experience using axes.
- Never stand behind someone while using an ax.
- Use a sharp ax. Dull, your tool could slip, bounce and cause a more serious injury than if it were sharp. If you are not sure how to sharpen an ax, ask for help.
- When using an ax to chop wood, if you strike by tilting the head of the ax slightly to the side, it will be less likely to get stuck in the chopping block, but small pieces of wood will be thrown out.
- Let the ax do the work. In other words, take a quick, controlled strike and relax just before the ax hits the wood. In the last seconds of the hit, you are simply a guide. This will prevent the additional impact of the blow from being transferred to your muscles and you will be able to chop wood for longer.
Warnings
- Do not put your hand or fingers on the piece of wood you are going to cut to support it or keep it stable. You could seriously injure yourself or even cut your finger while chopping wood, since to do this, you usually hold the smaller pieces with one hand while using the ax with the other. If you instead hold the piece of wood loosely by the sides, any accident would simply cause you to hit your gloved hand without causing further damage.
- Never stand behind or too close to someone while using an ax.
- Wear thick gloves, boots or shoes, and goggles.
- If you have severe back problems, do not attempt this unless you are completely confident that you have the physical ability to chop wood.
- Stand with your legs apart and place the firewood you want to cut in the middle. This way, if the firewood falls or if you miss the target, there is less chance that you will hit yourself and break your leg as the ax continues its course.
- Do not use a dull or damaged ax. Before using it, examine the head and handle, as well as the method applied to join them.
Things you will need
- wood for firewood
- ax
- gloves
- goggles
- cradle