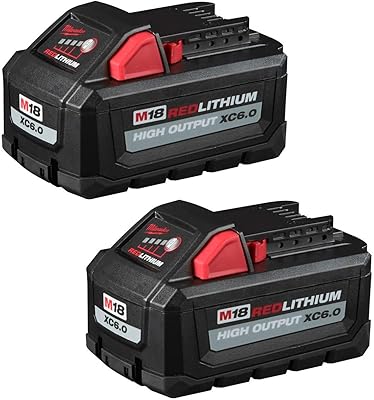
Product will either come in original packaging that is in less than perfect shape and has been opened to inspect contents or will come in non-retail packaging (brown/white box or white/clear bag). REDLINK Intelligence: Our battery circuitry provides optimized performance and overload protection using total system communication between tool, battery and charger
Best-in-class construction: Offers long-lasting performance and the best protection against jobsite, weather and environmental conditions
Fuel gauge onboard: Displays remaining run-time
Versatility: Powers all 175-plus M18 cordless solutions
Compatible with all M18 tools
Battery expansion pack
Blink cameras can operate normally for two years on a pair of AA lithium metal batteries. For indoor (gen 2) and outdoor cameras, the Blink Battery Expansion Pack provides up to 2 years of bonus under normal use, giving you up to 4 years of camera operation. The battery expansion pack is not compatible with Indoor (gen 1), XT, XT2 and Mini cameras.
The Expansion Battery Pack replaces the pair of batteries in your camera with four batteries found on the back cover of your camera.
Note: The reset button on the camera is accessible when the expansion pack is in place, but the Micro USB socket is locked and the serial number QR code label is covered.
To add or re-add a camera with the attached battery extender pack, you must do one of the following:
Please record the serial number of the camera before installation and enter it manually when requested by the application. Remove the battery expansion pack to access the serial number and QR code label when prompted by the app.
Installing the battery expansion pack
1. Remove the back cover and batteries from your camera. You will find detailed instructions here . Align the USB power port with the opening in the expansion battery pack.
2. Place the expansion pack by pressing it evenly over the camera's battery hole. You can press the tab holders or on the four tab locating triangles engraved on the expansion pack until the tabs click into place.
3. Check the fit by separating the two objects. If there is no movement, follow the battery example engraved on the expansion pack (shown here in red) to install the four AA-size non-rechargeable lithium batteries.
4. The battery expansion pack has a notch in the housing that exactly corresponds to a sample on the back cover of the camera. Align the notches and then hold the cover in place while holding the screw bracket. Turn the screw clockwise (to the right) until it is snug and the cap is flush with the surrounding edges.
If you don't use the mounting hole, replace the silicone screw cap, then check the camera operation and the batteries to make sure everything is correct.
For more information on mounting your camera click here .
Remove the battery expansion pack
1. Remove the back of the camera from the expansion pack. You will find detailed instructions here .
2. Remove all batteries from the expansion pack. You can use the opening tool to remove the batteries if necessary. Never use sharp or metallic objects to remove batteries .
3. Squeeze one of the tab holders toward its closest edge and this should release the clip. Repeat this on the other side and then remove the battery expansion pack. Note that you can use the opening tool to pry if you need to, even if you use only the necessary force to release the fixing clips.
4. After inserting a new pair of AA lithium batteries, you can replace the back cover of the camera and fix it with a screw and screwdriver.
The back cover should be flush with the camera housing, so you should not overtighten it. Install the screw cap if you don't use a bracket.
Mounting with the battery expansion pack
With a battery expansion pack and four batteries in place, the camera weighs more and is 'longer' than before. Because of this, gravity has a greater effect on the position of the camera. The right angle adapter included with the camera places weight away from the fulcrum of the mount, which can cause the camera with the battery to drop or slowly change position over time.
When the battery expansion pack is attached, we highly recommend using the bracket directly, without the right angle adapter.
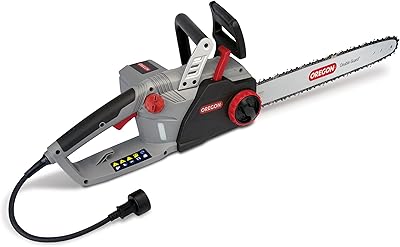
Oregon CS1500 18 in. 15 Amp Self-Sharpening Corded Electric Chainsaw
About this item
Includes 18” guide bar and PowerSharp chain, which minimizes downtime by allowing you to sharpen your chain right on the saw in 3 seconds or less.
Get to work right away with the instant start capability
The chain stays oiled using the built-in Lubri-Tec oiling system which reduces chain friction and increases the saw’s run time
No assembly required; comes pre-assembled
Low noise, silent between cuts. Chain brake for added safety
How to cut down a tree?
Cutting down a tree with a chainsaw requires method and prudence. Before starting the cut, take some time to familiarize yourself with the techniques and safety rules.
Discover in this video the step by step:
STEP 1 Prepare the felling
Take your time to reflect. Analyze the tree you are going to cut, take a good look at its structure and its possible tendency to lean to one side. Also observe its surroundings. Clear nearby vegetation for unimpeded work. There should be no obstacles around especially when you have to back up before the fall. The felling is carried out in two stages. On the side chosen for the fall, a V-cut of a minimum of 45 degrees is made, forming the so-called directional cut with a depth close to a quarter of the diameter of the tree. On the opposite side, 3 or 4 centimeters higher, a horizontal cut must be made, called felling cut, which will cause the tree to gradually fall on the opposite side. As you advance with the saw, the felling cut will open, causing the tree to rock before it falls.
STEP 2 Logging Direction cut:
If you work with a chainsaw with a heat engine, start it on the ground. Stand on the side chosen for the fall. Start with the downward part of the V-cut. Then make the horizontal cut to the bottom and remove the resulting wooden wedge.
The felling cut:
Stand on the other side of the log. Start a felling cut parallel to the bottom of the V-cut but 3 to 4 centimeters higher. Insert a wedge a few centimeters lower to avoid a possible blockage.
Continue with the cut:
When the weakened trunk begins to open slightly, leave everything behind and walk away quickly since the fibers in the union area will gradually give way and the tree will begin to fall.
STEP 3 The cut in the ground
Pruning:
Prune the branches when the tree is already in the ground. Pay close attention as the stresses can cause the chainsaw chain to lock or kick if you are not careful. Always stand on the other side of the trunk to cut the branches. In case of false moves, your legs should always be out of reach. Pay attention to where you place your feet so you don't slip on a piece of wood.
Tree in tension:
If the trunk rests on its limbs, make a cut one-third the diameter of the trunk at its top. When you finish the undercut, keep an eye out for a hypothetical effect of rotation of the trunk when breaking.
Chop the trunk:
If the log is not too heavy, put a log underneath to make the cut easier and prevent the chain from blocking. Always be on guard and beware of a possible twist when the trunk breaks.
Merece 4 Inch Mini Chainsaw 20v 1.5Ah Cordless Electric Chainsaw Battery Chain Saw, 1.1KG One Hand Chainsaw for Garden Bush Tree Branch Pruning Shears Wood Cutting
About this item
【Highly Efficient Cutting】Merece electric chainsaw adapts high-quality guide chain which has undergone a deep quenching process ensures smooth cutting. The powerful motor and unique chain tooth design make the electric chain saw faster and more efficient. The cutting speed can be adjusted according to the intensity and operating conditions by the switch to meet different needs.
【Ergonomics Design】Merece mini battery powered chainsaw adopts an integrated guide plate that dissipates heat quickly and is very resistant to drop and abrasion. The ergonomic non-slip handle fits the hand and feels very comfortable. Widened baffle design can prevent wood chips from splashing during cutting to better protect the hand.
【Portable & One Hand Using】Merece 4-inch chainsaw with portable design makes it easy to carry. The body + battery weighs just 2.4lb and measures just 33cm(13inch) in length. You only need to hold it in one hand to do the work. You will not feel tired even if you hold it for a long time. It can also easily controlled and used by women. For safety, please pull out the battery pack of the electric chain saw when not in use.
【Easy Install & Operate】Merece chainsaw comes with an English installation manual, and it only needs simple steps to install successfully.1.Install the chain into the guide plate, then install them to the chainsaw body. 2. Install the side cover and tighten the screw nut. 3. Use the screwdriver in the package to adjust the tightness between the chain and the guide plate. The charging time of 20V 1.5AH battery is 2 to 3 hours, and the working time is 15 to 20 minutes.
【Wide Application】Merece cordless chainsaw is very suitable for gardening pruning, bush pruning, small branch pruning, wood cutting, widely used in gardens, parks, farms, highways, pastures, orchards, greenhouses.(Please note that the chainsaw is mini and its maxi cutting length is 10 cm.) Please note that it is normal for an electric chain saw to spark during use. With excellent after-sales service, any questions will be replied within 24 hours.
HOW TO CUT A TREE CORRECTLY
Cutting down a tree, in addition to physical effort, requires technique. Likewise, it is something that can be done, but it must be planned carefully and have adequate equipment for your safety. In the case of inexperience, it is preferable not to try to fell very large trees.
PREPARATION
The first thing we have to do is know if we can cut down the tree we want . If the tree is in your garden or plot, it does not mean that we can cut it down.
Before "cutting our losses" we must first consult with the relevant local institutions, since a series of notifications or licenses are required which, if not requested, may entail high fines.
PLANNING
When you have the appropriate permits, it will be time to plan the felling . When going to the area it is important to be equipped with a helmet, gloves, acoustic protector, safety boots and protective pants.
Make sure you are accompanied in case something happens and that you have a mobile phone handy so that you can quickly request help.
Remember to check that you have enough fuel in the tank for felling, as it is very dangerous to run out of it during the maneuver.
First, we must analyze the natural fall path of the tree:
- Are you leaning to one side?
- Do their branches predominantly hang to a specific side?
- Which way is the wind blowing?
- How steep is the terrain?
In the case of not being clear about the direction of the fall, stay away from it and check it with a plumb line.
PRUNE THE TRUNK
Before we start to fell the tree, we must remove all the low branches that you can so that they do not disturb during the process.
Remember not to cut higher than your shoulders and not to stand directly behind the chainsaw. The trunk should always be between the person pruning and chainsaw .
CLEAR THE SAFETY ZONE
When we finish pruning the trunk, we will proceed to clean the security zone. We must first clear the area around the planned drop area.
Afterwards, it is important to clear any obstacles around the tree and in a 45 degree zone behind the tree in both directions .
This step is essential in case we must look for a quick escape route , so that we do not encounter any obstacle that hinders our passage.
HOW DO WE FELL THE TREE?
Stand behind the tree with your feet apart and rest your left shoulder against the trunk to be steady and steady.
Once positioned, direct the top of the front grip in the direction you want the tree to fall.
To knock down a tree in the right direction we must cut a kind of hinge in the trunk, which will direct the path of the tree. In addition, we must cut a wedge on the side that we want the tree to fall.
Step 1 Cut in the lower part of the tree in a directional way respecting a 45 degree angle with respect to the horizontal of the trunk as shown in the previous diagram.
It should be about 1/4 to 1/5 of the diameter deep . In this step remember to hold the front handle of the chainsaw.
Once this is done, we will saw parallel to the ground, closing the shape of the wedge.
Worker cutting log
Step 2 Next we will cut, on the opposite side to the first step, a felling line 2 centimeters above the cutting point. It is essential to leave a distance or hinge between the cut and the felling line.
Step 3 To ensure the direction of fall , we will use a wedge with a hammer or knockdown lever on the felling line. This will prevent the tree from falling backwards.
TREE GOES!
When the cuts are complete, put the chainsaw on the ground and raise the felling lever or drive the wedge further to bring the tree down. According to the tree falls, we must move away to the side and back, so that the roots do not rise hit.
Planning to cut down a tree
If the tree gets stuck against another tree , you can use a winch to free it. This task is complex and very dangerous, it is only suitable for professionals, ask for help by phone while you watch the tree. It is very important never to leave a half-cut tree unattended .
If the tree is rotten, felling in the natural direction of the tree's fall and using a winch if you are unsure. Rot usually affects the higher areas of the tree less, so one option would be to tear it down leaving a stump that is taller than normal.
Remember that it is important, for safety, to try to cut down a tree if it is very windy to prevent it from knocking it down and causing possible damage.
We hope this article has been helpful! Visit our YouTube channel for more tips.
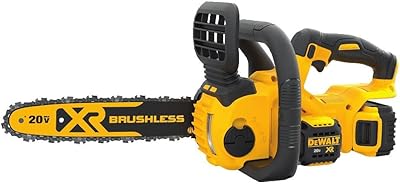
DEWALT 20V MAX XR Chainsaw Kit, 5-Ah Battery, 12-Inch (DCCS620P1)
About this item
Low kick back 12" Oregon Bar and chain: for construction and outdoor cutting applications
HIGH EFFICIENCY BRUSHLESS MOTOR: maximizes run time and motor life
Tool free chain tensioning and Bar tightening knob: for proper Bar clamping force
Compact and lightweight design: Only 8.8 lbs. for maximum user control and comfort
Part of the 20V max system of tools
Chain Speed : 25.2 feet/second
Six steps to felling a tree correctly
When felling trees, it is essential to use proper work techniques, not only to create a safe working environment, but also to increase work efficiency.
1. Preliminary planning
When it comes to felling trees with a chainsaw, preparation is key. By planning the logging and the forestry equipment you are going to bring, not only are you making the workday safer, but you are also making post-logging work much easier. First, ask yourself if there are any major obstacles in the area, such as power lines, roads, or buildings. Distribute warning signs if you know that there is a road through the forest area or that there are many people passing through that area on a daily basis.
2. Check the direction of fall
Next, determine the direction of the fall by carefully studying the tree. What do the branches look like and how do they grow? Also take into account the direction of the wind. If you are unclear about the tree's natural fall direction, stay away from it and check it with a plumb line (see the data chart for information). Clear the area around the tree's intended fall direction. Also clear a 45-degree zone behind the tree in both directions to create an escape route.
3. Prune the trunk
When you've cleared the area, post your warning signs in the direction of the tree's fall and your chosen escape route. You must check that you have enough fuel in your tank for the task ahead. Then it will be time to prune the trunk to get rid of all the large and small branches that can get in the way when making the felling cut. The safest way to prune is to do it with a pull chain (under the bar) from the top down.
4. Decide on the cutting technique
Once the trunk has been pruned to shoulder height, it is time to make the felling cut. When doing so, it is important to remember two things: the hinge must be of uniform thickness with the proper dimensions and the knockdown wedge or ripper bar must be inserted before the tree can engage the bar. The cutting technique to use will depend on the size of the tree and the slope, as well as the size of the chainsaw. Here we have compiled information about the different techniques, so that you can find for yourself the method that best suits your conditions. / insert link to proper passage in "working with chainsaws" /
5. Check the tree for diseases
If you notice that the wood is discolored and soft or if the lower part of the trunk looks swollen or diseased, you should be very careful. This indicates that the tree is rotten and the fibers of the wood are weakened. If this happens, log in the direction of the tree's natural fall and use a winch if you are unsure. Rot normally decreases the higher up the tree, so one option would be to knock it down leaving a taller than normal stump.
6. Choose the tool
You can choose from several felling tools when felling a tree. The size of the tree determines the type of forestry equipment needed. For smaller trees, felling tools are not usually necessary. The manual force is sufficient, perhaps with the help of a long bar. The knockdown wedge offers greater knockdown force than the different types of ripper bars. In extreme cases, you can use a rope and a winch, which are the safest and most powerful way to fell a tree. Take a look at the data box to learn more about the different tools available.
How to calculate tree height
Hold a stick with your arm extended straight in front of you so that the length of the stick equals the distance between your eye and your hand; Next, hold the stick upright so that a right triangle forms between the eye, the hand, and the top of the stick.
Aim at the tree and stand at a distance where the tree appears as tall as the length of the stick. If the tree is leaning, you will get more accurate results if you measure from the side, so the tree is not leaning towards you or the other way.
The distance between where you are and the tree will be equal to its height.
How to measure the slope of a tree with a plumb bob
Aim the plumb bob toward the top of the tree trunk.
Measure the distance from the point of impact of the plumb bob to the center of the trunk.
Felling tools
The standing stripper bar is suitable for thinning small trees. Insert the tool before completing the felling cut and support your full weight on the lever arm. The ripper bar is usually telescopic and can be carried in a tool belt holster.
The ripper bar is used on relatively small trees. To maximize lifting force, insert the tool (before completing the felling cut) into the center of the felling cut as far back as possible. Do the lift with your legs and keep your back straight.
The impact bar is used in the same way as the ripper bar, although it can also be used as a striking tool when using demolition wedges.
Falling wedges are ideal for medium to large trees. They are inserted before completing the felling cut and struck with an ax or impact bar. Always use plastic or aluminum wedges to avoid the risk of damaging the chain if you accidentally cut them.
The winch is used in situations where maximum strength and safety are required. To achieve maximum effect, the cable is placed as high as possible in the tree.
WHOLESUN 3000PSI Electric Pressure Washer 2.4GPM Power Washer 1600W High Pressure Cleaner Machine with 4 Nozzles Foam Cannon,Best for Cleaning Homes, Cars, Driveways, Patios (Blue)
About this item
HIGH PRESSURE FOAMER CANNON: As a high pressure foamer, the polymer corrosion-resistant detergent bottle can loose tough stuff or remove deep stains.
HIGH PRESSURE CLEANER: Powerful 1600-Watt motor generates up to 3000 PSI/2.4 GPM.Perfect for siding, decks, cement, pavement, pools, outdoor furniture, cars, trucks, RVs, ATVs and more.
LEAKPROOF CONNECTIONS: Professional metal garden hose connector and 22mm metal water outlet. Comes with a 20ft high-pressure hose (metal connection) to avoid annoying water leakage.
TOTAL STOP SYSTEM: Power Pressure Washer Features Safety Automatic Total Stop System (TSS), which automatically shuts off the pump when trigger is not engaged to save energy and prolong pump life. We provide 33 ft power cord with inline GFCI for use on all exterior outlets.
CUSTOMER SUPPORT: We provide a 2 year warranty, if you have any problems with your high pressure cleaner, you can contact us at any time. If you are not satisfied, you can get a full refund within 30 days! !
How to remove blood stains from concrete surfaces
If you have an accident that results in injury, you may need to be prepared to remove blood stains from surfaces around your home. If allowed to sit, blood can easily cause unsightly marks on a variety of surfaces, from furniture to carpets, clothing, and more. If you accidentally end up with a blood stain on a concrete surface, acting quickly is one of the best ways to ensure that all traces can be removed properly. Read on for a short guide on how to do this.
Step 1: clean up fresh blood
If you can target the affected area immediately after the accident, the first thing to do is clean up any excess blood that may be accumulating on the ground. Use a clean cloth to rub it in and avoid rubbing as this could spread the stain. Continue until you have removed all excess liquid from the soil. Wear gloves while doing this and be very careful not to spread the blood and make the stain worse. Gloves are also important for your own safety, as someone else's blood may be contaminated and capable of spreading disease.
Step 2 - Scrub the dry areas
Use a stiff-bristled brush to scrub the bloody patch. The objective is to get the dry particles in the concrete to loosen and peel off. Continue to go over the stain for about 10 minutes or until the blood has completely come off.
Step 3: sweep up the debris
If all or some dried blood has come out, use a broom and dustpan to sweep it up. This will generally work well if the spill is older and has had a chance to dry completely on the concrete surface. However, it can be tricky if the accident just happened. Dispose of waste in a safe and healthy manner, following the legal guidelines regarding hazardous waste disposal in your area.
Step 4: apply a detergent mixture
In a small bowl, mix one part liquid dish detergent with three parts water and stir until the contents are completely combined. Pour a small amount of the solution onto the stained area and then continue scrubbing vigorously with the stiff bristle brush. See if the stain begins to appear or if you will need a stronger method. Wipe up the liquid with a clean cloth or paper towels if successful.
Step 5: treat with hydrogen peroxide
If the stain still persists after you've completed all of the above steps, pour a small amount of hydrogen peroxide on the area. Let it sit for about 15 minutes so it begins to break down the blood and then scrub it once more with the stiff bristle brush. Wipe off the peroxide with another clean cloth or paper towel. Re-examine the stain; if it's still there, treat it with another dollop of hydrogen peroxide and rub until it comes off.
How to remove dry cement
Cement is one of the most used materials in construction and home repair. Learn how to clean dry cement from tiles, how to remove cement from metal and clothing with these tips.
Cement is a somewhat complicated material to handle, especially if we are doing a project on our own at home. The problem with working with cement is that it can fall on unwanted surfaces, and if it dries it is difficult to remove. But don't worry, we have the best solutions and techniques on how to remove dry cement from your floors and even your clothes. Discover them below!
How to remove dry cement from tiles
You made repairs at home and are wondering how to remove cement residue from the floor? We are going to teach you how to clean dry cement on tiles step by step: Buy a cement remover product at a hardware store. The most common is the so-called RC-10.
Wear protective gloves and goggles when working with these types of chemical materials
Apply the product on the cement stains and let it act for 5 minutes.
Scrub the tiles with a brush to remove the now thinned cement.
Dry the area with a cotton cloth.
Repeat the process if necessary, until all the dry cement stains have been removed from your ceramic floor.
Lastly, clean the floor with a cloth dampened in clean water.
How to remove cement from metal
For metal surfaces, such as aluminum windows or doors, the cement removal process is similar.
If there are coarse cement residues on the metal, try removing them with a putty knife. Then use the cement remover liquid, let it work and wipe with a clean cloth
How to clean contact cement from clothing
Now that you know how to clean cement-stained ceramic floors, it's time you learned how to remove cement from clothing. Pay attention to these tips:
How to get cement out of clothes:
If you stained your clothes with dry cement powder, don't get it wet!
Using a stiff bristle brush, brush the garment on both sides to remove as much of the cement dust as possible.
Wash the garment in the washing machine normally, but do not mix it with other clothes.
In the case of wet cement stains, with a blunt knife or spatula, remove the cement from the fabric, and apply a few drops of cement remover to the fabric to remove the rest of the cement.
Be careful when using these chemicals because they can damage fabrics. Try the product on an inconspicuous area of the garment first.
Wash the garment as usual.
Key steps:
When working with cement, wear old clothes that you don't mind getting dirty. You will save yourself trouble.
Cover all the surfaces in the areas where you use cement with a cloth or sheet, or prepare the cement outside your house.
If you do get stained with cement, act fast to remove the stains effectively.
Westinghouse Outdoor Power Equipment Electric Pressure Washer 1500 MAX PSI 1.5 GPM with Anti-Tipping Technology, ePX2000, Foam Cannon with Adjustable Spray
About this item
1500 max PSI of deep-cleaning water pressure and up to 1.5 GPM water flow - Adjustable spray wand with easy-coil nylon-braided 15' hose
Super compact and lightweight at 14” tall and 15 lb. for convenient storage and portability - Four Quick-Lock wheels with 360° steering design and low center of gravity engineered for anti-tipping design
Foaming soap cannon with 10 oz (300 mL) detachable bottle to add detergents/chemicals for versatile cleaning power on decks, driveways, garage floors, stairs, fencing, patio furniture, and vehicles
Pump automatically stops when trigger is not engaged to conserve energy, prolong pump life, and added safety
Backed by 3-Year Limited Manufacturer Service, Labor, and Parts Coverage
CLEANING CONCRETE SURFACES
Concrete stained surfaces can be cleaned, but to guarantee results you need to know the type of cleaning and the appropriate procedure in each case. To do this, nothing better than reading this article and others that will follow, as they contain everything there is to know on the subject.
Cleaning should be done in a way that removes dirt without neglecting the concrete. The structure and color of the cleaned surfaces must not differ from the untreated surfaces. In principle, three cleaning methods can be used: 1
cleaning by washing (softening of the dirt and its elimination with water);
dissolution cleaning (dissolution, absorption).
Sometimes all three methods are combined or used one after the other.
Stains on concrete surfaces
Soot, dust, sand, rubber particles, greasy materials, etc. are deposited on concrete surfaces. Lime efflorescence is also frequently added to newly finished concrete elements, rust stains, microorganisms, plants, as well as products of the reaction of cement paste with compounds in the air.
Initially, these deposits usually only damage the appearance of concrete elements, but do not directly reduce the functional capacity or durability of the same. Even certain layers of dirt are transformed into protective layers (patina). However, these crusts can also contain contaminating materials that damage the materials they cover. The faster a stain is removed, the greater the chances of success. Old stains can spread on the surface or penetrate deeply and are often solidly bound to the hardened cement paste, with which they sometimes react, with effects that make cleaning more difficult. On the other hand, it sometimes happens that mixtures are formed with the stains that were already in the concrete before,
Criteria for choosing cleaning methods
In general, the procedure should be chosen that allows the desired effect to be obtained by the least aggressive means, and that does not attack, or that attacks very little, the hardened cement paste. In addition, care must be taken that other elements that are in the vicinity and are made of wood, glass, aluminum or plastic material, as well as the gasket materials, can be protected if they are at risk of being attacked. It goes without saying that the people doing the cleaning should always be out of danger, as well as other people, plants or animals in the immediate environment. The evacuation of water, sand, dust, etc., coming from cleaning, must be carried out in accordance with the provisions of the legislation. Before using a procedure to solve a cleaning problem for the first time, it will be necessary to test in an inconspicuous place. In the case of a wet test, the effectiveness of the procedure cannot be judged until at least one week later.
Procedures based on the use of a combination of solvents or chemicals, or even both, are well known as a way to remove many types of stains on concrete surfaces. This will be covered in the next issue.
The following list shows different cleaning procedures in order of increasing efficiency and, for unidentified stains, it is advisable to use the first one that achieves the desired effect.
Dry rubbing with a stiff brush
Surface wetting, dry rubbing with a hard brush, low pressure water jet washing
Cleaning with a high pressure water jet or steam
Cleaning chemicals (for example, acids or bases)
Sandblasting or other abrasive
Torch cleaning
At least the last two of these procedures erode the concrete to a greater or lesser extent, generally requiring a coating to be applied immediately or other measures to be taken. Some of the main non-chemical procedures for cleaning concrete surfaces are listed in Table 1.
For delicate concrete surfaces it is advisable to use procedures whose degree of aggressiveness increases more slowly:
Water with a soft brush
Mild soapy water
Strong soapy water
Stronger soapy water and ammonia
Stronger soapy water and vinegar
If that does not work, it will be necessary to resort to stronger products.
Wet cleaning
Cleaning with water is one of the procedures that mistreat concrete the least. It is effective only when the stains are only on the concrete surface and have been fixed there by water-soluble compounds, such as gypsum (CaSo4.2 H2O). (Gypsum results from the reaction of calcium hydroxide [Ca (OH) 2] coming out of the water contained in the pores of concrete, with the sulfur dioxide [SO2] contained in the air.) Here, different degrees of cleaning are also possible:
Cold water cleaning without pressure
Cleaning with cold water under pressure
Pressureless hot water cleaning
Cleaning with very hot water (steam)
For cleaning with water under pressure, flat nozzles and special discharge systems are commercially available.5 High pressure water jets can also be used to remove thicker or thin layers of concrete. The cleaning effect of the different procedures can be improved by the addition of soap or other surfactants (surface agents), particularly for the removal of greasy surface stains. When water is not enough to remove softened staining matter, brushing is often indicated.
Mechanical and thermal cleaning procedures
There are numerous variants of mechanical cleaning procedures. All cause a more or less great loss of matter, which damages the surface, and it is the case that it remains in such a way that it suffers new stains. Generally used: 2.6
Cleaning by hand with
brush or broom
cellular glass
water resistant sandpaper
Mechanical cleaning with
circular brush
strawberries
corundum discs
Spray cleaning with
sand
wet sand
grain
jet of water under pressure
jet of water under pressure combined with sand
thermal cleaning
blowing with special nozzle
Many small stains can be removed by simply scrubbing with a stiff non-metallic brush, fine pumice stone, or cellular glass. This type of rubbing can also serve as an auxiliary means for cleaning by the wet method. If done properly, this rubbing does not damage the concrete surface at all. However, do not use mechanical brushes (steel or brass), because fine metal particles can cause color changes.
Sand blasting 2, 3, 7 lends itself to the removal of numerous impurities that have not penetrated deeply into the hardened cement paste. This abrasive treatment pulverizes and removes dirt particles as well as some of the surface layer. Since there are many abrasives available (blast furnace slag, silicon carbide, quartz sand, walnut shells, etc.), you can choose the blasting method that damages the substrate as little as possible. The blasting, however, is little appreciated as a cleaning procedure because, despite all the precautions, the loss of material is inevitable, the surfaces become rough and, therefore, more exposed to the influence of the environment. Also, this procedure generates a lot of dust and noise,
Wet blasting is less aggressive than dry blasting.2, 3, 7 Although some of the same abrasives are used as for dry blasting, the surface stresses are lower, and less dust is produced. With thermal cleaning, using a special 2.6 torch with an oxyacetylene flame, the concrete surface is subjected to such stress that the upper area disintegrates and partially separates. Rubber particles, as well as oil stains and other organic compounds are well removed as they burn.
Chemical cleaning procedures in general
The specialized literature informs us of a great variety of chemical products that allow removing certain stains from the concrete surface. We can add products that exist in the market and that have been perfected for certain applications.
This variety can have its risks, and requires great prudence on the part of users, as well as protection of the people who apply them; improper use can cause irreversible damage. To avoid this, it is necessary to call specialists, or inquire well in specialized publications. Inexperienced employees must be carefully updated on their new assignment.
The effect produced by chemicals on stains can be very diverse. In general, acids chemically react similarly with the surface of concrete. Often times, alkaline products and surfactants do not dissolve stains but emulsify them, that is, they give them a shape that allows them to be washed away.6
For many uses of chemicals, the procedure is almost always the same: the surface is carefully moistened so that the chemicals applied quickly by spray or brush do not penetrate too deeply. It is immediately rinsed with plenty of water, after a reaction time that should be as short as possible. It may be necessary to repeat these operations several times.
Acidic cleaning products
En el momento de utilizar ácidos, es particularmente importante el humedecimiento previo del concreto, ya que la mayor parte de los ácidos reaccionan con la pasta de cemento endurecido. Por la misma razón, una vez que ha terminado la limpieza, es necesario enjuagar hasta que el agua de lavado sea casi neutra. Las pruebas de neutralización con atomizador de las soluciones alcalinas no son aconsejables, pues es imposible conseguir una dosificación precisa.3
The most frequently used acids are the following: muriatic acid, phosphoric acid, sulfuric acid, oxalic acid, acetic acid and formic acid.7 If necessary, it must be taken into account that muriatic acid and sulfuric acid cause the formation of ions of chloride or sulfate, which promote corrosion of concrete. For safety reasons, the use of hydrofluoric acid should not be used.3 Acids generally help to eliminate efflorescence. It is advisable to use dilute muriatic acid. The use of phosphoric or formic acid at 15 percent is also possible. The acid is sprayed on the previously moistened support, or spread regularly with a sponge or brush. After three to five minutes (end of foaming), rinsed thoroughly and eventually brushed with a stiff brush. In the case of strong efflorescence, it may be necessary to repeat this treatment.3 Working with acids involves several disadvantages. For example, the concrete surface becomes rough and of a darker tint, even if chemicals are used sparingly. Acid that has penetrated the concrete and is not washed off will eventually dissolve the ferruginous minerals, which can cause brown spots on the concrete surface. even if chemicals are used sparingly. Acid that has penetrated the concrete and is not washed off will eventually dissolve the ferruginous minerals, which can cause brown spots on the concrete surface. even if chemicals are used sparingly. Acid that has penetrated the concrete and is not washed off will eventually dissolve the ferruginous minerals, which can cause brown spots on the concrete surface.
Construction elements that cannot stand coming into contact with acid must be protected.
Alkaline cleaning products
Alkaline cleaning products - mainly sodium and potassium hydroxide - have the advantage over acidic products that they do not react, or react very slowly, with the compounds of the hardened paste. This advantage is negated by the fact that such products attack glass and aluminum, and that they force users to wear protective glasses and clothing. It is also necessary to collect and neutralize the wash water.
Alkalis are especially suitable for removing oil or greasy stains, since they saponify fats and neutralize fatty acids. The reaction products can be removed by rinsing with water.
Protection of people and the environment
It has been mentioned several times in the course of this article that man runs risks when using chemicals. Employees, above all, have only some knowledge of chemistry and should not handle chemicals unless they have received sufficient instruction and are adequately protected. And, as necessary, the environment must also be protected against the action of chemicals.
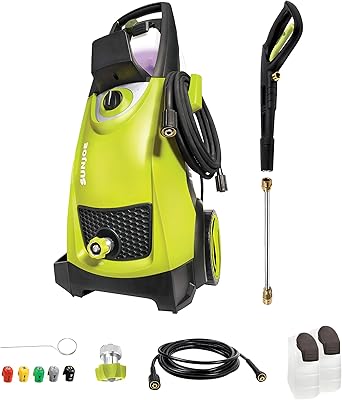
Sun Joe SPX3000 2030 Max PSI 1.76 GPM 14.5-Amp Electric High Pressure Washer, Cleans Cars/Fences/Patios
Brand Sun Joe Power Source Corded-electric Color Cleans Cars/Fences/Patios Item Dimensions LxWxH 15.6 x 13.5 x 33.9 inches Maximum Pressure 1450 Pound per Square Inch Item Weight 31 Pounds Hose Length 20 Feet
About this item
Power Source Type: Corded-Electric
HOW TO CLEAN CONCRETE SURFACES OF GREASE, OIL AND DIRT
In Concrete Surface Preparation - Part I , we discussed the detection, removal, and repair of unsound concrete. The next step is to remove the contaminants from the concrete. However, we cannot proceed directly to sandblasting, for the same reasons that steel sandblasting does not start immediately. Dirt, dust, and other loose contaminants will inhibit build-up and can be removed by first sweeping, vacuuming, blowing with air, or spraying with water.
Hydrophobic materials, such as oil, grease, and stripping lubricants also inhibit adhesion and must be removed. It's tempting to remove them by sandblasting the contaminated layer, but that can exacerbate the problem by spreading contaminants over previously uncontaminated areas. Recommended methods of removal are scrubbing with a brush, water and detergent, steam cleaning, and low pressure washing (less than 5000 psi) . Some chemical cleaning methods are appropriate, but solvent cleaning is not. Unlike steel, concrete has pores and cracks that solvents can enter, which inhibits adhesion formation.
A detailed discussion of acceptable methods for surface cleaning can be found in SSPC SP 13 / NACE No. 6 - Concrete Surface Preparation.
Efflorescence
Efflorescence is a powdery, crystalline deposit that slowly forms as moisture seeps soluble salts to the concrete surface.
Efflorescence is an aesthetic problem, not a structural one, but must be addressed when the concrete surface serves as a cover. If not done, efflorescence will cause unsightly stains under sealers and decorative finishes.
Being a soluble salt, efflorescence can be removed by scrubbing with a brush and water, power washing, or with a light blast of abrasive steam . However, unless the underlying moisture problem is resolved, the efflorescence will return.
Humidity problems
If the relative humidity of the air is less than that of the cured concrete slab, the moisture will be drawn from under the slab to the surface, causing efflorescence, mold, and emulsion of flooring adhesives. Where sealants and other waterproof coatings block vapor flow, delaminations and blistering can occur. The solution is to install a vapor barrier under the slab.
There are two common tests for the relative humidity of concrete:
Plastic sheeting test. A plastic sheet is glued to the concrete surface and left for 16 hours or more, then removed and inspected for condensation. See ASTM D4263
Calcium chloride test. A plate with calcium chloride is weighed, placed on the concrete surface, and sealed under a dome. About sixty or seventy-two hours later, the plate is weighed again. The increased weight of the sample indicates the amount of moisture absorbed, which is used to calculate the moisture vapor emission rate (MVER).
Grout
Grout is a weak, friable layer of cement and fine aggregate materials carried to the surface by water exiting the concrete. It is the result of excess water in the mix or excess water that has occurred during curing, and is always present to some degree in new concrete.If grout is not removed, repairs, layers and coatings, because the friable layer has poor material strength. However, cement grout is tough enough to warrant removal by abrasive blasting, sandblasting, grinding, high pressure water blasting, or acid washing.
Grout appears when the concrete surface is scraped with a sharp object, leaving a dusty residue.
Curing compounds are applied during the curing process to seal the concrete and retain water for cement hydration. By sealing the pores in concrete, curing compounds inhibit the adhesion of mortars and coatings. Adhesive layers and coatings above present the same problem. The solution is to remove the concrete layer below the penetration level of the compound by abrasive blasting, shot blasting, high pressure water blasting, or by mechanical means.
With healthy, contaminant-free concrete, all that's left is to properly scrape the surface, but to what extent? In Part III of our series on Concrete Surface Preparation, we will discuss the specifications of structures and blasters to agree on the number of profiles needed, and examine the various concrete surface preparation methods, their advantages and disadvantages, and their applications.