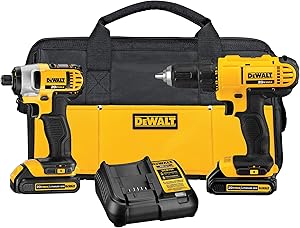
DEWALT 20V Max Cordless Drill Combo Kit, 2-Tool (DCK240C2)
- DCD771 in cordless drill combo kit features 2 speed transmission (0-450 / 0-1500 RPM)
- DCD771 high performance motor of cordless tools combo kit delivers 300 unit watts out (UWO) of power ability completing a wide range of applications
- DCD771 compact, lightweight design of the drill/ impact driver combo kit fits into tight areas
- DCD771 1/2-inch single sleeve ratcheting chuck provides tight bit gripping strength
- DCD771 Ergonomic handle delivers comfort and control
- DCF885 Compact (5.55-inch front to back), lightweight (2.8 lbs) design fits into tight areas
- DCF885 1-handed loading 1/4-inch hex chuck accepts 1-inch bit tips
- DCF885 features 3 LED light ring withe 20 second delay to provide visibility without shadows
Cordless Drill: Which is the best in 2021?
Welcome to ReviewBox Brasil. Today you will find out which are the best models of cordless drills that can be found on the market. Let's talk about the differences between the main products and what you should pay attention to before making your purchase.
Who has never had to hang a picture on the wall, for example? Or fix a shelf? To carry out these and other activities, a cordless drill is very important. That's because it makes work easier and avoids the use of hammer and nail.
Having your own equipment also gives you more independence. With the drill, you don't need to ask for help from a neighbor to perform these services. So, read on to get to know all the features of a cordless drill.
- First, the most important
- Drills and screwdrivers are different equipment. Some models of drills, however, also have a screwdriver function.
- Pay attention to the amount of accessories available. Some brands offer different parts such as gauges and screws, which can be useful in everyday life.
- A cordless screwdriver can cost between R$200 and R$600, depending on its quality and accessories.
Best Cordless Drills: Our Favorites
Let's now introduce the four best cordless drill models. To build this list, we take into account the main features of each product. Please read carefully and decide which one fits your needs best.
Black+Decker LD12SC Screwdriver/Drill Kit
This model has the functions of a drill and screwdriver. The chuck measures 3/8” and the product has reversible, variable and lock speed. The equipment unites strength and speed in a single piece. Torque reaches 16NM and speed reaches up to 900 RPM.
The 12V battery is lithium. The charger is dual voltage. The set comes in a case and comes with 31 accessories, 30 bits for screwing, in addition to a magnetic adapter.
Rotary Hammer Worx 3-in-1 Cordless Perforator
At this time, the selected product is not available from the supplier. Therefore, we replaced it with another one with similar characteristics. To report a problem.Das Problem mit diesem Produkt wurde gemeldet. Danke!
The model from manufacturer Work is considered a 3 in 1. In addition to a drill and screwdriver, the equipment is also an SDS hammer.
Includes a mandrel that holds cylindrical drills, concrete drills and screw bits. One advantage of this product is flexibility. With it, it is possible to use standard drills and tips that the user already has.
It has a 12 V powershare system with batteries interchangeable with other tools. Despite being compact, the tool has a pneumatic mechanism for efficient drilling in concrete.
Stanley SCD12S2K-BR Screwdriver / Drill
Stanley's line of cordless tools is versatile and performs well. The size is compact and the equipment's weight is low.
With these features, it is possible to drill and screw hard-to-reach areas. The two-finger trigger is electronic and has variable and reversible speed. The set comes with a battery and a dual-voltage charger. Charging time is 70 minutes.
Stanley Screwdriver/Drilling Machine CD121K100-BR
This model is variable speed, reversible and has a lock. Torque control has 17 positions.
Power is 12 volts and comes with a dual-voltage charger. The set comes with 101 pieces. Among them are ratchet wrench, guides for 1, 2 and 3” screw-on tips, sockets, screws and double-ended bit.
Buying Guide
In this guide, we'll introduce you to the main advantages of a cordless drill and what you should pay attention to when choosing yours. Before going shopping, it is ideal that you know how you will use this equipment. Depending on usage, a specific model may be best.
Man using a cordless drill.
What is a cordless drill and what are its advantages?
The cordless drill, as the name implies, is a tool that serves to drill surfaces. It is used for installing and fixing objects on walls and also for electrical, hydraulic and mobile network devices, for example.
With drills, household activities like hanging pictures or assembling shelves are faster.
Technically, a drill is a machine whose function is to drill holes in any type of material. For this, the engine of this equipment applies a high rotation speed to the drills that make contact with the surface. As a result of this force, a hole is opened.
The main advantage of a cordless drill is the fact that it can perform everyday tasks without the need to be plugged in and therefore giving more speed and accuracy to the user.
On the other hand, a cordless drill can be a little expensive so you only want to use it once in a while. Furthermore, the fact that it is powered by a battery creates the risk that when you need it most, the accessory will simply stop working.
This, however, doesn't happen that often, as batteries are generally made to last a long time. Check, briefly, what are the advantages and disadvantages of a cordless drill:
Benefits
- Makes housework more practical
- It doesn't need to be in the socket
- Facilitates everyday tasks
Disadvantages
- cost may be high
- Battery could run out at any time
Professional or home use?
When choosing a cordless drill, the first step to be taken is to define whether it will be used professionally or just for home repairs. There are drills aimed at both types of audience. The difference is in the power and in the parts used in manufacturing.
Models intended for home use are used for small jobs and shorter periods. The power is around 600W and some versions make it possible to work in masonry.
The professional drill, on the other hand, can work for long periods, continuously and is capable of drilling through heavy materials such as concrete and steel. Power reaches 1100W. In this article, we're focusing on cordless drills for home use.
Cordless drill on white background.
Cordless or cordless drill? Which one to choose?
Cordless drills are suitable for more casual jobs, where a lot of power is not required. They are intended for use in locations where there is no access to an outlet. Anyone who needs mobility should choose this model.
This type of drill is heavier and bulkier, as it has an attached battery. Cord drills, on the other hand, have greater power and are lighter. This model is suitable for more professional use or in case a higher power is required.
cordless drill wire drill
power Smaller Bigger
Mobility Total Smaller
Weight Battery makes it weigh more Smaller, no battery
Use mostly domestic Domestic and professional
Should I choose a screwdriver model?
The main cordless drill models sold on the market are also screwdrivers.
Screwdrivers are machines that are used to tighten, fix or unscrew rivets and screws. With them, the screw is firmer than if it had been fixed with a screwdriver. To use this function, just change the tip of the equipment.
These days, it's very difficult to find a cordless drill that doesn't have the option of screwing. So, basically, this is not a question you should spend a lot of time thinking about. After all, it's not a bad thing to have a screwdriver at home to help with the housework as well.
Did you know that the drill appeared in the year 1889? The invention was the Australian engineer Arthur James Arnot. A few years later, German brothers Wilhelm Emil Fein and Carl Fein registered the first portable electric drill.
How much?
Cordless drills cost between R$ 200 and R$ 600. Prices may vary according to the power reached and also with the accessories that make up the set. Some models come with briefcases and various parts to make your work even easier.
However, if you just need to do simple jobs at home, a more common and cheaper model might suffice.
Where to buy?
To buy a cordless drill, you can go to a specialized tool store or large department stores, such as Magazine Luiza or Havan.
However, there is also the option to buy online. On the internet, there are many options for models, and you can check the evaluation of previous buyers of each drill.
In large retail stores such as Amazon, Submarino, Shoptime and Lojas Americanas, you can find several models.
Man handling a cordless drill.
Buying your cordless drill online can be an excellent option. (Source: rawpixel.com / Pexels)
Purchasing Criteria: Criteria for comparing cordless drill models
When buying, review all the details. By doing this, your money will be put to good use and you will not regret it.
So when choosing which cordless drill to take home, consider the following points.
- power
- Speed
- Chuck Size
- Handling handle
We will detail each of these items so that you can make the best choice.
power
The more power, the more power your drill will have. Wireless models have power measured in volts, based on the voltage of the battery. Simple tools have between 3.6v and 4v. They are able to handle small objects.
Tools with more than 10 volts can handle large screws and pierce hard surfaces.
Speed
Drill speed is controlled by a trigger. The more it is pulled back, the greater the speed of the drill. Equipment with variable speed control is a better purchase option.
A useful feature is the continuous actuation lock. With this function, the drill works without the need to continuously press the trigger.
Chuck Size
Chuck is the part that fixes the drill to the rest of the drill. In general, the larger the chuck size, the more power the equipment will have.
There are two main types. The 3/8 inch size one accepts drills up to 10mm. It's enough for everyday tasks.
The 1/2 inch chuck, which accepts up to 13mm drills, is intended for heavier jobs.
Set of drills on white background.
Some cordless drill models are purchased with drill sets and other parts. (Source: Pixabay / Pexels)
Handling handle
Make sure the drill handle is comfortable and firm. Ideally, you should be able to firmly hold and keep the equipment in the proper position.
This way, the hole will not get bigger than planned. This also prevents screws from getting loose inside the drilled channel.