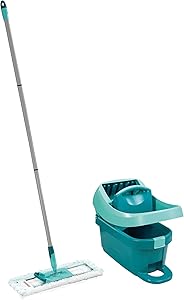
Leifheit Click System Wiper Press Profil XL, Mop and Bucket with Wringer Set Cleaning Tools, Turquoise/Silver
- Cleaning has never been easier with this hassle-free Leifheit mop and bucket with wringer set.
- Removable microfiber head and wringing device offers absorbency and mess-free cleaning.
- Ideal for tile, hardwoods, laminates, and other smooth flooring options.
- Crafted from steel and durable plastic to ensure stability and reliability through regular use.
- Measurements- Handle 57.5" H, Mop Head 18" Long, Bucket 15.25" H x 8" L x 11" W

How to Clean Dirty Floors: Step by Step for Each Type
Your floor is very dirty and you don't know what else to do? Dr. Lava Tudo has separated tips on how to clean grimy floors so that you can get rid of that bothersome dirt once and for all.
After all, there's nothing better than arriving home and finding everything clean, shining with that clean smell . However, even keeping a routine of cleaning the house daily , it is common to find stains resulting from the day to day.
Arriving with a dirty foot from the street, dropping certain substances, accumulating fat… the list is endless. The floor is one of the most affected areas and it can beat that despair: how to clean dirty floor?
Importance of cleaning the floor correctly
how to clean grimy floor
Your floor may be clean, but it may not look clean. This situation is very common when he is dirty. But, the importance of solving this problem is not just aesthetic.
A well-kept floor is the guarantee that your porcelain , parquet or any other material that covers your floor has a long life, that the finish remains in perfect condition and that it doesn't need to be replaced anytime soon.
It is common for centuries-old houses to draw attention for their well-kept floors. It is worth remembering that several domestic workers were dedicated to this on a daily basis, a time that is no longer common nowadays. Therefore, check out practical tips that will facilitate this care in your home!
What is the best product for cleaning grimy floors?
If you're reading our article, you probably have this question. Did we get it right? Homemade products offer good value for money. We are talking about: detergent, vinegar, bicarbonate, alcohol, among others. So read on and discover homemade tips to end this headache using these items.
How to clean grimy floors with baking soda?
As an alternative to traditional cleaning products, baking soda has a lot of potential to make your grimy floor shine again. Learn this tip and test it at home!
Then mix the baking soda with a little hydrogen peroxide. Leave on for a few minutes and then scrub away the dirt with a soft brush or clean microfiber cloth. Then just remove the excess. And don't forget to test it first on a small area of your floor, huh?!
How to remove stains on the floor?
Stains on the floor always look bad. But rest assured, we brought a tip that solves most cases, using only 2 ingredients: salt and lemon.
Squeeze the lemon onto the floor until the stain is completely covered. Then sprinkle some salt on it. Let the 2 products act for a few minutes. Now, with a soft brush or sponge, gently rub the spot. Finally, wipe off with a dry cloth and remove the excess.
Miraculous Dirty Floor Cleaner Recipe
If you were looking for a miracle recipe for the best cleaning of grimy floors, you've just found it! Oh, and don't worry! All the ingredients are probably already in your house. Let's go to the list of materials needed:
- 1 grater;
- 1 bowl;
- 1 liter of hot water;
- soap shavings;
- 200 ml of fabric softener;
- 100 ml of alcohol;
- 200 ml of vinegar.
Procedures:
Take the soaps, preferably the ones that are old, that you no longer use, and rub them on the grater. Put the zest into the bowl and pour in hot water until it dissolves. Add the other ingredients and mix well until smooth. If the floor cleaner has become too concentrated, add water. Store in a plastic bottle so you can use it whenever you need it!
To use the product, dilute 2 scoops of it in a bucket of water. Moisten a clean cloth in the mixture, apply to the floor, making gentle movements and spreading the mixture. Finally, remove the excess.
How to clean grimy floors with baking soda and vinegar?
Are you familiar with the dynamic duo vinegar and bicarbonate? These 2 products together have a huge cleaning potential ! And when we talk about cleaning grimy floors it couldn't be different. See, then, how to make this homemade mix:
You will need:
- 1 plastic pot;
- 400 ml of water;
- 5 tablespoons of neutral detergent;
- 100 ml of vinegar;
- 50 ml of alcohol;
- 2 tablespoons of baking soda;
- 1 tablespoon of salt.
Procedures:
Put all the ingredients in the plastic pot and mix until it forms a very homogeneous mixture. Apply to the floor, testing in a small area beforehand, and let it work for a few minutes.
Rub the product with a soft microfiber cloth all over the floor, making gentle movements. Finally, rinse and remove excess mixture.
Tips on how to clean grimy floors of different types
Each floor requires a different type of cleaning. Passing a broom and a damp cloth is almost universal, but some care is needed so that a certain type of floor is not spoiled and maintain its beauty, without soiling.
Some people have a habit of mixing cleaning products such as chlorine, bleach and disinfectants and soaking the floor. This can be fatal to the floor and make it more easily damaged.
In general, always avoid very strong products and follow the instructions for use on the packaging. Here's what not to do when cleaning your floor.
Also, check out the tips below on how to clean grimy floors properly.
Homemade product to clean grimy ceramics
How to clean grimy ceramic flooring
There are specific cleaning products to be applied to ceramics and porcelain. The tip is to read the labels and look for the one that best suits your situation. This floor allows the use of specific cleaning products. In rooms such as the bathroom and kitchen, where the presence of grease is a constant, degreasing and disinfectant mixtures are ideal.
To avoid grimy floors, thorough cleaning of the floor is important. To do this, mix detergent and water and apply to the floor with a broom. It is important to rub on the grout, as they are more prone to soiling. Then wipe off the solution with a wet cloth and dry the floor with a damp cloth.
How to clean wooden flooring
how to clean grimy wood floor
The wood brings a sense of warmth to the house, but it requires constant care and careful attention. Whether hardwood, hardwood or parquet, none of them can have much contact with moisture, as this spoils the wood, leaves it rotten and has many stains.
Therefore, cleaning should be done more often throughout the week, using a broom with soft bristles or a vacuum cleaner. Avoid piassava brooms!
After sweeping the environment, wipe with a damp cloth with water. Once a week you can dilute a little disinfectant specific to the area in the water. This will allow for deeper cleaning.
In both cases, the important thing is to dry well. So use two cloths. One wet to clean and one dry to remove moisture. This is the key to cleaning and not ruining the floor!
How to Clean Dirty Stone Floors
how to clean grimy stone floor
When the coating is made of stone, the surface is therefore more porous. If the stone is light, it's much easier for it to get grimy and lose all the beauty and class that this floor can give your home.
Using only water and neutral detergent, try to brush with a material with more rigid bristles, this way you can remove dirt that accumulates without using aggressive products.
Marble floor cleaning product
how to clean grimy marble floor
Overall this is an easy-to-clean floor, although it is a porous material. Strong or greasy products should be avoided as they will keep the grimy from coming off. In fact, they can contribute to dirtying.
If you want to clean your marble, and learn how to clean white floors in general, the ideal solution is to put a spoonful of coconut detergent in a liter of water, use a cloth with the mixture and then another to dry.
From time to time, it's worth calling a professional company so that you can take care not to get dirty, especially if the floor is white !
How to Clean Dirty Laminate Flooring
how to clean grimy laminate flooring
Laminate flooring can be the terror for those who don't want to see any kind of stain on the floor. Lamination facilitates the accumulation of fat and the fixation of liquids that fall on it. This is the kind of floor where just a damp cloth will not solve the situation.
A tip for these cases is to mix vinegar, alcohol and water in a spray bottle, adding drops of detergent. After gathering these materials, just sprinkle them on the floor and wipe them with a microfiber cloth. This cloth is ideal for its softness.
How to clean non-slip grimy floor
First of all, avoid using bleach to clean the non-slip floor so that it is not damaged.
Remove excess dust and coarser dirt with a broom. Now mix in a bucket of water, a little disinfectant and mild detergent. Apply over the entire surface of the floor and let it act for a few minutes.
Use a broom in a circular motion to remove the remaining dirt and rinse off the excess mixture.
How to get the grime off the bathroom floor?
To learn how to clean grimy bathroom flooring and get it clean again, you will need:
- 2 liters of water;
- 200 ml of liquid soap or neutral detergent;
- Essence to taste;
- 250 ml of bleach.
Mix all ingredients well and apply on the bathroom floor. If necessary, also apply on tiles. Scrub well with a broom and don't forget about the corners or grouts where you can use an old toothbrush. Wait for about 15 minutes before rinsing off all the excess mixture and you're done!
Take special care when handling bleach, which can stain clothes. Also, don't forget to wear gloves to avoid the strong smell this product can leave on your skin.
professional floor cleaning
After all these tips, you already know how to clean grimy floors. However, you may have noticed that it is not easy and that this type of cleaning deserves dedication.
Therefore, it is worth considering a professional cleaning service from a company that specializes in the service. In addition to saving your work, you save time and are sure that the result will be as expected. Dr. Lava Tudo, for example, has the ideal solution for each type of floor.
The guarantee of a better job is due to the use of innovative and specific machinery and products for each purpose. The company assesses the situation and performs the ideal procedure, in the shortest possible time.
When deciding to hire a company, instead of risking doing it yourself in the few moments of free time, you guarantee the hygiene of your home and you are sure that the products and care applied to your floor are the best to prolong the result. , without interfering with its useful life.