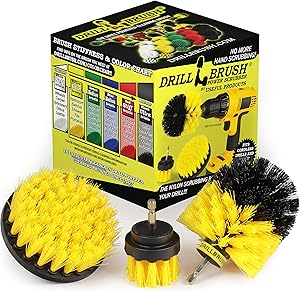
Drill Brush Attachment - Bathroom Surfaces Tub, Shower, Tile and Grout All Purpose Power Scrubber Cleaning Kit –Grout Drill Brush Set – Drill Brushes by Drill Brush Power Scrubber by Useful Products
- This kit contains medium stiffness nylon power brushes that will attach to your favorite cordless drill
- 3 different sizes and shapes of brushes for cleaning around your bathroom surfaces
- These nylon bristles will not scratch and can be used on tubs, sinks, baseboards, fiberglass shower enclosures, shower door tracks, and porcelain
- all three brushes have quarter inch QUICK CHANGE shafts,Cordless drill NOT included Drill NOT included
- All Drillbrush Products have a 90 day no questions asked Money back Guarantee. If you are not completely satisfied with our product we will issue a full refund or ship out a replacement at the buyer's request. Cordless Drill NOT included.

SANITARY BRUSH: INDISPENSABLE ITEM FOR YOUR BATHROOM
When we think about household cleaning, one of the most unwanted tasks is cleaning the toilet. Nobody likes to clean this essential item in any home. But this type of cleaning is essential and must be carried out with specific materials for this purpose, such as a sanitary brush, sponges and exclusive brushes, that is, they will not be used to clean other environments.
Cleaning the toilet needs to be frequent. Ideally, it should happen two to three times a week, after all, it is a place where there is a great accumulation of bacteria and germs that cause illnesses. If someone is sick in the house, cleaning should be even more frequent. If you have small children in the house too.
Cleaning the toilet
We usually associate the cleaning of the toilet with its interior, but this is where they accumulate less bacteria, since the water ends up taking them down the pipes with each use. The main concern should be with the surfaces that come into contact with our skin.
The lid is also often heavily contaminated, especially when users act correctly and close the vessel during flushing. This prevents bacteria from being released into the environment, contaminating other parts of the bathroom, but makes the lid a strong point of contamination that needs to be remembered when cleaning.
The flush trigger button is also a point that can easily go unnoticed. When we contact him, our hands have not yet been washed, so there could be contamination.
In general, to reduce the chances of contamination of the environment, it is important that the person is reasonably clean, flush immediately after use with the lid down and, if possible, wipe the surface with a damp cloth or handkerchief.
What is the sanitary brush for?
The toilet is in constant contact with germs and bacteria and frequent exposure to heat, caused by daily baths, makes this dish one of the most dangerous points for health.
Keeping this item always sanitized is essential to ensure a healthy environment.
The sanitary brush is a product created to facilitate and ensure proper cleaning of bathrooms. With it, it is possible to reach the most difficult parts of the toilet without necessarily having contact between the hands and the dishes.
It is an essential item for the maintenance of bathroom hygiene, but it requires care when cleaning and afterwards.
How to correctly use the sanitary brush?
To clean the toilet, you will need a sanitary brush, rubber gloves, chlorine or bleach, multipurpose cleaning products, sponge, cloth or paper towel.
The first step is to put on the rubber gloves and place the recommended amount on the toilet, chlorine or bleach product packaging in the vessel, from the inside of the rim. Let sit for a few minutes.
Then, take the sanitary brush and scrub carefully, cleaning all the space inside the toilet, including inside the seat. Pay attention to the gaps where the water comes out that can hide germs. Rub even more where there are stains.
Then, flush and wash the sanitary brush inside the toilet, turning it to rinse well. At this point the brush will be wet and should be placed in an appropriate place to dry.
You can trap it between the seat and the dishes, with the wet side facing in, and leave it for a few minutes. Only after it is completely dry should it be stored on the rack inside the bathroom.
How to keep the sanitary brush clean and free from germs?
There are those who use the sanitary brush repeatedly without ever having cleaned it. When this happens bacteria and germs end up being spread through the bathroom instead of cleaning it.
Cleaning your sanitary brush properly is critical to ensuring your family's health and well-being. And to do this it is very simple, but you will need to have a bucket, hot water (on boiling point) and bleach or chlorine.
Half fill the bucket with hot water and add two cups of bleach or chlorine. Clean the brush and remove any stuck dirt, such as hair or dental floss, for example. Place the sanitary brush in the bucket and soak in this mixture for at least an hour.
After this time, remove the sanitary brush from the bucket, wash it in clean, running water and let it dry completely before putting it in the holder.
The support must also be washed in the same way, adding hot water and a little bleach or chlorine, leaving it to act for approximately 10 minutes. Then it is necessary to rinse.
Ideally, this cleaning should be carried out at least once a week and that the sanitary brush is never left on the support with water, to avoid the proliferation of bacteria. Change the sanitary brush periodically, at least once every year, too.
Other cleaning tips to keep your bathroom free of germs and bad odors:
- Tip 1: It is common that people do not have a lot of time to clean the bathrooms with the ideal frequency, and when they decide to do so, they are already in a catastrophic situation. A simple tip to avoid this problem is to use toilet paper or baby wipes to clean small dirt as it happens.
- Tip 2: Most men are in the habit of urinating standing up even at home, so splashing urine down the toilet and on the surrounding floor can be unavoidable. Therefore, it is recommended that, when washing the toilet, the top of the toilet is completely removed. That way you'll also be able to clean the gaps that usually accumulate bacteria and traces of urine without you noticing.
- Tip 3: To remove stubborn stains on the toilet you can use chemical removers or a mixture of baking soda and vinegar. First you need to pour the vinegar into the toilet, starting from the edge. The indicated amount is one cup or about 250 ml. Leave on for a minute and add a cup of baking soda and another cup or two of vinegar. The vase will be bubbly as this is a natural reaction of this mixture. Wait another five minutes and use the sanitary brush to scrub the mixture all over the pot, especially on the toughest stains. Then flush.
- Tip 4: Remember to always clean the area around the toilet as well. This area is also contaminated and needs attention. You can use an all-purpose product to remove dirt from the floor, but it's important to use a disinfectant as well. If there are objects around the vase, they should also be cleaned frequently, using alcohol or the multipurpose product itself.
The sanitary brush should not be used to clean the lid or the outside of the vessel to avoid the risk of spreading bacteria. For these areas it is correct to use a sponge or cloth with disinfectant.
Now you know what it is for, how to use it and how to keep your sanitary brush free from germs. Take advantage of these tips and ensure the cleanliness of your bathroom and the health of your family.