A hardened bolt and nut to assure exact adjustment of both the cutting and anvil blades
Rubber cushion and shock absorber
Ideal pruner for light applications and easily adjustable
Features strong blades with a wire cutting notch
Lightweight metal handles
Blades are made of high-quality hardened steel
Limited lifetime warranty
How to remove dead carnation flowers from the cape
Cape carnation enjoys full sun and well-draining soil, as well as giving the gardener a display of brilliant flowers all summer long and beyond. Regular pruning of faded flowers results in the redirection of the plant's energy to produce new flowers instead of seeds. In addition, pruning will keep the beds fresh and neat and give them good air circulation, which reduces the risk of disease. Rock gardens and flowerbeds often have some of the 300 varieties of carnations.
Step 1 Examine each flower and stem systematically and cut out any flowers that have died, lost their color, or started to lose their bloom and are turning brown. Cut them 1/4 inch (0.6 cm) from the closest group of leaves. Removing these flowers encourages the plant to focus on producing new buds rather than new leaves. Removing dead flowers makes the remaining ones, in good condition, last longer.
Step 2 Remove dead flowers before they form seeds on the inside. Pruning them at the right time prevents the seeds from spreading spontaneously and vigorous root development, which will be beneficial when you want to divide the plant.
Step 3 Prune the carnation once it has nearly completed flowering, usually 6 weeks after it produces its first flower. Using garden pruning shears, cut the foliage about 5 inches (12.5 cm) to retain its shrub shape, however, to have green foliage all winter only cut 3 inches (7.5 cm) . This plant will tolerate cutting it flush with the ground if necessary.
Step 4 When the dying flower turns brown, harvest the seeds that are inside. Cut them with the pruner or scissors once they are completely dry, at which point the seeds will fall easily if you shake them. Even if the plant may appear sloppy and unkempt for a few weeks, the seeds will give you a solid base for propagation in future seasons.
When and how to prune rose bushes: keys to taking care of your flowers
The rose, considered "the queen of the garden", gives life and color to the place to patios and gardens. When to prune it and how to take care of it so that it looks beautiful.
Growing our own roses is a luxury that we can give ourselves if we learn some secrets of this beautiful flower, associated with love, passion and purity, among many other symbols derived from its color and its particular perfume. We tell you how to prune rose bushes without hurting yourself with thorns and how to take care of the plant so that it gives you more and more buds.
The first thing to know is that pruning rose bushes is a task that we cannot skip if we want to have these beautiful flowers at home. And we must do it correctly so that the plant does not weaken.
Keys to prune rose bushes To achieve a good result and have roses worthy of a flower shop in the garden, the ideal is to start by learning how to plant rose bushes, how to care for them and how roses are pruned , when and with what tools.
Rose plants are believed by many to be difficult to care for, but they are undemanding and fast-growing shrubs . They adapt very well in all temperate areas of the world and withstand quite extreme temperatures, which can range from 40ºc heat to a few degrees below zero.
They can be planted in large pots, but they thrive and look best in the soil in a garden. They need plenty of sun, plenty of water and it is very important that they have good and loose soil so that the irrigation drains well.
It is also necessary to put compost in spring and summer. But one of the keys for the plant to grow healthily and give us good flowers is pruning.
When to prune rose bushes
When winter is ending and the temperatures begin to be warmer . The key is to do it when the risk of frost has passed because pruning "favors" the plants to accelerate their vegetative activity. Therefore, if we can do them in autumn and encourage them to sprout, when the frosts arrive they can damage those tender twigs that have just sprung up. For this reason, in areas with very cold climates and intense frosts, wait for spring to appear.
During the flowering season: at that time the other type of pruning is done that we should not skip. It is smaller but just as important, since the withered flowers have to be removed from the plant. This will cause the plant to have more flowers each year, of good size and color. And it is the way to take care of the health of the plant, because withered flowers can be a source of bacteria and other microorganisms that damage the rose bush.
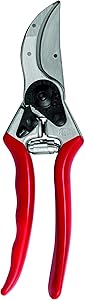
What tools do we need to prune rose bushes It is important to have the right tools, which are generally used for pruning bush and climbing roses. Ideally, you should have:
Scissors with anvil cut .
Normal garden scissors .
Gloves (optional, but remember that the plant has thorns).
Healing paste (optional, but highly recommended).
How rose bushes are pruned Pruning is cutting off dry, dead, damaged or diseased branches, flowers or leaves. In the case of the branch, if it is sick you will see a brown color when you cut it; if it is healthy its color is white. The cuts must be made oblique, clean and without tearing.
As we saw, there are two times to do this task and a recommended tool for each.
Training pruning and rejuvenation
Anvil-cut scissors should be used, as the branches do not exceed 2.5 cm in thickness.
Disinfect the scissors with pharmacy alcohol and check that they are sharp so that the cut is clean.
Remove the branches that look weak, diseased, and also those that do not produce flowers.
Prune healthy branches above the fourth or fifth bud. The youngest must be left with at least 2 or 3 buds. The cut must be oblique.
Put healing paste on the wounds in each cut to prevent the proliferation of fungi and bacteria.
Finally, clean the scissors well with alcohol and dry them with a clean cloth. Store them in a cloth bag or toolbox to prevent rust if they come in contact with water and sun.
Flowering pruning
To cut the flowers we can use common garden scissors. If, in addition to the wilted flower, you want to trim the branch a bit, use the anvil cutting scissors.
To remove the flowers, the step is simple: you just have to cut the stem that connects the flower with the rest of the plant.
In this case also do not forget about the hygiene of the scissors before and after pruning.
An important fact: you can reuse the cut stems of the branches that are not stinked. It is enough to apply powdered rooting hormones to the base of the cut and plant them in a small pot with good soil and universal growing medium. Keep watering and in no time the roots will start to grow. It is recommended that you keep those stems in the rooting process in the same pot for at least 6 months.
Climbing rose: how to prune it Rose bushes are not climbing plants in the strict sense: by themselves they cannot climb like ivy, Wall Lover, vines, etc. They can if we guide and tie them. That is why climbing roses must be well attached to a support (column, lattice, wall, etc.).
The roses of the climbing rose bushes are not born directly from the main branches but are born from the secondary or lateral branches, which are the carriers of roses.
Pruning should be done every year but it is not complicated; You only have to cut from 3 to 5 buds and cut at the base all the branches that we see weak or very old, since they will not give flowers. You also need to trim the shoots that are stinky.
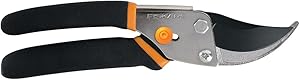
Ideal for cutting stems and light branches. Easy-open lock protects the blade during transport and storage
Fully hardened, precision-ground steel blade stays sharp, even through heavy use
Low-friction coating helps blade glide through wood, prevents the blades from gumming up with sap and debris and helps the blades resist rust
Maximum cutting capacity: 5/8 inch diameter
Lifetime warranty
How to prune withered rose flowers
Roses that have died, or those that have fully blossomed and are beginning to wither, should be removed. This process is known as "pruning the wilted flowers" and is done to keep the roses looking attractive. In addition, it encourages more flowering. This is a trick that focuses on the stems and flowering of the plant rather than wasting energy on dead roses or producing seeds. During the blooming season or summer, you should prune the withered rosebush flowers regularly until the bush begins to winter hard.
Part 1 Prepare to prune
1 Gather the tools you will need to prune. You will need sharp, clean pruning shears, gardening gloves, and a large bucket to carry the cuts you make.
Your scissors should allow you to make very clean cuts, and they should be small enough that you can hold them in one hand and make precise cuts.
Buy gloves that cover not only your hands, but also your forearms. Some rose bushes are very thick and tall, and you will need to reach the bush to prune certain roses. Therefore, by covering your arms, you will protect yourself from thorns.
2 Learn to identify dead roses and other problem areas that you need to prune. One prunes the faded flowers not only to encourage more blooms, but also to keep the rose bush healthy and free from fungal and insect diseases. Examine your rose bush and look for the following:
Dead roses . When the roses have finished blooming, they will begin to wilt or bend down. Its petals will become extremely loose and will even fall off in the mildest winds. Therefore, you will need to prune those stems.
Conflict roses. Some roses may become entangled with each other. These roses basically compete with others to grow in the same small place, stunting the growth and appearance of the others. By pruning these roses correctly, you can change the direction they will grow the next time they bloom. [1]
Roses that grow inward. You want the bottom junction or base of your rose bush to get plenty of water and sun. Therefore, if the stem of a rose grows inwards, it will not allow sunlight and water to reach that junction, possibly causing it to become infected with bacterial fungi. You basically want the stems of your rose bush to grow outward and the path leading to the junction to be clear. [two]
Part 2 Cut the stems
1 Identify the sets of 5 sheets that are facing the correct direction. Looking at the stems you will probably find some with 3 or 5 leaves. The correct way to prune a rose is by cutting over sets of 5 or more leaves. [3] The set of 5 leaves (sometimes called a true leaf) should be oriented in the direction you want the stem to grow. For example, if you want the stem to grow outward, cut a set of 5 leaves that is also pointing outward.
Cutting a set of 3 leaves can cause the stem to lack flowers.[4]This means that it will not bloom or will not produce more roses. However, it can flourish in the following season.
You don't have to cut the stem on the first set of 5 leaves you see. Sometimes a set of blades may be facing the wrong direction, so you will need to cut lower.
2 Recognize knots. You will see a dark spot just above the point where the stem and the set of leaves meet. This union will be the point where a new stem will appear on which a rose will grow. You should make the cut just above the seam.
If you must prune multiple rose bushes, you may not have time to find all the knots there are. Fortunately, this junction is very close to your blade set. Only make a 6 mm (¼ inch) cut over the 5-blade set.
3 Make the cut at a 45 degree angle. You should never cut straight. A 45 degree cut will allow water from your sprinklers or rain to run off and not pool on the stem, preventing bacteria and fungus from growing.
There are conflicting opinions on whether to use garden shears at a 45-degree angle when pruning roses. In many sources it is stated that the angle at which the cuts are made does not affect how well the plant heals or how many flowers it produces.
Consider putting some white glue on the edges of the fresh cut. This reduces the risk of disease attacking the base of the plant.
Tips
If you want to reduce the size of the rose bush in general, cut the stem so that it is smaller. This is especially necessary for fast and abundant growing roses like David Austin roses. However, the more you prune it, the longer it will take for the flowers to form.
If you don't prune off faded flowers from a rose bush, dead roses will turn into seeds or rose hips. By pruning them, you will be able to enjoy more blooms in the growing season.
If desired, place the fresh rose cuttings in the compost bin. However, avoid placing abundant woody or mature rose cuttings in the container as they will take longer to disintegrate than young stems.
Cut dry stems, flowers and leaves to plants
A couple of days ago Hilda, one of our Cuidatujardin.com readers, asked us about the care we should take when we want to cut the leaves of our plants that are dry. Therefore, today we want to take care of analyzing all the details that we have to take into account when we think about cleaning the stems, leaves and flowers that are dry in our garden.
The first thing we must bear in mind is that beyond the fact that autumn is usually the most recommended time to cut the stems, flowers and leaves of our garden that are requesting an urgent cleaning , each species of plant has its own peculiarities, and that is where the secret is that we must know.
Remove dry leaves or wilted flowers Of course, one of the main doubts that arise in this regard has to do with being able to remove the dry leaves or withered flowers from the plants. Ideally, you should check them every week and remove them as soon as you discover them, because otherwise you could put the rest of the plant at risk. In addition, we make it much easier for you to develop new leaves and flowers in this way.
The plant species Anyway, and as we said before, if we have doubts about the species of plant that we have before us, it is convenient that we carry out a survey about it. The rule indicates that those that bloom in the first and summer, that is to say at this time of the year in the northern hemisphere, are pruned in autumn. On the contrary, those that bloom in autumn and winter are pruned in spring. Finally, almost no plants are pruned in summer.
And how do I clean it? Considering that the pruning of the plant is one of the main cares that we must have in this regard, the ideal is to cut the branches or stems in a skewed way, as close as possible to their growth nodes. In the case of wilted flowers and leaves that are already weak, it is best to remove them first by hand, and then proceed to remove the trunk if you no longer have any of them.
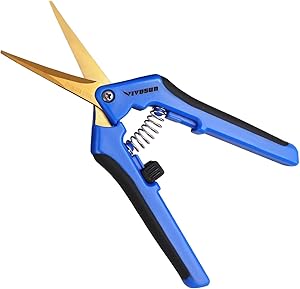
VIVOSUN 1-Pack Gardening Hand Pruner Pruning Shear with Titanium Coated Curved Precision Blades
REDUCE HAND STRAIN: These micro tip snips are built spring-loaded so that they automatically push themselves open without you having to do the work which greatly reduces hand fatigue making these snips great for those with arthritis, carpal tunnel, hand or wrist issues. Comfort Grip handles will make it easy to work for long periods of time without discomfort
ULTRA SHARP BLADES: These quality snips come with stainless steel precision-sharpened blades which is titanium coated and are ready to tackle all of your deadheading, trimming, and shaping needs for your roses, annuals, vegetable and small flower gardens
SECURE, EASY TO OPERATE LOCK: These micro tip snips feature a safe and secure sideways locking mechanism that keeps your blades protected and closed when not in use. The design of these pruning snips are perfect to use whether you are right or left handed with ease
MAKE PRECISE CUTS: With these micro tip snips, you can easily get between plants to "clip and snip" only the area or part that you want to cut with one-hand and without damaging the other vital stems and branches of your other plants.Care: Clean blades after each use
What You Get: VIVOSUN Precision Pruner and our friendly customer service
Cut off withered flowers throughout the summer
To keep the garden clean we have to cut the withered flowers during the summer:
We also facilitate the cutting of the withered flowers the new flowering of the plant. So unless for decorative reasons we leave some wilted flowers in most cases it is best to cut them.
When the flowers wither, the seed formation process begins, this process is very costly in energy for the plant and prevents a new flowering. So unless we want to harvest seeds from a plant, it is best to cut off the withered flowers. In the case of wanting to obtain seeds from a plant, we will leave some withered flowers preferably at the back of the bush.
To keep the summer pots and planters clean, we will cut the flowers as they wither. This task in this type of plantation should be part of the daily cleaning of our pots and planters. Large flowers, petunias and geraniums for example, we can cut them directly by hand with the help of nails. The finest flowers must be cut with scissors. Sometimes we will have to cut a good portion of the stem next to the flower to balance the whole.
In the case of rose bushes, the treatment of withered flowers is different depending on the types of rose bushes. If we have a rose bush that forms beautiful fruits after flowering, we will not cut the withered flowers to leave the plant to form those fruits. If it is a question of rose bushes that bloom forming clusters of flowers, we will cut with the scissors only the withered flowers that are in an inflorescence, when all that set of flowers is in poor condition we will cut the stem one centimeter above the branch from which it starts. We will do the same with roses that bloom alone.
Annual plants will last longer, until the arrival of the first frosts, if we are careful to cut the wilted flowers frequently. We will carry out this operation with pruning shears or with simple kitchen scissors.
Remove dead flowers to promote blooming
To ensure flowering abundant and continuous in our annual and perennial plants must remove withered flowers. Today we give you some tips so that you can do it successfully.
Removal of faded flowers is preferable for most annuals and some perennials. If we do not take this into account, we can end up delaying or preventing the formation of new flower stalks.
In the first place, the fact of cutting these dead flowers is done for aesthetic purposes, but we also know that in this way we will avoid the appearance of low-quality seeds for their next flowering season. In short, it is a good method to promote the appearance of new, good-looking flowers.
To remove dead flowers from a perennial plant, we will use the pruning shears, making diagonal cuts, at an angle of 40-45º and a few millimeters above the third or fourth leaf. You want to make sure that you don't cut in the wrong place, because that way you could be removing the stem that will produce new flowers.
In some varieties of plants, the stems must be cut in half (for example, those seen in the images), so it will be necessary to inform you specifically for each plant before doing anything. If you achieve this, you will be assured of a good production, enough to make a fantastic bouquet of flowers!
How to cut dry leaves from a plant?
Cutting dry leaves from plants is always tricky, especially when you don't know much about gardening. I understand the feeling of wanting to do it, but being afraid to kill your plant.
To that special that, for some reason, has not died and you want to keep it.
If you have any comments or want to know more about me, follow me
Delirium and go ahead and prepare chicken in an easy and delicious way with these recipes, you will love them!
The truth is that cutting dry leaves from plants or pruning them, is necessary and the day must come when you must do it.
So the longer you put off the topic, the more dried leaves you will have to cut and the harder it will be to do.
It is also true that you must take into account some points so that when cutting dry leaves of the plants you do not ruin everything and kill your little plant.
The first thing is the scissors, these must be special for gardening, if you do not have one, you can use one that is very sharp, so you will not damage the branches.
The season is also important, you should prune the plants at the beginning of their growing season.
If your houseplant isn't blooming, you should prune it in late winter, but if it does bloom, it's best to wait for it to bloom before pruning it.
To cut dry leaves of plants and branches you must do it at an angle of 45 °, in this way you do not hurt your plant.
Do not cut those that are green, leave the main stems intact, only cut what is NO longer alive.
You should also cut the withered flowers, remember that those that are alive and beautiful take life away.
I consider that these tips are enough to cut the dry leaves of the plants that you have at home, little by little you will do better.
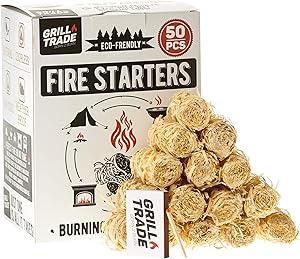
Bangerz Sunz Fire Starter Squares 144, Larger and Safer Fire Starters for Fireplace, Wood Stove & Grill, Camp Fire Pit Charcoal Starters 50B, USA Made
ALL-PURPOSE & VERSITILE – Get a fire going anywhere fast. Easily combustible fire starters are designed to start fires fast. Great for camping, pit fires, or charcoal lighters for barbequing (Doesn’t flavor food)
NATURAL FIRE STARTER – Ecofriendly product made with non-toxic recycled wood chips and wax, emits up to 80% less carbon monoxide. “Go Green” (No lighter fluid necessary)
WEATHER RESISTANT LIGHTER NUGGETS – Designed for all weather conditions, these robust squares ignite even when wet
SAFETY FIRST – Our safe lite produces no flare ups, perfect for safely lighting indoor fires. Safely light up a cozy fireplace or wood stove, and its a must have accessory for your emergency survival kit
EASY TO USE & HASSLE FREE – Quick, and ready to use with no kindling or paper required to ignite. Place squares into desired application and ignite. Squares break apart very easily to meet your requirements
How to light a fire in a wood burning fireplace fast. Tricks
Do you want to know how to make the wood in your fireplace burn?
When you have a fireplace to heat your house, in addition to saving money, you offer a relaxing and romantic atmosphere to your home. Knowing how to make a good fire in a fireplace is not very difficult, you just have to safely follow a few key points. Therefore, we want to offer you some essential tips and recommendations for lighting a wood burning fireplace.
The fireplace: much adored in winter by many people. It warms us, it hypnotizes us with its flames and it relaxes us… It creates a romantic atmosphere or it encourages endless conversations by the fire with family and friends.
Sometimes lighting a fire can be difficult, but do not be discouraged, follow these tips and essential recommendations to be able to light the wood fireplace without stress! and you will see how you get it more easily. There are many ways to light the fire, but this is one of those ways that makes the process easier.
What is the best firewood for the fireplace?
The hardest wood firewoods are those with the highest calorific value. What is considered the best firewood is oak . It is a hard wood and very resistant to humidity, that burns slowly generating a lot of heat and is affordable. It is preferable to use dry firewood.
To choose the type of firewood, we have to take into account the heat capacity. Ordered from highest to lowest, this is the heat capacity of each type of firewood:
Over: 4900
Chestnut: 4800
Elm: 4790
Oak: 4690
Olive: 4678
Beech: 4630
Pine: 4557
There is a firewood called "green firewood", it is much cheaper, but it has much less calorific value and gives off a very unpleasant white smoke. Although it is cheaper, it is not the best option when it comes to cooking.
The firewood is preferable that it does not have branches or green twigs. If not, it will cause thick smoke, plus it will cost much more to light the fireplace.
You will need to light and use the fireplace: Here are some products that can be very useful:
A couple of large logs.
5-10 small pieces of wood chips or firewood or pinecones.
Several sheets of paper. Even better if you use some small pre-treated eco-friendly material to light. It must be taken into account that lighting with newspaper is especially polluting and contributes to the formation of soot in the chimney, even so, better from newspaper than magazines or colored paper, it is more ecological.
Ignition pills.
Matches or lighter.
Product to clean the windows of the fireplace
Step 1. Most importantly, your safety. The first thing you have to take into account before lighting a good fire in the wood fireplace is to make sure that there are no objects that can burn nearby , you will have to remove any object that can catch on.
Step 2. Start a base with easy ignition fuel. You have to prepare a base with fuel of easy ignition . You can put some newspaper, thin branches, dry leaves, a couple of ignition pills ... place them in such a way that there are holes for the flame to breathe and oxygenate.
Step 3. Light the fire and don't neglect it. Remember, it is better to use firewood from a hard tree, and it is recommended, to make it easier to light, that it is always as dry as possible. It is often said that the best firewood has had to be 6 months in the open, in the sun. This helps it lose much or all of the moisture it contains.
Now you have the base ready to light the fireplace, take a match or a lighter, light the fire and close the door. This step is the most delicate , it is very important to be careful and not neglect the fire so that it does not go out. To make it easier for the fire to really ignite, you can put the flame in different places. If you see that it is fading, add some more twig.
My personal trick to ignite faster is: Take 1 or 2 pineapples, and in their holes put pieces of ignition tablets . Then put newspaper on top, small branches and a thicker trunk on top, I usually do it in the shape of a pyramid leaving holes so that the fire does not drown and oxygenates.
Light a match or lighter and from time to time hit with the bellows to fan the flames until the fire gains strength.
Some fireplaces take longer than others to create a good draft, especially brick ones. If the draft isn't enough, it may be a good idea to open the stove door slightly until the stove is hot.
If, after all, we have miscalculated the size of the log, or we have erred in its placement, and the fire is extinguished, we can still take advantage of the embers and start again. It is not uncommon for multiple attempts to be made.
Step 4. Watch the air flow. Remember that the air flow is the most important thing, we recommend a distance of 1 cm between piece and piece of firewood, it is the ideal measurement. The small wood should not be thick, small logs or chips between two and four centimeters thick are ideal.
Step 5. Add thicker logs. Once you see that it is already lit, it is time to add thicker logs so that they start to ignite before the twigs are consumed and the fireplace goes out. To light the log, you have to bring a flame to it continuously for a while until the log burns by itself. In this step we will still have to be attentive, and not neglect the fire by putting in some twigs from time to time. It will be necessary that there is space between the logs, so that the fire breathes and has the necessary oxygen to burn, you can place the logs in a "pyramidal" shape so that air enters and ignites more easily.
If after a while, the fat log has not yet lit, we can forget about it for the moment, to prevent it from going out we have to take advantage of this fire to burn a medium-sized log. Once this log has ignited, the thick log will surely burn. While being inside the fireplace it takes temperature to ignite more easily. From this moment on, the log will give us its warmth, just by paying attention to a few details. The placement of the log is very important, since its flame has to give us heat, on the one hand, and it has to be the source, also, of the combustion itself; for this reason, it is important to give it a little twist when part of the trunk has been consumed.
Step 6. Use the bellows. We can help ourselves with a bellows, it is very useful to stoke the fire. A bellows is an instrument that is used to give air to the fire and thus fan the flames, thus achieving that the largest logs ignite and the flame does not go out. If you have a fireplace with a door, you have to check that the vents are open.
Step 7. Take care that it does not go out by adding more logs from time to time. Once the flame is well lit, you will have to add larger logs and recharge it as we observe that it is necessary. If you follow these directions and light the fire with a couple of thick logs, the first load of firewood will last an hour. When it has turned to embers, you can open the door and add more firewood. We recommend leaving the door ajar for a few seconds before fully opening it.
Step 8. How to prevent the stove glass from turning black? The best way to light the wood stove is, once the tablet is in place, leave the door half ajar while the iron and pipes are heating up and creating the appropriate depression so that the stove works well, and does not accumulate excess smoke in the combustion chamber, which will make the glass stain more.
Step 9. C OW clean the glass of the fireplace or stove? It is one of the questions we ask ourselves when we have a wood or pellet fireplace. There are different cleaners on the market for stove and fireplace glass that effectively remove all traces of tar and soot .
You just have to spray the product and let it act for a few seconds (or minutes, in the case of particularly resistant deposits) and wipe with a dry cloth paying attention to the most difficult areas.
Step 10 Use a chimney sweep log at the beginning and end of the season to prevent potential fires It is a log shaped like a log or a briquette. It is used to remove soot and clean the chimney flue pipes. This helps the proper functioning of the fireplace or wood stove and avoids possible incidents, since sometimes the creosote that forms in the pipes can ignite and cause a fire .
The frequency with which this type of chimney sweep log should be used varies depending on the use that you have given to the fireplace or stove. It is advisable to use the log at the beginning and end of the cold season. To use it, the fireplace is started with a load of wood and then the unopened chimney sweep log is inserted from the bag in which it comes. The process ends when the fire goes out by itself.
Important notes:
If you want to light the fireplace and have a comfortable and lasting fire, it is better to put, once the fireplace is lit, a thick log. The thinner branches will provide us with the flame much sooner, but it will also be extinguished quickly, so it will be necessary to continually replenish the fuel.
It is important that the logs are dry; if they are green they will give off a lot of smoke, it will be constantly sizzling, and it will only be the source of unnecessary annoyance.
With the help of the appropriate fireplace utensils, you can turn over and reposition the wood as necessary.
Be careful with the children, that they do not approach the fire if you are not present.
Another very important point to achieve a joyful flame is that air can enter: the fire must be oxygenated. If we bring many logs to it, we will only be able to drown the fire, and it will be extinguished without being able to avoid it.
If you go to sleep and the fire is still burning, do not forget to put a protector or make sure that there are no carpets, chairs or any flammable objects near the fire.
It is common that when you light a fireplace, you are surrounded by people giving their own advice. Although these are always welcome, a good fire is usually a single thing.
Now we can enjoy the pleasure that the heat of the fireplace gives us at home.
How to put out a fire in a wood burning fireplace
With salt
Another very effective way is to add salt on the embers scattered and covered with ash. More or less, a large bowl will suffice, although this varies depending on the size of the fire. This method can be used when the fire is not very intense.
With sand
With a metal shovel, spread the ash over the embers. Although it will not put out the fire completely, it will extinguish it. When the flames disappear, finish extinguishing the embers by pouring sand over them. Before lighting the fire again you will have to remove the sand well and put new wood so that there is no sand in the fireplace.
With bicarbonate
Baking soda can help you put out a fire effectively. You have to spread the logs, cover them with ash and put a thin layer of bicarbonate on top, enough to cover all the embers.
With water
Do not even think about adding a bucket of water to put out the fire in the fireplace, it would be a very sharp contrast to your temperature and it could damage your fireplace, what you have to do is moisten the logs with a spray bottle. Spread the firewood with the poker so that it goes out more quickly. Spray until you see the fire go out.
Our rural accommodation in Asturias has heating in all rooms and two comfortable wood fireplaces, designed for the comfort of our customers. Enjoy a warm and homely atmosphere in our house in a natural environment surrounded by mountains.
And what better than to make a winter getaway and sleep warm in a rural mountain house with a fireplace in Asturias?
Fire starter sticks is made of all-natural pine wood shavings and food-grade wax. Firestarter doesn't smell and smokes - ideal lighter log for indoor and outdoor use.
Unlike the usual fire starter squares, fire starter cubes, or lightning nuggets, Grill Trades firestarters consist exclusively of organic materials, which is safe for cooking.
Firelighter has burning time 8-10 min. Need to have among bbq accessories. You need only one piece to light a fire.
It is useful for camping bonfire, picnic or barbecue party. It does not take up much space and does not require special storage.
This is an excellent gift for your husband or neighbor. Firestarters simplify the process of kindling fire as much as possible. Now you don’t have to use paper, harmful liquids, or electric devices.
TRICKS TO LIGHT THE FIREPLACE
If you have never lit a fireplace, you may be wondering what are the best ways to do it. You may think that it cannot be that complicated, although you have heard of different methods to do it. In this article we want to give you some tricks to light your fireplace safely, efficiently and with little effort. So you can enjoy the heat of your home in the shortest time and safely.
Today in the HotFireDoor post , fireplace doors , we talk about how to light a fireplace. All the tricks, steps to follow and materials to use. If you want to light a fireplace optimally, keep reading this post.
First steps to lighting a fireplace
In either case, the main thing is to place the firewood in the right way. To do this, make a kind of cabin by placing branches in such a way that there is free space underneath. So you can better light your fireplace.
Make sure the branches are neither too thin nor trunks. It is also important that they are well dry, since damp branches, in addition to not lighting well, produce a lot of smoke and it is very annoying.
What to use to light the fireplace
Lit with papers Form a ball of newspaper about the size of your fist. Don't over-tighten it, as it won't light up well. Set the ball on fire and place it inside the fireplace under the twigs that you have previously placed. The paper will quickly burn and cause the branches to ignite as well. When the fire starts to rise, carefully place a log on top, letting the fire begin to build in it. Add a few more logs as needed.
If for some reason you see that the branches do not ignite, blow lightly towards the fire to raise the flame.
Ignition pills The ignition pads are very practical. You only need to light one and throw it in the fireplace so that everything starts to burn, although it is better to light a couple of them and make sure they fall in the center. This way you will get the fire to feed earlier.
Corks with alcohol This homemade trick is very effective too. Store all the corks from the bottles you use in a bottle with burning alcohol. When you need to light the fire, you just have to take out one of the corks and light it. Be very careful because they catch on immediately and if you don't do it quickly you can burn your fingers.
With matches You can light the fireplace perfectly with a pair of matches. You just have to light them and throw them on the branches for the fire to ignite, although you may need to repeat the process a couple of times.
There are also matches that have the longest stick, specifically designed for this type of fire. They are lit and can be kept on the branches until the fire starts, so that it is not necessary to light more than one match to make the fire.
What firewood is better to light the fireplace?
Depending on the type of firewood, the fire will last more or less and you will have to do more cleaning of the fireplace . For example, pine firewood is the cheapest, but also the one that lasts the least and generates the most waste because it releases a lot of resin and does not burn. On the other hand, the harder olive and almond woods make the fire last longer.
TRULite Premium Fire Starters, 20 Piece Box, USA Made, Ideal for Quickly & Safely Lighting All Types of Grills, Bonfires, Fire Pits, Fireplaces, Wood Stoves, Campfires, and More!
100% NON-TOXIC & ECO-FRIENDLY! Our TRULite Premium Fire Starters will not flavor your food, and are all natural!
ALL NATURAL! TRULite Premium Fire Starters are made from Wood & Paper Chips compressed in Wax. The materials in our products are made from renewable resources, so you can be sure that your choice is a clean and safe one!
CHEAP TO USE AND HASSLE FREE! With TRULite Premium Fire Starters, you don't even need to use a Chimney! Just light the stick, and stack Charcoal chunks around it! Will not flare up, and they light INSTANTLY!
VERSATILE AND AUTHENTIC! TRULite Premium Fire Starters work for SAFELY and QUICKLY lighting any type of fire, whether it is an Outdoor Fire, Indoor Fireplace, Barbecue Grill, Barbecue Smoker, Bonfire or Campfire! Our TRULite Fire Starters are very easy to transport, so these are great for Hunting, Fishing & Camping!
MADE IN THE USA! Our TRULite Fire Starters are Made & Manufactured right here in the United States! We are dedicated to bringing you only the best quality, nature-inspired products that make it easier for you and your family to either start the grill or simply chill by the fire with a simple strike of a match!
How to light a fireplace
Do you want to know how to light a wood burning fireplace? Although there is no single way to do it, here we tell you, step by step, a fast and effective method. Also, you have 5 practical tips. And if you want to light a barbecue, read these other tips.
How to light a fireplace. Cleaning first
Before starting the winter season with the fireplace lit, you have to think about cleanliness. This will allow the smoke to escape unobstructed to the outside instead of plastering in the room. In addition, your fireplace will work at full capacity and you will avoid possible fires in the tube. It is advisable to sweep the chimney every year at the end of winter.
Thinking of cleaning the fireplace yourself? Or do you want to know how professional chimney sweeps do it? In this other article we will tell you in detail.
How to light a fireplace step by step
Get everything you need first. The wood must be dry so that it ignites well and does not generate excess smoke. In addition, gather fine firewood, small branches, sticks or chips to start the fire. Have ignition pads on hand: it is the most practical, although you also have other options that we will tell you below. And, of course, a lighter or matches.
STEP 1 Open the shot Before starting to light the fire, open the draft wide. And keep it in this position for about 20 minutes. If your fireplace has them, open the vents as well. The objective is that the fire has the necessary supply of oxygen.
Have you just arrived at your country house and want to know how to light the fireplace for the first time in a long time? First you will have to warm it up a bit. Open the shot and wait an hour or so while you finish setting up.
STEP 2 Place the first pieces Here it is a question of choosing material that ignites easily to start the fire and then “infect” the thicker and slower-burning logs. The softwood, such as pine, is the turns faster. Always make sure that everything you put is dry and clean.
How to arrange the material? It depends on the size of the pieces:
Fine firewood . You can also cut thicker wood chips. At the base of the fireplace, put two or three pieces in the same direction. Then put the same amount on top, but in the opposite direction. Repeat the operation two more times. In total, you will have about six floors of interlocking pieces, which make up a “mountain” with a hole in the center.
Smaller twigs and / or chips (b). You can get a bag of chips selected just to start the fire: they are cut into pieces of about 10 cm so that they ignite more easily. In addition, they guarantee a maximum percentage of humidity (it is usually indicated on the packaging). Make a bed in the center of the fireplace. You can also add dried pinecones , but with caution: they contain a lot of resin and can cause large flames.
Also, if you have a log that is too bulky, you can add it at this time. Place it in the bottom of the fireplace. If you are going to start the fire with fine wood, support the branches on the trunk leaving a free space at the base below, like a small tunnel.
STEP 3 Add the logs There are several ways to organize firewood. The key is that there is enough air between the logs so as not to "smother" the fire. One of the most common methods is the pyramid : On top of fine firewood or small branches and chips, place thicker logs in a pyramid shape. That is, joining in the center and leaving a gap below. At this point it is convenient to have hardwood firewood, such as holm oak, oak, elm, beech ... This wood generally burns more slowly and its embers generate heat for a longer time. Although it also depends on its quality and degree of humidity. In addition, they contain less resin: less residue that can adhere to the outlet tube.
If you have chosen fine wood as a starting material (a) , you can alter the order of the steps. Light the fire first (step 4) and then add the logs, forming a pyramid on top of the “mountain” of fine wood.
STEP 4 Light the fire How to light a fireplace? One of the most practical and effective ways is to use ignition pills :
Light the pill with a lighter or match and place it on top of the twigs or small chips, under the logs. If you have opted for the “mountain” of fine wood, insert the lit tablet in the central hole. Next, add the logs. (step 3).
Be that as it may, the fire must start quickly. If it doesn't or too much smoke is generated, perhaps the wood is damp or you forgot to open the chimney flue.
How to make fire without pills?
If you have a sack of special ignition chips or good-sized dried pineapples, you can probably do without the pill. Simply try to bring a lit match closer.
Consider getting long matches or special lighters for lighting. They will make your work easier and you will avoid accidentally burning your fingers.
How to make fire without conventional pills
Traditional ignition pads are made from solvents and petroleum products. They give off poisons when they burn and some (not all) produce odors. Therefore, for your fireplace you should choose healthier and more ecological solutions, such as:
Forest wool with natural waxes. They are pressed wood filaments bathed in natural waxes. Pills or discs made with pressed wood . There are even those that light like a match.
How to light a fireplace safely
Keep these tips in mind:
Beware of paper and cardboard. It is quite common to include crumpled paper or cardboard to get the fire started or stoked. However, it has its drawbacks, such as contributing to the accumulation of soot. In addition, as it is a lightweight material, it can float while it is on and cause a fire in the chimney tube when it comes into contact with substances adhering to its surface. Or, fly into the room, with the consequent danger. Completely discard printed papers or cardboard: when the ink burns, it generates polluting gases in the room.
Don't burn wood products. Painted or treated wood can release toxic gases when burned.
Use only dry firewood. If it is wet it gives off a lot of smoke, contributes to soot, does not ignite well and sizzles.
Get hold of fireplace utensils. They allow you to move logs safely and keep your fireplace ash-free. The usual ones are: clamp, hook, brush and shovel. To stoke the fire, nothing better than a bellows.
Read the manufacturer's recommendations if you have purchased a fireplace with an insert or a metal fireplace.
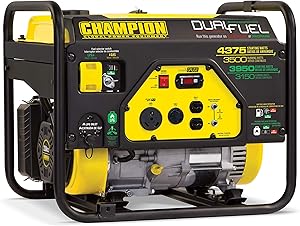
Operate your 3500-watt portable generator right out of the box on either gasoline or propane, plus the unit holds 0.6-quarts of oil and has a low oil shut-off sensor
Keep track of voltage, hertz and run-time hours to easily monitor power output and track maintenance intervals with Intelligauge
Outlets – One 120V 30A RV outlet (TT-30R), one 120V 30A locking outlet (L5-30R) and two 120V 20A household outlets (5-20R)
Kinetic energy: creating electricity with our movement
Beyond wristwatches, there are a few devices that use only kinetic energy to operate. Storing kinetic energy is not the most efficient way to generate electricity, but it is the most appropriate way to take advantage of all the energy we generate to recharge the devices we use daily: mobile phone, laptop, desktop computer, electronic equipment, household appliances, etc. .
Ever since I read an article a few years ago on experimental devices powered by energy that is generated with movement, I have believed that kinetic energy is wasted by the technology industry, which has strived in recent years to increase the life and reliability of batteries conventional, whose latest lithium ion models equip computing and electronic devices, and even electric cars.
Why the kinetic energy I generate dissipates as heat
I live near the Barcelona seafront and I take advantage of every morning to go jogging for half an hour, along an urban route of just over 5 kilometers. I don't ride the bike as much as I'd like to, but Kirsten does it more consistently, at least until our second daughter was born.
Living in a very dense urban area where pedestrian areas and local establishments predominate, we rarely use public transport to get around, but we move on foot. All these movements produce energy, which is dissipated, especially in the form of heat . No system is used to transform it, store it and use it at another time.
Our youngest daughter, Ximena, who is six months old, usually enjoys going for walks and errands inside a baby carrier , looking out to satisfy her curiosity.
Baby carriers are usually comfortable and reinforce the bond between a child and his parents, by resembling in a way not only the bales traditionally used in many parts of the world, but also, in nature, the pouch used by kangaroos and the remaining marsupials to protect their young while they nurse them during their first stage of development. Both the baby carrier and its carrier generate energy with their movement, but it dissipates without being used. Another opportunity to create wasted useful energy. Agnes , our oldest daughter, turns 3 in February and alternates walking with the cart. In the coming months, Ximena will go by car, to the relief of her parents' lower back, and Inés is now ready to stand on the wheeled platform that attaches to the back of any car. All the energy created by the movement of the car is also wasted. Again, a missed opportunity to convert all this energy into electricity.
Why does the kinetic energy that I generate dissipate as heat? Perhaps the computer and electronics industries are to blame, which have so far failed to successfully market devices that are recharged (or that are always recharged and do not even require conventional batteries) thanks to the conversion of our movement or movement generated by our shares in electricity.
Our movement is energy ... untapped
As I was running the other day, I was thinking about wearing energy-storing trainers with every step, plus a T-shirt and leggings capable of doing the same. This energy could be used to recharge the music player I carry while I run, or it could even be stored in an equally compact device that is light enough to be effortlessly carried in a bracelet or pocket.
Set to dream, this same device could then extend the autonomy of my mobile or laptop, for example. Unfortunately, this everyday application of stored kinetic energy converted to electricity is a vision for the future.
There are several forms of energy, such as chemical, generated by heat, electromagnetic radiation, nuclear energy, gravitational energy, electrical energy, elastic energy, etc. All these forms can be grouped around two groups, potential energy (the ability of some bodies to generate work) and kinetic energy (from the Greek "kinesis", movement), which appears with movement. When potential and kinetic energy are joined in a moving body, mechanical energy is born, which we can store and reuse.
Although health studies in recent years show an increase in sedentary lifestyle , especially among the youngest, we continue to make daily efforts that we do not pay attention to.
One kinetic battery per child?
One way to take advantage of all the energy generated during any activity, most of which is dissipated as heat and is never used, would be to use kinetic energy chargers, or devices that function as perpetual-running clocks, using our physical activity as a method of recharging.
But this vision still has significant pitfalls to resolve. One Laptop Per Child ( OLPC ), responsible for the development and commercialization of the computer for children in poor countries, the XO-1, is one of the organizations that has shown the most interest in developing a battery powered by children's kinetic energy.
According to OLPC , although kinetic technology is well known, a battery of this type would not be small enough to be integrated into future models of the computer they develop.
Another challenge would be to convert an inconsistent and changing motion into electricity. A child playing or going to school can walk, stand, run, jump, crawl; different intensities of kinetic energy.
The OLPC wiki mentions the intensive research carried out by DARPA , a technology agency under the US Department of Defense, in the field of small devices that create electricity from simple movement, such as that generated by a hand or by walking.
According to OLPC, the charging device used for Faraday mechanical lanterns produces electricity through a simple wiggle, and is technologically as simple as it is cheap. It could be modified to generate electricity with any noticeable movement, especially walking.
Mechanical flashlights were already used in World War II, when the recharging of handheld equipment was intermittent and unreliable, if not unfeasible.
Already then, different methods were developed to generate the necessary power to maintain constant lighting: squeezing a handle, moving a crank or shaking the device. Despite the knowledge of these techniques for decades, their commercial application has always been a minority.
Generate energy while walking
In the same category of devices, there are small backpacks that capture the vertical movement generated while walking or running and convert it into electricity. IBM published abundant documentation on this family of devices a decade ago , in which it is concluded that the movement generated by the legs is the most suitable for capturing energy. These studies have attracted little commercial interest thus far.
TIME magazine included in its article on the best inventions of 2008 , in position 33, a " harvester of biomechanical energy ", an invention of Max Donelan , a specialist in kinetics at Simon Fraser University. The device ties around the knee and “recovers” up to 5 watts with the sheer power of leg braking while walking.
Shake Before Use: Personal Power Generator
At the January 2009 edition of the CES computer and electronics fair, the startup Tremont Electric presented a device that stores kinetic energy generated while a person walks or shakes the device. The nPower PEG (“Personal Power Generator”) transfers energy, converted into electricity , to the battery of the connected portable electronic device.
The nPower PEG, which has the appearance of a small cylindrical bar that houses another slightly longer bar inside and has been designed for easy portability, can recharge 80% of the battery of a mobile or a netbook in 1 hour, according to Tremont Electric. The recharging process can be done with body movement or by shaking the nPower PEG vertically.
The inventor of the device and driver for Tremont Electric, Aaron LeMiex, came up with the idea of developing the device for recharging devices with kinetic energy while walking, 10 years ago now, some 2,500 kilometers of rural routes in the Appalachians, United States. Aaron LeMieux then often found himself in the dilemma of having to deviate his path and move to urban centers in order to recharge his electronic devices.
The 22.8 (9-inch) by 3.8-centimeter (1.5-inch) nPower Personal Electric Generator weighs 255 grams (9 ounces) and is made from recycled materials. However, this small generator does not include a battery, so that users cannot store the generated kinetic energy for later use, but instead the transaction must be done instantly, limiting its potential use in any situation.
The device, which includes a USB 2.0 port, is compatible with 90% of portable electronic devices, such as multimedia players, GPS, cameras, mobile phones, portable game consoles, camcorders and small computers, or netbooks.
It is not necessary to continuously shake the nPower PEG to guarantee its operability, since it has been designed to transmit electricity inside a backpack or suitcase. Likewise, it also works while the user is sitting on the subway, train, or bus, or while riding a bicycle.
Devices like the nPower PEG serve as pioneers in the field of electric generators starting from our movement.
Kinetic mobile phones
It is not surprising that companies and research centers work on dozens of experimental prototypes of everyday devices that never reach the market; however, many of them are used as a previous model for later commercial versions.
And, if several companies experiment with mobile phones that incorporate batteries that hardly need to be recharged, others go further and directly dispense with any need for external recharging, employing the same kinetic principle used in the watch industry for decades.
It is precisely a watchmaker, the Swiss Ulysse Nardin, who claims to have created the first mechanical mobile phone with the help of the firm SCI Innovations. The mobile uses kinetic energy for its operation, although it has additional energy from a battery if necessary.
Kyocera also intends to commercialize mechanical telephones in the future, which would only operate on accumulated energy from the user's daily movement. This Japanese company has created a flexible mobile phone prototype that uses tiny piezoelectric generators to capture and convert even the tiniest movement or vibration into energy.
The head of the concept mobile, Susan McKinney, has created a flexible device that folds up to make calls and essential functions, while it can be unfolded to take advantage of its high resolution screen with content that requires it. The device feeds on the energy that we provide when we interact with it, not only from movement or slight vibrations, so that its energy reserve would increase with more intensive use.
Both Ulysse Nardin's Swiss mobile and Susan McKineey's model are, for the moment, mere conceptual objects, but they respond to the desire to create electronic and computing devices capable of sustaining all their activity without the need for conventional electrical power, a relief from the growing impact of these devices on the environment.
A floor that converts our steps into energy
In addition to personal electric generators that, like Tremont Electric's nPower, recharge any powered device with simple movement, it is also possible to install a kinetic mechanism on a busy surface and thus convert the footsteps of people (or livestock) walking on your surface in electrical energy.
Already in 2006, a group of British engineers decided to collect the vibrations of the street with a prototype that was installed at the same level as the surface. The mechanism devised is capable of converting the vibrations generated by people's footsteps into electricity , which is later used to supply the nearest street lighting. The initiative was dubbed the Pacesetters Project and promoted by the British firm The Facility Architects, which continues to work on what it calls " energy harvesting ".
Now, the also British Pavegen has achieved a certain impact with the installation of a slab in East London that collects kinetic energy from pedestrians . Pavegen ensures that each small station can generate up to 2.1 watts per hour with the clueless and random of the anonymous pedestrian.
By installing 5 units of these kinetic energy collector slabs on a busy street, the startup Pavegen ensures that enough energy is generated to illuminate a bus stop for an entire night.
Take advantage of the pavement in car parks to generate energy
A Sainsbury's supermarket in Gloucester, also in the United Kingdom, has proposed that part of the energy required by the establishment and the lighting be generated by the buyers' cars , which actuate piezoelectric lights installed at the entrance to the car park, capable of converting kinetic energy into electricity.
According to the Daily Mail, the more than 30 kW generated by the speed bump installed on the parking lot is enough for all the cash registers to work . A small change in the parking lot that visitors do not even perceive that, however, supplies a substantial part of the establishment's electricity consumption. In the future, similar mechanisms could cope with the energy needs of particularly crowded places.
The idea put into practice by Sainsbury's seems to have been liked on the other side of the Atlantic: an establishment belonging to a fast food chain located in Hillside, New Jersey, intends to install a similar speed bump in the car ordering area. The device for capturing and transforming kinetic energy into electricity has been developed by the American company New Energy Technologies.
We, a wasted energy source
The kinetic energy generated by any moving body could be collected and converted into electricity using known techniques. Until now, research centers around the world have focused more on improving increasingly smaller and longer-lasting batteries, to the detriment of technologies that would avoid the dependence of the devices themselves on an external power source.
However, a greater awareness of users and the improvement of equipment related to adventure sports lead an increasingly noticeable change in which kinetic devices and chargers stand out, in addition to solar ones. Meanwhile, I still have a dream: to turn every one of my actions, no matter how small, into electricity.
I'd be comforted to know that a morning run is enough to keep the laptop I use for work next to work for hours.
Generate electrical energy
There is no natural source of electricity that is practical to use, so it is necessary to resort to other energy sources that allow it to be generated. Various systems have been designed to convert other types of energy into electricity.
Electric generators and thermal machines
When any type of energy, be it mechanical, thermal or other, is converted into electricity, we speak of electricity generation. The most common process is to convert the initial energy into mechanical energy and then this into electricity by a machine called an electric generator. The initial energy can come from different natural sources such as water and wind, which are capable of producing movement to generate electricity.
Electric generators convert the mechanical energy of a rotating shaft into electrical energy. If a conductor, for example a copper wire, is in a variable magnetic field, a potential difference (voltage) is generated; This is also called electromagnetic induction. The variable magnetic field is produced by the rotation of the central part of the generator, called the rotor; the fixed part is called the stator.
The voltage or electrical potential indicates an energy level; electrons always move from a point with high potential to one with low potential.
It is also common to convert the original source of energy into heat (thermal energy) and then this into mechanical energy, a process that is carried out by a heat engine. This is the case, for example, of chemical energy from fuels and nuclear. There are also other more direct processes, such as photovoltaic cells, which convert solar energy into electricity, and fuel cells, which convert chemical energy into electricity.
The steam engine is the first heat engine, and probably the most successful. They became commercial thanks to Thomas Newcomen, an inventor who around 1712 began using them in the coal mines of England. However, today the steam engine has been almost completely displaced by others much more efficient and economical.
Thermal machines convert heat into mechanical energy, and the latter into electricity using a generator. Various systems are used for this operation:
Steam turbine, also called Rankine cycle. This turbine is only part of a more complex system, so it is preferable to call it a generation plant or cycle. It is made up of a large number of blades (blades) attached to a shaft. The steam enters at high speed, collides with the blades and makes them rotate. The turbine shaft drives a generator that produces electrical energy. The steam that comes out goes to the condenser, where it is transformed into liquid water.
Gas turbine or Brayton cycle, it is similar to the steam turbine because both have blades attached to the shaft. However, the gas one has an additional component, the compressor, also made up of blades that are attached to the same turbine shaft; in this the ambient air is sucked and compressed. It is then heated in the combustion chamber by burning a fuel, to finally pass through the turbine itself. The hot gases drive the turbine, which turns the compressor and the electric generator.
Diesel engine. This type of engine is widely used in land transportation, not only in older vehicles but also in automobiles. It is widely used in medium power thermoelectric plants.
Diesel engines use a four-stroke system: intake, compression, injection and ignition and exhaust. In the first time, the air enters, then it is compressed with the push of the piston plunger upwards, which raises the temperature of the air. In the third stage the fuel is injected, which with the high temperature and pressure of the air produces the combustion; The fuel mixed with the air burns rapidly, whereupon the gas expands and pushes the piston downward, causing movement. Finally, the gases escape and a new cycle begins.
Combined cycle electric generator. It consists of a gas turbine linked to a steam turbine. Natural gas ignites as it enters and turns the blades of the gas turbine, generating great energy. The hot gases leaving the gas turbine pass through a recovery boiler, where high pressure steam is generated, which expands in the steam turbine. Both turbines generate electricity. The steam turbine has a condenser such as in the Rankine cycle. The efficiency of this cycle is higher than that of each separate cycle.
Fuel cells They directly convert the chemical energy of a fuel into electricity. Its first applications were in space programs. Currently the most common type of cell uses hydrogen as fuel, generating electrical energy with efficiencies of the order of 50%, without producing any pollutant; the only product they discharge is pure water. Many scientists and technicians think that the fuel of the future is hydrogen and that the best way to use it is in this type of cell.
Hydrogen can be obtained from water, abundant and cheap, using electricity generated by non-polluting renewable sources, such as hydropower, wind or solar energy; the great drawback of fuel cells is that their cost is still high.
Steam machine
It was key in the development of rail transport. Although they were very inefficient, they were until the 19th century the only ones that could move the heavy train carriages.
In Chile, the first steam engine that was used on the railroad between Copiapó and Caldera is still preserved as a historical memory, thanks to the boom of the Chañarcillo silver mines. It was inaugurated in 1851; It was the first railway in Chile and one of the first in America.