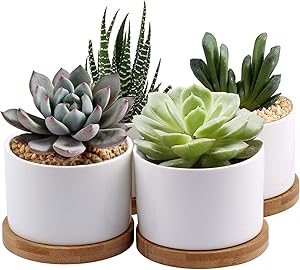
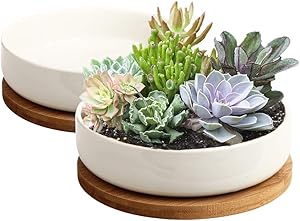
Succulent Pots, ZOUTOG 6 inch White Ceramic Flower Planter Pot with Bamboo Tray, Pack of 2 - Plants Not Included
- Free Bamboo Tray: Simple design with a removable draining tray made of bamboo is perfect to catch drips for potted plants.
- Drainage Hole Design: Shallow round planter with a drainage hole, create a young and fresh look for your home and office!
- Modern & Simpler: White ceramic Set of 2 succulent / flower planter, add a decorative touch to any room.
- Sleek Table Centerpiece: The clean pattern of your planter looks great in apartments on coffee tables, modern home decor, offices and dorm room.
- Planter Size: 6.14 * 6.14 * 1.57 inches (L * W * H); Tray Size: 6.22 * 6.22 * 0.41 inches (L * W * H)

How to move plants safely
It is very common that throughout our lives we have to move residence, the causes can be many: change of job, a cheaper rent, a bigger house, better opportunities in another city or country. But beyond the causes, for those of us who love gardening, the fact of moving adds an extra problem: How to move the plants to our new home?
Having to leave years of work in our garden behind can give us a lot of sadness and nostalgia and we cannot resist taking at least part of it to our new home. Luckily, if we do it correctly, we have a great chance of success moving plants to a new location, there are times better than others, but beyond that, I am going to give you some basic tips that you should know and take to the practice if you want to move the plants along with the rest of your belongings. Maybe you can't take everything with you, but something is something ...
If you are in Spain, the national removals page in Barcelona can help and advise you on the matter
Checklist for moving plants
Before deciding to move your plants, you should ask yourself the following questions and consider the efforts that this task will entail from start to finish.How big is the plant in question?
If it is a specimen of more than one meter wide or high, consider that it will be very heavy both to handle and to transport it, also find out the cost of transport.Is it a special variety or can I buy a new one?
Perhaps all the work and risk of the transplant is not justified.Will it adapt well to my new climate?
Especially if you change cities, remember that there may be a totally different climate, as long as you are within the same hardiness zone there should be no problems. But consider the frosts, rains, and summer heat that the place you move to has.Will I be able to take care of the plant during its adaptation?
That is, I will be able to plant it quickly and take care of it or I will have too many chores with the rest of the things in the house. It is a point that sometimes we do not consider and we end up killing the plant for not being able to do things in the appropriate time.Do I have enough space in my new home or garden for these plants?
If you have reviewed all these considerations and you still want to move the plants to your new home, take note of the following recommendations for cheap moves in Mataró so that success is certain.Ideal time to move plants
- There is an ideal time to move perennials from one home to another, and it is spring or fall. During these seasons, the temperatures are not excessively hot and the plants suffer much less. If you have the choice, try not to move the plants during the summer, as these climatic conditions make the plants stress very quickly when we transplant them. If we talk about trees and shrubs, the ideal time is winter.
- Of course, many times we cannot choose in which season of the year to move, therefore, I am going to give you other information that can help you to make the move as optimal and successful as possible.
- Something else, if you have all your plants in pots, obviously you will have less inconvenience, but anyway, the advice for transporting them can be very useful.
Taking the plants out of our old garden
- The first thing you should try when you dig up your plants is to try to remove them with as many roots and soil as you can and trying to hurt it as little as possible. The soil will help protect the plants during the move. Once you've dug it up, place it in a large pot and make sure to moisten the substrate as much as possible and that it remains moist. In the case of very large plants, such as small trees or shrubs, you should wrap their roots in burlap cloth to protect them even more.
How to transport our plants in a move
If we must move the plants during the summer or spring, it is very important to keep them away from the sun and the wind. The root ball must be kept moist during transport and we should replant them in their new location as soon as possible. The less time it takes to relocate our plants, the better, as there will be less stress. If the move is in autumn or winter, the time that the transport takes is not so critical, however, the sooner we do it, the better.
An important consideration would be to try to move the plants in a closed vehicle or transport, such as a truck, in order to avoid any damage that may be caused by the wind. If the distance is long, such as a move to another city, we should check the humidity of the substrate every time we stop.
Finally, we are in our new home!
- Once we reach our destination, we have to check and see if our plants have suffered any damage. We can trim the broken leaves or branches and will try to re-plant them as soon as possible.
- If we are looking for an ideal time, this would be a cloudy day and in the morning, especially if they are spring or summer months.
- A plant that has been transplanted is going to need all our love and intensive care. Make sure to keep the soil moist with waterings as, especially in hot weather, plants can easily wilt. Something that can help retain moisture is adding a 5-10 cm layer of mulch.
- It would also be convenient to protect them from the intense sun during the adaptation period that must inevitably occur when the plants are moved.
- Remember that the safest thing is that your plants need several weeks until they finally adapt to their new location, so pamper them a lot and do not neglect them.