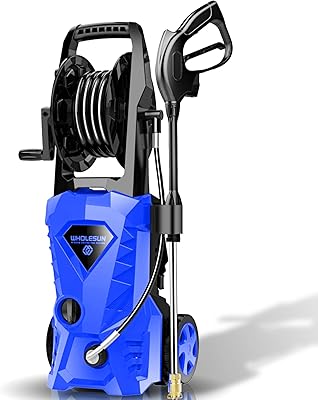
WHOLESUN 3000PSI Electric Pressure Washer 2.4GPM Power Washer 1600W High Pressure Cleaner Machine with 4 Nozzles Foam Cannon,Best for Cleaning Homes, Cars, Driveways, Patios (Blue)
- HIGH PRESSURE FOAMER CANNON: As a high pressure foamer, the polymer corrosion-resistant detergent bottle can loose tough stuff or remove deep stains.
- HIGH PRESSURE CLEANER: Powerful 1600-Watt motor generates up to 3000 PSI/2.4 GPM.Perfect for siding, decks, cement, pavement, pools, outdoor furniture, cars, trucks, RVs, ATVs and more.
- LEAKPROOF CONNECTIONS: Professional metal garden hose connector and 22mm metal water outlet. Comes with a 20ft high-pressure hose (metal connection) to avoid annoying water leakage.
- TOTAL STOP SYSTEM: Power Pressure Washer Features Safety Automatic Total Stop System (TSS), which automatically shuts off the pump when trigger is not engaged to save energy and prolong pump life. We provide 33 ft power cord with inline GFCI for use on all exterior outlets.
- CUSTOMER SUPPORT: We provide a 2 year warranty, if you have any problems with your high pressure cleaner, you can contact us at any time. If you are not satisfied, you can get a full refund within 30 days! !

How to remove blood stains from concrete surfaces
If you have an accident that results in injury, you may need to be prepared to remove blood stains from surfaces around your home. If allowed to sit, blood can easily cause unsightly marks on a variety of surfaces, from furniture to carpets, clothing, and more. If you accidentally end up with a blood stain on a concrete surface, acting quickly is one of the best ways to ensure that all traces can be removed properly. Read on for a short guide on how to do this.
Step 1: clean up fresh blood
If you can target the affected area immediately after the accident, the first thing to do is clean up any excess blood that may be accumulating on the ground. Use a clean cloth to rub it in and avoid rubbing as this could spread the stain. Continue until you have removed all excess liquid from the soil. Wear gloves while doing this and be very careful not to spread the blood and make the stain worse. Gloves are also important for your own safety, as someone else's blood may be contaminated and capable of spreading disease.Step 2 - Scrub the dry areas
Use a stiff-bristled brush to scrub the bloody patch. The objective is to get the dry particles in the concrete to loosen and peel off. Continue to go over the stain for about 10 minutes or until the blood has completely come off.Step 3: sweep up the debris
If all or some dried blood has come out, use a broom and dustpan to sweep it up. This will generally work well if the spill is older and has had a chance to dry completely on the concrete surface. However, it can be tricky if the accident just happened. Dispose of waste in a safe and healthy manner, following the legal guidelines regarding hazardous waste disposal in your area.Step 4: apply a detergent mixture
In a small bowl, mix one part liquid dish detergent with three parts water and stir until the contents are completely combined. Pour a small amount of the solution onto the stained area and then continue scrubbing vigorously with the stiff bristle brush. See if the stain begins to appear or if you will need a stronger method. Wipe up the liquid with a clean cloth or paper towels if successful.Step 5: treat with hydrogen peroxide
If the stain still persists after you've completed all of the above steps, pour a small amount of hydrogen peroxide on the area. Let it sit for about 15 minutes so it begins to break down the blood and then scrub it once more with the stiff bristle brush. Wipe off the peroxide with another clean cloth or paper towel. Re-examine the stain; if it's still there, treat it with another dollop of hydrogen peroxide and rub until it comes off.How to remove dry cement
Cement is one of the most used materials in construction and home repair. Learn how to clean dry cement from tiles, how to remove cement from metal and clothing with these tips.
Cement is a somewhat complicated material to handle, especially if we are doing a project on our own at home. The problem with working with cement is that it can fall on unwanted surfaces, and if it dries it is difficult to remove. But don't worry, we have the best solutions and techniques on how to remove dry cement from your floors and even your clothes. Discover them below!
How to remove dry cement from tiles
You made repairs at home and are wondering how to remove cement residue from the floor? We are going to teach you how to clean dry cement on tiles step by step:
Buy a cement remover product at a hardware store. The most common is the so-called RC-10.
- Wear protective gloves and goggles when working with these types of chemical materials
- Apply the product on the cement stains and let it act for 5 minutes.
- Scrub the tiles with a brush to remove the now thinned cement.
- Dry the area with a cotton cloth.
- Repeat the process if necessary, until all the dry cement stains have been removed from your ceramic floor.
- Lastly, clean the floor with a cloth dampened in clean water.
How to remove cement from metal
For metal surfaces, such as aluminum windows or doors, the cement removal process is similar.If there are coarse cement residues on the metal, try removing them with a putty knife. Then use the cement remover liquid, let it work and wipe with a clean cloth
How to clean contact cement from clothing
Now that you know how to clean cement-stained ceramic floors, it's time you learned how to remove cement from clothing. Pay attention to these tips:
How to get cement out of clothes:
- If you stained your clothes with dry cement powder, don't get it wet!
- Using a stiff bristle brush, brush the garment on both sides to remove as much of the cement dust as possible.
- Wash the garment in the washing machine normally, but do not mix it with other clothes.
- In the case of wet cement stains, with a blunt knife or spatula, remove the cement from the fabric, and apply a few drops of cement remover to the fabric to remove the rest of the cement.
- Be careful when using these chemicals because they can damage fabrics. Try the product on an inconspicuous area of the garment first.
- Wash the garment as usual.
Key steps:
- When working with cement, wear old clothes that you don't mind getting dirty. You will save yourself trouble.
- Cover all the surfaces in the areas where you use cement with a cloth or sheet, or prepare the cement outside your house.
- If you do get stained with cement, act fast to remove the stains effectively.