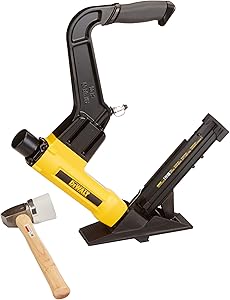
Lightweight at 10.6 lbs for better balance and control
Optimized for the most popular solid flooring fasteners, 15.5ga Staples and 16ga “L” Cleat Nails
Interchangeable, Non-marring base plates adjust to all sizes of flooring
Ergonomically designed with longer handle and comfortable rubber grip for ease of use
Lower CFM requirements for less compressor run-time
Can I use a nail gun to install a wooden floor?
Nail guns cut down on time and labor by replacing the old "swing-a-hammer" technique with automated nails. You can use certain types of nail guns to install a hardwood floor, but practice on scrap wood first to ensure you master the correct technique. You can use three types of guns on a hardwood floor: a floor nailer, a finish nailer or a floor and mallet nailer. Framing nail guns are not suitable due to the size and configuration of the nail.
The nailing process End hardwood planks fit end and side by side with a tongue and groove set. After installing the first plank in the corner of a room, each subsequent plank will snap together to form a smooth floor. The edge of the plank's groove faces the wall, and the tongue side faces outward; this is the part where you will insert your nails. The nails you use should have little or no heads so they will sink slightly below the surface of the wood and will not prevent a tight fit when you install the next row of planks. For the first course of planks, a hammer and a set nail may be needed for the face-to-nail.
Nailer flooring One of the best guns to use to install a hardwood floor is a pneumatic floor nailer or stapler. Made specifically to fit over the top edge of the board and the tongue, this fires a headless nailing nail through the tongue and into the sub-base or floor joist underneath. When positioned correctly, making a mistake with this nailer is difficult.
Finish Nailer Not everyone keeps a floor nailer around because it only has one use. If you are handy with a nail finish gun, you can use it to install a hardwood floor. A nail finish gun, designed for trim work, shoots an almost headless nail that doesn't mar the wood surface look, which makes an effective finishing nailer for installing hardwood floors as well. To use this nailer, position the nail shoe on the wooden tongue at a 15-degree angle downward and inward, toward the plank. Depress the shoe nails, keeping the nailer carefully in place, and pull the trigger. Use finishing nails that are long enough to run through the subfloor, if any, and at least 1/2 inch to the floor joists.
Floors and Mallet Nailer Even power nailers became common in the flooring industry, a manual floor nailer and hammer were standard, and it still does a good job today. Like the pneumatic floor nailer, the manual nailer keeps the nails paving and features a nail shoe shaped that fits snugly over the edge of the plank and tongue. After positioning the nailer, tap the cap by nailing it with the mallet to shoot a nail, staple or staple floor through the tongue. Flooring and mallet nailers can use gravity and a spring system to drive the nails, or they can employ compressed air to shoot the nails when you hit the lid by nailing with the mallet.
How do I choose the best floor nail gun?
When trying to choose the best nail gun for floors, it's important to identify the features that are most important to you. Most floor nail gun options are available in both air and fuel operated models. The pneumatic nail gun requires an air compressor as well as air hoses to operate in any job site. The fuel-powered weapon has the advantage of being cordless, however, the initial cost is generally higher than an air-powered weapon. After cost, the most common and important characteristics for many people are the weight, type and style of nails used, as well as other uses to which the weapon can be attributed.
The first thing you need to decide when looking for the best floor nail gun for any job is whether or not you want an air-powered model or a cordless style. The air-powered floor nail gun is almost always cheaper than a wireless gas-operated model; however, you have other considerations that will accompany the air-powered model. Unless you work for a company that has a large air compressor available at each job site, along with a connecting manifold, you will also need an air compressor and multiple air hoses to reach all areas of a job site. of works if you decide to buy an air. motorized nail gun. Furthermore,
When you factor in all the additional expenses associated with an air-powered floor nail gun, you may find that a wireless gas-powered model is much more to your liking. This style of floor nail gun uses an interchangeable fuel cartridge that injects a small amount of fuel into a chamber at the top of the nail. This fuel is ignited by a small electrical charge from a rechargeable battery inside the nail gun. This floor nail gun model uses no hoses or cables and is typically good for firing over 1,000 nails from each replaceable fuel container.
Other considerations that should be made to ensure you are purchasing the best floor nail gun are the style of nails used with the gun, along with other uses for the gun. Most nail guns use a straight nail clip or a large round nail roller. The nail roller will require fewer refills, although it weighs more than the straight nail clip. Also, to get the most for your money, you can choose to purchase a floor nail gun that can be used for other types of nail work as well as flooring.
Fixing the wooden floor
The drilling for the passage of nails and screws must be done with a drill. The hole can be in the surface, in the case of screws only, or in the male insert for nails or screws. In case of installation on beams, the hole must not reach the subfloor. When the floor is installed on joists, the screw must be fixed on the floor surface, provided it is rough as shown in the figure below.
Of the types of screws and nails found, the use of those made with galvanized steel is recommended, as they are more resistant to moisture and consequently to deterioration.
Mixed fixation
Mixed fixing consists of installing the wooden floor using adhesive and nail or adhesive and screw. This system is used when the piece of wood has a very accentuated warpage and is installed directly on the subfloor. In this case, the screw must be used to provide greater security in fixing.
On rough floors, with dimensions from 9.5cm in width and 2.0cm in thickness, glue, screws and 8.0mm dowels must be used, respecting a spacing of 40.0 to 50.0cm between the screws in the male fitting.
On varnished floors that are 9.5cm wide and 1.8cm thick, glue, screws and 6.0mm dowels must be used. In this case, the spacing between the screws is variable, depending on the specific situation of the installation.
For this type of fixation, it is important to emphasize that the dimensions of the floors will define the type of material to be used.
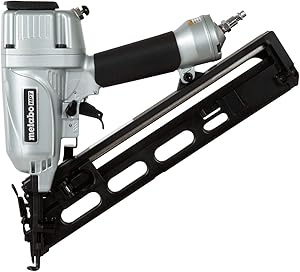
Metabo HPT Finish Nailer Kit, 15 Gauge, Pneumatic, Angled, Finish Nails 1-1/4-Inch up to 2-1/2-Inch, Integrated Air Duster, Selective Actuation Switch, 5-Year Warranty (NT65MA4)
AWARD: Rated the Pro Preferred Nailer for 7 years running (2014 - 2020) by Builder and Developer Magazine
FASTENERS: 15-gauge nails from 1-1/4-in Up to 2-1/2-in In length
APPLICATIONS: Ideal for installing crown and base moldings, window and door casings, chair rails, cabinets, exterior trim and staircases
TRIGGER: Easily switch from either sequential or contact nailing with a simple flip of the switch
DEPTH ADJUSTMENT: Tool-less depth of drive dial adjusts for flush fastening into varying materials for improved control and a professional finish
LIGHTWEIGHT: Only 4.2 lbs, this finish nailer minimizes user fatigue, while increasing maneuverability
EXHAUST PORT: 360-Degree fully adjustable exhaust port directs air exhaust away from the user or work piece
What is a Nail Finishing Gun?
A finishing nail gun is an electric tool that triggers the finishing nails. It is used to quickly attach finishing pieces such as moldings and panels. Most of these tools are air powered and can drive several nails per minute, making them a basic tool for finishing carpenters.
There are many types of nails used during construction, including roof nails, frame nails, and finishing nails. Structure nails are longer and heavier than finishing nails, both because they contribute to the structural strength of a building and because they are guided by thicker pieces of wood. These nails often require an entirely separate and more powerful tool. Tools that provide different cartridges for finishing and finishing nails - and that have adjustable power controls - are available, but can be more expensive.
Finishing nails can be shorter and thinner because they are used to secure non-structural finishing pieces. These nails should, in fact, be thinner than framed nails, because a heavier nail can cause a finishing piece to crack or chip. Finishing pistols are specifically made to shoot these smaller nails. The nails are driven with enough force to secure the trim, but they are not so powerful that the surrounding wood is damaged.
Most finishing nail guns are air powered, meaning they are connected to an air compressor separated by a hose. These compressors are available in different sizes and powers. The compressor uses an electrical supply to generate air pressure, which is forced through the hose to the gun. When the trigger is pulled, air pressure forces the nail into the wood.
Finish carpenters, who are carpenters who specialize in finishing jobs such as cabinets, trim pieces, and decorative panels, often use a finishing nail gun, especially when they are installing many finishes at once. Using a nail gun is faster, allowing them to complete more jobs in the same amount of time. Using a finishing nail gun also eliminates the marks or dents that a hammer can leave on the wood.
This tool also drives the nail deep enough so that the nail head is recessed below the surface of the finish piece, the desirable position for applying putty and paint. To create this same effect manually, a carpenter would need to carry and use a hammer and a set of nails, a tool specially designed to place the nail head below the surface. This means holding the nail and hammering it most of the time, then putting the nail in and hammering the rest. A finishing nail gun, on the other hand, simply requires the carpenter to hold the barrel in the desired location on the wall and pull the trigger.
As with any power tool, care must be taken when operating a finishing nail gun. Nails should not be loaded when the pistol is depressed, nor should the barrel be pointed at anyone or anything that could be injured or damaged. Air pressure must also be properly relieved whenever the tool is not in use.
What is a finishing nail?
When installing the baseboards, a medium sized finish nail such as 10d is often used.
Many different types of nails are used in manufacturing and carpentry. A finishing nail, made of steel wire, is a specific nail used to hide the presence of the nail. With its small head and diameter, a finishing nail is much smaller and easier to hide than a larger nail.
Instead of the wide, flat head that common nails have, finishing nails have small barrel-shaped heads with a recess at the top. This allows them to be inserted in addition to a larger nail. This size and shape also helps the finishing nail remain invisible in the final project.
Finishing nails are often used in building interior projects. This can include moldings, wainscoting, joinery, furniture, cabinets and panels. Finishing nails are also very useful for small projects like wooden jewelry boxes.
One thing to keep in mind when using a finishing nail is not to drive the nail fully embedded into the project. Doing this will usually create a large kickback in the design by the hammer. Instead, there is a precise technique that artisans use to fully insert finishing nails.
After the carpenter drives a nail almost flush with the surface of the project, he places the tip of another nail into the dimple itself. Then the head is inserted fully into the surface, creating a small hole. This hole can then be filled with plaster, wood glue or other filler compound. If the final product is to be left outdoors, and is made of wood, the hole can even close itself due to swelling due to bad weather.
When selecting a finishing nail, a carpenter or workman will base their choice on a few different requirements. This can include nail size, steel wire gauge, head diameter, number of nails needed per pound, and nail length. Each finishing nail should be three times the length of the thickness of the wood it will be used on to ensure proper cohesion.
Nail size is usually measured by the term pennyweight, an archaic word that refers to how much 100 nails cost. Symbolized by “d”, these sizes are most common in sizes 2d through 10d, as well as 12d, 16d and 20d. Finishing nails used in fine woodworking projects usually require the use of the small 2d size. A medium sized finishing nail such as 10d is often used for baseboards.
WHICH NAIL TO USE FOR WOOD AND ROOF INSTALLATIONS
For most repair projects, fasteners, nails and screws are required. And there are plenty of each type to choose from! Following are some of the most common types of nails and screws and advice on selecting the most appropriate one.
nails The easiest way to fasten two pieces of wood together is with nails. They are manufactured in many shapes, sizes and metals to make almost any type of fastening. Nails are generally made of steel, but there are also other types – aluminum, brass, nickel, bronze, copper and stainless steel – for use where corrosion may occur. In addition, the nails are manufactured with a protective coating – galvanized, paint or asbestos to prevent rust and increase their power to hold the materials together.
Common Nails : Used in medium construction services, this type of nail has a thick head and can be driven into hard materials. Common nails are made of wire and cut to length and come in a variety of sizes.
Small nails : Lighter and smaller in diameter than common nails, these nails are designed for light construction and home use.
Finishing nails : These are lighter nails than common nails and have a small head (headless nails). Generally, they are used when you don't want the head to stick out.
Roof nails : Usually galvanized, these nails (roof nails) have a much larger head than common nails. This helps to prevent damage to the roofing material.
Masonry Nails : There are three types of masonry nails designed for use in concrete and cinder block: round, square and ribbed. Masonry nails should not be used where a lot of strength is needed. In brick, stone or reinforced concrete, superbly threaded screws must be used. Corrugated fasteners : used in joints where effort is not important. Fasteners are placed at right angles to the joint.
WEN 61721 18-Gauge 3/8-Inch to 2-Inch Pneumatic Brad Nailer
Shoot 18-gauge brads ranging from 3/8 to 2 inches in length
Operate at 60 to 115 PSI with the 1/4-inch NPT air inlet fitting
Features a depth adjustment wheel, a nail gauge, a rotatable exhaust, and a quick release 106-nail capacity magazine
Hassle-free nose latch makes clearing jammed nails quick and easy
NOTE: nails and case not included. Pneumatic nailer, need air compressor to drive
2 Types Of Brad Nailers Explained
Brad nails are commonly used for home improvement projects. In fact, a brad nailer is a popular tool in any DIY kit. It is primarily used to attach 18 gauge nails (which have a distinct rectangular head) in various home repair projects. It is a more convenient option compared to manual nail hammering.
1. Brad Nailer Pneumatic
2. Electric Brad Nailer
Brad's nails are commonly used for home improvement projects. In fact, a brad nailer is a popular tool in any DIY kit. It is primarily used to attach 18 gauge nails (which have a distinct rectangular head) in various home repair projects. It is a more convenient option compared to manual nail hammering. In addition, it helps to considerably reduce working time, as it allows you to work faster and ensures a cleaner finish. Brad nails are used mainly for fastening furniture pieces together, attaching trims to cabinets and other small carpentry projects.
There are two types of brad nails on the market: an electric nail and a pneumatic nail. Given below is brief description about both brad nails.
1. Brad Nailer Pneumatic Pneumatic nails work using compressed air. This compressed air is fed by the light hose. This hose powers the compressor and powers the weapon. Pneumatic nails are a popular choice of tools because they allow the worker to work efficiently without wasting time. It also allows for a professional and elegant finish, even when the task at hand is complex (eg adding trim to cabinet). That said, when using a pneumatic nail, it's important to keep some safety issues in mind. Pressurized air is responsible for a high accident rate and therefore it is essential to handle the instrument with care.
When it comes to choosing a pneumatic nail, there is a variety in terms of available sizes as well as operating methods. You need to choose the one that best suits your building needs. The instrument itself consists of the gun, an air hose, batteries and a cartridge. Also, there are certain issues that need to be considered before opting for a brad pneumatic nailer. A pneumatic nail may seem like an economical option, but over time, your maintenance costs (oil inspections, hose replacements, etc.) will add up. 2. Electric Brad Nailer The alternative to a pneumatic nail is an electric nail. As the name suggests, the electric nailer is powered by an electric motor. It's this electric motor that powers the gun and drives the nails. An electric nail is usually a heavier machine by default, as the bulky motor increases its overall weight. However, despite the light volume, the electric preacher is very effective to work with. It gets the job done much more quickly and efficiently than a manual attempt.
Like the pneumatic nail, the electric nail also requires the same set of safety precautions. The nailer gun is known to cause injuries when mishandled. That's why it's crucial to always have a first aid kit handy.
The electric nailer may seem like a more expensive option when its prices are compared to the pneumatic variety; However, this cost difference balances out in the long run. Over time, the electric press instrument proves to be more cost-effective as it only needs a limited amount of maintenance.
Carmyra Portable Chainsaw Mill 36 Inches Planking Milling Bar Size 14 Inches to 36 Inches
High Quality Steel and Aluminum Construction
Cut Cedar, Walnut and Oak into High Quality Lumber
High-Quality Mill Cuts Beams or Lumber from 0.5“ ”To 13“ Thick and 36” Wide
Attaches to saw without drilling bar
Lower price
Best Chainsaw Mill
Cutting wood can be a big pain in the butt. Especially since they require a lot of effort and time to move. Taking it to the sawmill requires a lot of labor and a few dollars as well. This tubular metallic structure uses a common chainsaw to be used as a portable sawmill.
You may also know them as an Alaskan mill. The accuracy you will get from one of these is nothing less than what you would get from a sawmill. With a torpedo level, you can make sure the boards are completely level and all that.
Chainsaw Mill Buying Guide Finding the perfect tool for a project is not everyone's preference. Some key points must be noted before purchase as it is the only way to get an effective product. To serve this purpose, I disclose some key points that I obtained from my experience to guide you to the best chainsaw.
The adjustability of saw kerf
Sometimes you need to make thin boards out of the wood, sometimes thicker ones. Using the same mill, this purpose is achieved if the mill allows you to adjust the cut size. In most cases, power saws allow cuts from 0.5 to 13 inches thick. If you want more variations, choose the dedicated ones.
Weight
If you need to carry the tool where you felled the tree, choose a lighter chainsaw. They will serve the purpose of cutting on site. Later, you can adjust the cut in the workshop with a larger chain saw. The lightest ones can weigh 6 kilos, while the heaviest ones can reach 18 kilos.
Maximum Capacity of the Bar
Suppose you have to cut a huge log with a diameter of 36 inches, but the adjustment capacity of your chainsaw is between 24 inches. It's going to be a big mess. That's why consider the width of the logs you have to deal with regularly. Then ask for one that you can handle the most.
Cut Adjustment
The chainsaw bar is primarily responsible for determining the cutting capacity. But the chainsaw can help adjust the capacity. Check this tuning option if you need to handle huge logs.
Material:
Aluminum and stainless steel dominate the market. Aluminum is lightweight and stainless steel is robust. Also, this combination does not pick up rust easily. That's why major manufacturers use them extensively. You shouldn't go with older options that are only built with steel.
Key
If you've been milling for a while, especially with the larger logs, you may have noticed that it's difficult to slide the setup along with the log. That's why manufacturers have installed a key mechanism to facilitate sliding. This is an option that can be seen on high end chainsaws from trusted manufacturers.
Chainsaw compatibility
A common problem with budget options is that they just don't fit on high-powered saws. Furthermore, the vibration generated by the instability of the arrangement brings great discomfort to the miller. That's why, if you're going for budget options, you need to have a chainsaw with moderate production.
assembly time
No drill will save you a lot of time when fixing and repairing your saw with the milling machine. This tool may be assembled soon. Also, a detailed instruction manual will help you reach the goal quickly.
Accessories
You may find it difficult to tighten a bolt to a specific point without having a wrench of a specific measurement. That's why manufacturers supply them with chain saws.
But to cut budgets, you might not find them in cheaper chainsaws. This shouldn't be a problem if you have a good collection of tools to trade.
Return policy
It is possible that the chainsaw you ordered does not match your chainsaw. Furthermore, any defect may occur during shipping or handling. Make an effort to review the returns policy, especially focusing on financing and replacement options.
Reviews of the best chainsaw mills As you've already gone through the shopping guide, you should now be ready to choose the best portable chainsaw. The list below shows the best choices for various uses that are currently available. Buckle up to get the best!
1. Carmyra Portable Electric Saw Mill appealing treats
At the top of the list comes an economical option. If you are new to milling and don't need to cut a lot of hard wood, this chainsaw can delight you.
This tool can handle logs from 14 to 36 inches wide. Thanks to your adjustable kerf option. It's simple to extend the jaws to enclose large trunks. You can also find an electric saw that can handle a 48 inch wide log from the same manufacturer. Stubs 0.5 to 13 inches thick can be cut with the tool.
Yes, the time to set up the configuration is a crucial parameter. This time is also shortened by some accessories provided by the manufacturer. They provide you with a key that can provide you the most needed leverage.
You don't have to worry about the return policy. This tool is backed by a one month money back guarantee. As noted earlier, this tool is for serving people who are up to small projects. That's why the tool can smooth the edge of lighter boards. Thanks to its simplified design.
When it comes to the material used to build the tool, you won't be disappointed. While this is an economical option, the manufacturer chose the best combination of durability and light weight. Steel and aluminum are used as the main construction material for the tool. This tool weighs about 16 lbs.
Glitches
A powerful chainsaw is needed to get the proper leverage.
2. Chain saw by ALASKAN Granberg appealing treats
This is a product with the trusted brand name Granberg. If you've been looking for a chainsaw for a while, you've probably heard its name. Yes, this G777 model is highly appreciated around the world for its compatibility, efficient design and continuous operation.
This chain saw was chosen to cut beams or lumber 0.5 to 13 inches thick and 17 inches wide. This allows you to handle smaller logs and get a lot of variation in cuts. That's why this is a more standard setup you can find than most other chainsaws out there.
The assembly process of this tool is something very easy. This mill connects to the saw without drilling. That means you don't have to waste time adjusting screws and other parts. The mill can fit chainsaws with bars of 20 inches or less.
Steel was chosen as the main construction material for this tool. That's why it's robust enough to withstand heavy milling and last for years. In addition, its light weight allows you to carry and saw saws wherever you want.
Glitches
Not for bigger chainsaws. Guide rail not included.
This tool is made to deal with big boys. You can adjust the jaws to accommodate logs 14 to 36 inches wide. If the mill is combined with a chainsaw larger than 60 cc, the result will be spectacular.
When it comes to the editing process, I must say, it's very easy. The manufacturer provides a detailed guide that depicts step-by-step procedures for assembling the tool. The design was made to keep in mind that you can set up the mill wherever you need it in a minimum amount of time.
Once you start working with this tool, you'll find that the setting creates less vibration to handle speed and therefore provides a smoother cut. Thanks to the end brackets that feature an improved design. Now you can easily adjust the height and width.
The manufacturer chose top-notch materials to build the tool. That's why they end up with an elegant profile mill. Stainless steel provides strength to withstand the stress of regular milling. Also, aluminum is used to minimize weight. That's why the tool is portable and can be carried easily.
Glitches
It's hard to understand the guide.
4. Granberg G555B Laminator appealing treats
You may have heard of Granberg since the beginning of his carpentry career. They simply make every kind of tool needed for woodworking. As a result, they launched this 'minimill'.
This tool is not the perfect alternative for those mills that work with large logs. Instead, this tool targets the shortest ones and can handle logs up to 25 inches wide. This mill can be used with a chain saw that has 16 to 36 inch bars and 50-70 cc or more displacement.
Its compact design is something really interesting. Although this is a cost-effective solution, the manufacturer used aircraft aluminum and zinc-plated steel. It is a commendable combination that can guarantee durability and effectiveness. The tool only weighs 6 lbs. Excellent combination for portability must say.
Assembling this edge milling machine is really easy. The manufacturer provides you with a 12-foot V-rail as a cutting guide. These attachments reduce your workload and require only tightening the nuts and clamping the saw. Then you are ready to go! This rail helps you work together with the log without any problems.
You get a cutting manual to learn how to make this cut correctly. This manual is written in a way that can help newcomers become familiar. Even for professionals who want to scale logs anywhere, this tool can be a great companion. This cost-effective tool can be a useful addition to any woodworker's arsenal. Glitches
Not suitable for larger logs.
5. Zchoutrade Portable Electric Saw Mill appealing treats
The Zchoutrade chainsaw may be the toughest competitor for most American brands that sell the adjustable chainsaw. The main reason is the cost. This upstart manufacturer offers almost the same quality but at a reduced price.
As noted earlier, this is an adjustable power saw that can provide support for logs up to 36 inches. This means you have a great opportunity to handle large parts instead of paying a sawmill's fees. Like most portable sawmills, this one can also cut stabs 0.5 to 13 inches thick.
It's easy to install! You may face the need for a portable sawmill in different locations to cut logs right there. This chainsaw can easily provide this facility due to its portability. The total weight will be around 15 lbs when fully assembled.
Although the tool has a low price, no compromises were made during the choice of materials. The manufacturer chose steel as the main building material, but at the same time kept aluminum. That's why the tool is light and less vulnerable to rust.
Here are the professional attacks again! You may have heard about this Alaskan chainsaw mill if you work with large logs or beams. This is probably the most reverted option for sizing larger logs.
You can handle a log of various thicknesses. This tool will help you cut boards from ½ inch to 13 inches thick. That means you don't need to be bothered, even when you need less thick stabs. All credit goes to its movable arms which are quite easy to adjust. This tool can handle logs up to 27 inches wide.
Less than an hour is enough to assemble the entire set. The manufacturer provides some accessories to make the setup process faster. The key that comes with the set especially needs to be mentioned. You will find it useful to screw in some hard-to-reach spots.
Yep, this big guy weighs about 18 pounds, a lot heavier than his counterparts. But it must be remembered that this tool was designed to handle heavy logs. In that sense, this is a commendable design from the manufacturer. They used steel along with aluminum for aircraft to reduce weight.
Glitches
A little expensive than others. Carrying is difficult for those who are overweight.
At the end of the list, I like to present an awesome tool from Imony. Although Imony is not a very familiar brand, they produce tools that will impress you. They have two chainsaws in their arsenal for two different uses.
One of the chainsaws is for chainsaws up to 24 inches and the other up to 36 inches. Both are economical but offer a great milling experience. You can cut boards of various widths by adjusting the jaws. This feature is useful, especially when you need to handle different types of wood.
Many manufacturers use aluminum to reduce weight. Yes, in this case aluminum is also used for a compact profile. Additionally, aluminum has strengthened the tool to protect against rust. 304 stainless steel exists to ensure durability. The handle is designed to be more ergonomic and effective. Due to its improved design, the chainsaw can also be easily fitted with the guide rail and be a great cut of time.
Glitches
You may have difficulty adjusting high powered saws.
Common questions Here are some frequently asked questions and their answers.
How big a chainsaw do I need for a sawmill in Alaska? Re: Husqy size for Alaskan Mill
For occasional use and just a 24 ″ bar, a 3120 is probably overkill, but would leave room to upgrade to larger logs. Looking at the older huskys, a 288xp, 394xp, 2100 would also be excellent choices for a mill. Stihl, a good 066\660 would also work fine.
Does a rip current cut faster? Re: tear current
I think regular chain tears faster, but chain tear produces a smoother cut. Cutting is much faster if you can use a long bar and cut at an angle that doesn't directly attack the final grain, you know the angle that produces those long shavings that eventually clog your saw.
Why is Husqvarna better than Stihl? Side by side, Husqvarna overtake Stihl. Its security features and anti-vibration technology make it easier and safer to use. And while Stihl chainsaw engines may have more horsepower, Husqvarna chainsaws tend to be more efficient and better at cutting. When it comes to value, Husqvarna is also a top choice.
What brand of chainsaw do loggers use? stihl 460 The most popular saws I see here are stihl 460 and husky 372xp. These are probably 90% of the saws used by logging crews here. Many of the woodcutters, tree services and homeowners have them here too.
What is the most powerful chainsaw? Husqvarna's largest chainsaw is one of the most powerful in the world. The main applications of the 3120 XP® are logging, portable sawmills and working with stumps. This saw is designed to pull the chain on our longer bars. Like all Husqvarna chainsaws, the 3120 XP® has a superior weight/power ratio.
Is it worth grinding your own wood? The spirit may be willing, but milling your own wood is an expensive, time-consuming and often frustrating process. On the other hand, it can be a personally rewarding and potentially profitable venture—the logical link between a fallen tree and your workshop. How long must logs dry before sawing? You must seal the ends minutes after cutting; you shouldn't wait hours, and definitely not days! Drying time varies depending on the wood species and the thickness of the logs, but they will take at least one to two years to dry - the longer you can leave them before starting to build, the better.
Stihl makes a tearing chain? Stihl 26RS 81 Links to units. 325 Pitch. 063 gauge fast chainsaw chain (2 pcs).
Is Echo better than Stihl? ECHO - Stihl offers the best options and reliability with chainsaws. ECHO has better residential options for trimmers, blowers and trimmers. … Stihl may have an advantage in some areas, while ECHO is better in others. So let's start the decomposition process.
What is the best selling chainsaw? STIHL STIHL - The best-selling chainsaw brand.
Is Stihl made in China? Stihl chainsaws are manufactured in the United States and China. The company has facilities in Virginia Beach, Virginia and Qingdao, China. “Made by STIHL” is a brand promise - regardless of production location.
What is the most aggressive chainsaw chain? Stihl chain The Stihl chain is slightly more expensive, but it is the most aggressive chain commonly available. It's also made from the hardest steel, so it holds a better edge than any other brand I've tried (including Carlton, Saber and Bailey's Woodsman Pro).
What is the advantage of a jumped tooth chain? A jump chain has fewer cutting teeth than a conventional chain, which means it won't drag as many teeth into the wood you're cutting. Less drag on the chain means less energy is needed to cut the log. This means your saw's motor runs faster, which keeps it on a more efficient power curve.
Q. How should the chainsaw bar and guide rail be placed?
Ans: The most efficient way to cut the log is to position the guide rail parallel to the chainsaw bar. This setting helps you get more out of it than any other setting.
Q. Should the configuration be cleaned after each use?
Ans: It depends on the condition of the configuration after milling. But the rule is to clean the setup and also sharpen the chain after several uses.
in short Luckily, you've found the best chainsaw in Alaska that fits your purpose. But if you have the slightest doubt, don't worry! Let me help you further to get the best chainsaw. In this I mentioned some of the chainsaws that have captured my heart.
If you want to choose a mini chain saw that is super portable, try the Granberg G555B Embroidery Mill. But for handling larger logs, Alaska's Granberg MK-IV chainsaw mill will be a better option. Alternatively, the Zchoutrade portable chain saw mill can add value for your money.
MILLED BARS
WHAT IS MILLING AND WHY IS IT KEY TO CREATING MILLED BARS? Milling is a machining operation, just like drawn, ground and rolled steel. The metal in milling is removed by a rotating tool known as a cutter, which has multiple cutting edges. Each of the edges removes a slight amount of metal with each movement of the shaft to which the part is clamped. The machine that carries out the entire milling process is called a milling machine. In this way, it is possible to produce milled bars, normally applied in forging and welding of various products. In milling, chips are removed by rotating the cutter. The cutter is a tool with several cutting edges, so each cut is only in contact with the part for a few moments of rotation and can be cooled throughout the rest of the cycle. Usually, it is steel industries that carry out this type of operation, selling different types of milled steel to larger industries, which manufacture other final products using the part. There are some variables and cutting parameters to be carried out before milling. As with all machining processes, there are a number of fundamental parameters to consider. It is through them that it is possible to quantitatively describe the movements, dimensions and other characteristics of the cutting operation.
Know some movement parameters:
• Rotation frequency (n - rpm): it is the number of revolutions per unit of time that the cutter makes around its axis. • Cutting Speed (Vc – m/min): it is the instantaneous speed of the selected point on the cutting edge, in the cutting movement, in relation to the part. In milling, the cutting movement is provided by the rotation of the tool. • Feed Speed (vf – mm/min): It is the instantaneous speed of the selected point on the edge, in the feed movement, in relation to the workpiece. In milling, the infeed movement is caused by the tool moving over the workpiece or vice versa. THE IMPORTANCE OF MILLED BARS Milled bars are mainly used in the manufacture of tools for work at high temperatures, such as forging dies, pressure casting, molds for the plastics industry, among other applications. To have the quality of a milled bar, it needs to go through the milling process. Aços Express works with quality milled bars, which guarantee a final product with a high level of strength and usefulness. We work with experienced manufacturers in the market, who follow current standards and tests already defined with regard to dimensions and strength of materials. Make your online purchase of our materials, we deliver throughout Brazil.
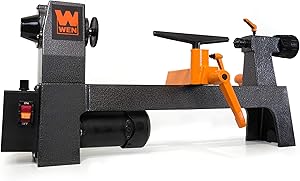
WEN 3421 3.2-Amp 8" by 12" Variable Speed Mini Benchtop Wood Lathe
Perfect for pens, bowls, cups, chess pieces, and other small workpieces
Fits workpieces up to 12 inches long and 8 inches wide
3.2-Amp motor provides over 50% more power than most 8-inch wood lathes
Adjust the soft start variable speed motor anywhere from 750 to 3200 RPM
Features a 2.3-Inch face plate, an MT1 spindle and tailstock taper, and two interchangeable tool rests
WHAT IS THE WOOD LATHE FOR?
In our day-to-day it is possible to find many objects, furniture and decorative items made of wood, but have you ever stopped to think about the processes necessary for these items to reach you?
There are many steps for the wood to be finished and commercialized and today we are going to talk about an essential instrument for shaping wood, it is the wood lathe .
The wood lathe, as well as several other machines and instruments, are part of important steps so that the wood can be finished and finally sold.
The lathe is an instrument that can be used to deal with the most varied types of wood in their different sizes. A lathe can be used to create anything from small objects and toys to large furniture, boats, and gigantic projects.
Let's better understand the functionality of the wood lathe and its use.
Woodworking
The invention of the Wood Lathe! Like many machines and tools we use today, the wood lathe has a long history.
It was created, more like what we know today, around the 19th century, but there are records of similar tools being used since 1300 BC! There is a lot of history that accompanies this tool.
Certainly, the invention of the lathe was fundamental for the development of society as we see it today and its operation was improved over time.
Previously, the lathe was used with a kind of rod that contained a rope. The rope was used to hold the piece of wood and also to activate a pedal that made the axle rotate, turning the wood .
There were other types of lathes. Leonardo Da Vinci also ventured into the invention and created a lathe that was composed only of a pedal and a wheel. Henry Moudslay was another man who went even further in inventing the modern lathe.
Old Wood Lathe
Example of an Old Wood Lathe
He used the steam engine, created by James Watt and added this important part to the lathe, making it even more powerful.
And with industrial development, this equipment was being improved until it reached what we know today, with the engine. Currently there are several types of lathes for wood such as bench, vertical, CNC lathes and others.
Each piece of equipment serves a purpose. Let's now understand how a wood lathe works .
What is the Wood Lathe As already said, the wood lathe is an instrument used to turn wood. It consists of a tool that is used to shape the most diverse types of wood.
It is a mechanical rotation system in which the wood is held between two ends which will allow the wood to be rotated at an ideal speed so that it is possible, with specific instruments, to mold the piece of wood by means of strong friction .
A basic lathe has 4 essential parts which are: the support table, the fixed head, the movable head and the tool holder. Fixed head includes pulleys, motor, belts and axle. It is also possible to find the center with claws, which will be one of the direct wooden supports.
The counterpoint is the other end that will directly support the wood. The counterpoint is the place that will rotate and will also tension the piece of wood to form the rotation movements.
Next to the tailstock is the location of the head shaft and a mechanism generally similar to the flywheel used to hold the piece of wood between the center of the lathe.
This part is essential for using the lathe safely. We will see more below on how to use this equipment correctly to reduce the risk of accidents.
The tool holder is where the piece of wood will be lightly supported. The use of the support serves to support the instruments that will be used to mold the wood, being able to slide along its entire base. With more or less pressure it is possible to “wear” the wooden piece, thus giving the desired shape.
As already said, the wood lathe can be used on smaller scales, in the manufacture of bowls, toys, furniture and decorative items, among others. But there are also large lathes used in industrial manufacturing.
Many people use the lathe as a hobby to produce small parts.
Molding and turning wood are very old carpentry activities that, with the advancement of technology, could become even more functional, innovative and give life to creative work.
Whether professionally or as a hobby, it is essential to know how to correctly handle the equipment to avoid serious accidents.
Turned Wood PieceExample of some turned wood pieces
The role of the chisel Now that you can understand the basic components of a wood lathe, it's time to talk about an indispensable tool to carry out the most diverse types of work: the chisel.
The chisel is a manual cutting instrument that has a metal blade at one end and a wooden handle at the other.
There are several types of chisels that are used for the most varied manual work, for example, working in metal, leather, cement and wood itself. The chisel is an instrument that will be used to rub against wood to create new shapes for the piece.
The chisel rests on the tool holder and the person handling it will make the appropriate movements to give it the desired shape.
It is important to work with quality chisels, as this way the friction will be well done and the end result will be much more satisfactory.
Keeping the parts sharp is also a safety tip for those working with wood lathes. Wood Chisel Example of a chisel turning wood
Cautions when handling the Wood Lathe All equipment that has a high-speed shaft must be handled with great care. It is important to use all safety equipment when working with the wood lathe.
Appropriate clothing, helmets, gloves and especially glasses are essential for safe work.
The use of glasses is extremely important, as the friction of the tools with the piece of wood produces splinters that become real projectiles thrown away. In addition, there are other tips to be more secure when working with a wood lathe:
At all times when you are not turning the wood, turn off the engine.
For beginners it is essential to start with smaller projects. Working with smaller parts will bring more experience and avoid wasting raw materials.
It has a very clean and bright environment to carry out the work.
Recurring maintenance of all parts that make up the lathe.
Use high quality tools to avoid harming the machine.
Some types of wood produce very fine sawdust , so wearing breathing masks while working is essential.
Always read the manufacturer's instruction manual.
Check that the rotating parts are securely fastened to the vise before turning it on.
Before starting a new project, always check cables, possible cracks, chips and all the parts that make up the lathe.
These are basic tips for working with a wood lathe safely. Even if you never handle a lathe, it's important to know how important and extremely delicate this step is to finish a piece of wood.
We must value the work of the turners, who are the people who do this work professionally. After all, these professionals are the ones who bring to life the most diverse types of design ideas with wood.
Important part of the process You just got to know a little more about an instrument very used in woodworking. The wood lathe is indispensable and can be used in different ways.
The lathe is just one part of a long, laborious and dependent process for the wood to reach its destination perfectly.
Knowing and knowing more about the history of the processes of objects around us is very important to better understand the world, its events and the value of each item purchased.
WEN JN8504 8.5-Amp Plate and Biscuit Joiner with Case and Biscuits
Perfect for edge-joining panels, aligning boards, strengthening joints, and more
Adjustable fence helps create biscuit slots at any height or angle
Pre-set stops easily adjust to create slots for standard #0, #10, and #20 biscuits
8.5-amp motor rotates the 4-inch carbide-tipped blade at 10,000 RPM
How to make a joint without a jointer
At one point or another, most carpentry projects require you to build a frame. One of the most effective ways to make a strong, good-looking corner on your frame is to use a corner set. Ideally, this will be done with a planer to make the job faster and easier. However, if you don't have this piece of equipment, it's still possible to make a nice singing joint. Instructions
1. Cut a slot in the side of the wood that will be hidden. This can be done with a table saw, or, if the length of the wood makes it heavy, with a chisel. The groove should start at the end of the wooden tile and be open, and should sink farther than the middle of the board.
2. Cut a notch in the second piece of wood so that it can be slid into the slot in the first piece of wood. Be sure to measure so it will fit snugly in the slot. Use a saw or chisel to make the cut.
3. Notch coat with carpenter's glue.
4. Slide the notch into the slot. Hold it in place while the glue dries.
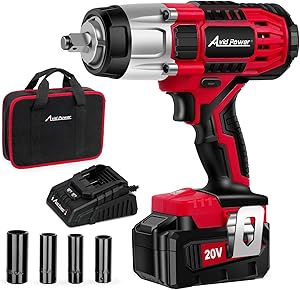
AVID POWER 20V MAX Cordless Impact Wrench with 1/2"Chuck, Max Torque 330 ft-lbs (450N.m), 3.0A Li-ion Battery, 4Pcs Drive Impact Sockets, 1 Hour Fast Charger and Tool Bag, Avid Power
Important: AVID POWER impact wrench is designed with unique friction design instead of bearing ball, which can hold sockets onto the anvil more tightly and allow more smooth sockets changes.
Powerful - Equipped with a high spec powerful motor, this impact wrench provides maximum productivity by removing rusted-on or over tightened nuts and bolt. The max tightening torque is 3,983 in-lbs and max losening torque is 4,465 in-lbs.
Variable Speed & Bright LED Light - With variable speed trigger, you can very easily control the speed of your wrench from 0-2000 RPM. Bright LED light will enhance visibility in the dark working areas.
Versatile Applications - Not only suitable for removing tires from cars, commercial vehicles, motorcycles, trucks, and trailers, but also can be used for automotive repairs, major construction projects, heavy equipment maintenance, or product assembly.
3.0 AH Battery & Fast Charger - With a fast charger, this rechargeable 20V 3.0 Ah lithium-ion battery can be fully charged within only 1-2 hours.
What You Would Get - A cordless impact wrench, 4Pcs drive impact sockets, tool bag, 20V Max Lithium-ion battery, fast charger, user manual.
Using an impact wrench
Impact wrenches are very simple tools. They require a lot of control from your operator, and for that, we will teach you how to operate them! Read the step-by-step below
1 - Install the drill adapter and drill bit, or the appropriate tool socket.
2 - Hold the tool firmly in your left hand if you are right-handed, or in your right hand if you are left-handed.
3 - Wrap the stuck screw.
4 - Press down and turn the impact switch in the desired direction.
5 - Hit the top of the wrench with a hammer.
6 - Keep hitting and pressing until the screw is looser, so you can use a faster tool.
7 - Tighten a screw, forcing the rotation in the opposite direction.
Today our tip is the LDR2 pneumatic impact wrench. Designed with the Twin Hammer hammer system to quickly and effectively reach maximum torque, it is suitable for heavy work and is considered one of the toughest!
Everything you need to know about impact wrenches
Everything you need to know about impact wrenches One of the most common tools in the daily lives of thousands of companies around the world is the pneumatic impact wrench (with fittings from 3/8” to 1-1/2”). Its basic function is to tighten and loosen nuts and bolts using the energy of compressed air. This is achieved with agility and with a greater torque force than in electrical equipment.
Want to know more about how this tool works? Read on and find out!
How does the pneumatic impact wrench work? As the name suggests, the pneumatic impact wrench works by means of compressed air pressure, usually obtained by a compressor .
It's very easy to use. Connected to the air compressor, just adjust the air filter and lubricator and help the pressure as indicated on the tool. So, just fit the socket according to the screw gauge, select the machine speed and get to work.
What are your applications? They are ideal for work in automotive workshops and tire repair shops. However, it is increasingly possible to see them being used in civil construction, such as in metallic structures for buildings and construction of bridges.
What care must be taken? The internal parts of the tool need care with their maintenance. Therefore, keep the impact wrench lubricated and away from water, dust and contaminants. Preferably install an air dryer together with the compressor, pre and post filters for the correct treatment of compressed air.
It is always important to pay attention to the quality and guarantee that the manufacturers provide. This will ensure greater durability of the equipment and work efficiency.
Is the impact wrench always the best option? In addition to pneumatic impact wrenches, there are also screwdrivers to help tighten screws, which are lighter and more practical. Therefore, jobs that require lighter and smaller equipment, screwdrivers can be a more interesting option. You can consult our guide and check the options!
Did you like the tips? So subscribe to our newsletter and you will be informed whenever there is news around here!