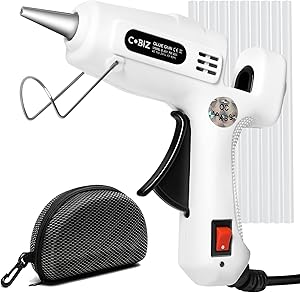
Glue Gun, Cobiz 25W Mini Craft Hot Glue Gun Kit with Premium Glue Sticks and Case,Low Temp,Quick Heat Up,for Child School DIY Holiday Decoration
- Easy to Use and Warm Up Quickly: Just insert the glue sticks,plug and turn on! Preheat it for 2-3 mins then pull the trigger to squezze the hot glue out! It's super easy to operate!Packing list:a premium 25w glue gun+20pc glue sticks +a sturdy zip case to keep all organized and convenient for carry-on,also making it as an exquisite,practial,worthy value gifts for crafter &DIY-lovers
- Get a Stream of Smooth Running Hot Glue: Unlike others (local heating only at the tip),our mini hot glue gun tube is metal unibody,designed to make sure a 360° quick heating up at the whole tube,to melt glue completly with no bubbles and stringy glue strands messed all over the place.It offers you a continuous hot glue stream without any interruption during your projects and no clog issue even when you use it again after cooling down
- Good Trigger & No Drip: Don't waste time on repeat prodding and positioning for the mechanism to advance the second glue stick.The glue sticks is easy to loaded and no drip between uses!
- Safety,What We Care:①This low temp glue gun has built-in fuse to offer an auto over-current protection and prevent it overheated.Cobiz hot glue gun will keep constant temperature when reaches the certain point.②Besides,it features with on/off switch so you have no hassle to plug/unplug it repeatly over working. ③And a metal kikstand to allow you set it down gracefully when not in use! It's safety to use even for a long time!
- Super Handy Craft Mini Glue Gun: Weighs only 175g/6oz,super lightweight even for children and won't cause your hand tired! The thin nozzle works great on smallest parts or kids school projects. It can be used as an repairing tool for small cracks of furniture, household appliances, toys, bead,shoes, glass fish tank, circuit board, etc.
How to use a hot glue gun
Do you know how hot glue guns are used? Below we show you its operation and its most important characteristics.
The hot glue gun is a very practical tool that allows us to fix an infinite number of materials almost instantly. Its use is very simple.
Here we show you step by step how to use a hot glue gun . Don't miss out on this Bricomania Trick !
Step by step to use a hot glue gun
Step 1
The first thing we need to do is insert the glue stick into the back of the gun, gently pushing it forward.
Step 2
In DIY stores we will find different hot melt bars , so we will choose the one that best suits our needs. Depending on the material or materials that we want to glue, we will acquire one model or another.
Step 3
We plug in the tool and let the product heat up . For the glue to perform its function correctly and to prevent the tool from breaking, it is very important that it melts well.
Step 4
When pressing the trigger , we will do it gently , without forcing. If we see that it is hard, we will wait a few more minutes until the product heats up properly.
Step 5
The next step is to apply the glue to one of the surfaces to be joined.
Step 6
Immediately afterwards, we fix , in this case the tile on the wall, pressing hard so that it adheres perfectly.
Step 7
We must act quickly, since the adhesive hardens immediately and if that happens, it no longer sticks.
Step 8
These hot melt glue glue guns are ideal for DIY tasks around the home .