In addition to serving to cover an area, even though they are light, the corrugated fiberglass tiles still allow diffused light to penetrate the area. Their undulation increases your stamina. To cut this type of tile it is necessary to use tools that are quick to make the cut, so that it does not crack or break into pieces. Both hand and power saws, used to cut wood, are also good for fiberglass shingles if you have the right type of saw and you apply proper pressure to the tool.
Step 1 Place one of the tile sheets on the service bench.
Step 2 Stretch the measuring tape from one end of the tile to the part where you want to cut and mark with a pencil. Make enough reference lines to then draw a line over the part.
Step 3 Hold the tile in one hand, not exerting too much pressure, but just enough to hold it in place while cutting.
Step 4 Place the machine saw at the beginning of the line drawn in pencil on the tile. Then turn on the saw and force it forward very slowly, at a steady pace, towards the other end of the piece to start cutting it. Allow the tile to vibrate a little while cutting to avoid cracking.
Step 5 Push the saw in faster as you reach the end of the cut line and then place the sawn piece somewhere.
Step 6 Run the stylus blade through the cut end of the tile to remove fiberglass burrs.
SuperHandy Plate Compactor Rammer 7 HP Gas Engine 4200-Pounds of Compaction Force Rammer Jumping Jack Tamper 20 × 15 Inch Plate for Paving Landscapes Sidewalks Patios EPA/CARB Compliant
PROFESSIONAL SPECIFICATIONS - This Force Compaction Plate Compactor has a powerful Alphaworks 7Hp 4 Stroke Single Cylinder OHV Gas Engine. Performing at a Max Output Power of 5kW, Exciter Speed of 5500VPM, Travel Speed 115FT/min, a High Max Rotation Speed of 3600RPMs granting a Compaction Force of 4200-Pounds (19Kn burst high impact force). With a Max Compaction Depth of 12", with a Heavy Duty Industrial size 20” (508mm) x 15" (381mm) Steel Compacting Plate, includes folding wheels.
EFFICIENT & MANEUVERABLE - Our Plate Compactors have specially designed shock absorption systems, resulting in minuscule vibration transfer to the single lever direction control providing easy handling, increased operator comfort & reduced fatigue. Great for Outdoor & Concrete projects: lawn/garden, sand, walkways, patios, paver installations or asphalting projects. Great Mobility on surfaces in narrow confined areas. Dimensions: 26" x 18.5" x 22". Storage with the Collapsible Folding Handle.
SAFETY & PROPER USE - The engine is designed to ensure the operator's safety. Always operate machine according to directions in the user manual, always wear the appropriate ANSI standard hand & eye protection (ENGINE OIL NOT INCLUDED, MUST ADD UPON UN-BOXING). The engine runs on Unleaded 87+ octane Gasoline (10%< less ETHANOL recommended) & a Max capacity of 0.7 gallons. ONLY use this Plate Compactor for approved applications. Our Compactors are EPA Certified/CARB Compliant.
Simple tips for using a concrete vibrator
The purpose of the concrete vibrator is to remove air trapped between the concrete mix and other materials for better strength and durability. Immediately after it is placed, the cement may contain trapped air bubbles, which vary in quantity based on a number of different factors, including slump, placement method, shape size, and amount of reinforcing steel. which is generally used in the range of one to two percent.
Trapped air occurs as a result of the cement paste's inability to seal with the aggregate, causing voids or air bubbles that are not visible to the naked eye. It is not beneficial to concrete and should not be confused with entrapped air, which helps concrete durability in freeze-thaw climates, and is created with an air-incorporating admixture. Trapped air pockets or voids extend throughout the casting and have negative effects on the appearance, strength, and durability of the product.
Fortunately, vibration techniques can be helpful in removing trapped air; however, they must be done correctly and with great attention to detail. The concrete vibrator is easy to use, but it can be more complex depending on the size of the work. Some suggestions on proper vibration are:
Excessive vibration causes concrete to separate, causing heavy materials, such as aggregates, to sink to the bottom and lighter materials, such as cement paste, to float to the top.
High-slump mixtures, such as self-lubricating concrete, generally do not require vibration and have a higher risk of segregation if vibrated.
Contractors should have enough vibration equipment on hand to account for failures during pouring.
Areas that require the most care and attention include the underside of slabs and around construction joints to prevent leaks. It is particularly important to get to the bottom of the walls to consolidate the wall-to-slab bond, as this is where most leaks occur.
It is important not to use vibrators as a concrete placement tool, as it could create an inconsistent surface. The type of vibrator used must meet the requirements of the concrete and the job site.
The vibration consolidates the concrete in two stages: first it moves the concrete particles and then it removes the trapped air. A good vibration process will ensure that the concrete is finished correctly and has the necessary strength once it reaches its dryness and complete solidification in 28 days.
At Maquinaria Alfo we have more than 45 years of experience with a national presence and part of Central America. We specialize in the sale, rental, maintenance and training of light equipment, such as concrete vibrator , and machinery in the construction, industrial, soil foundation and mining sectors.
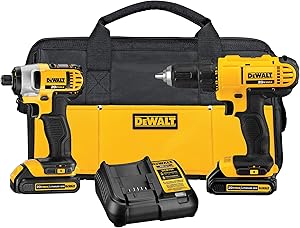
DEWALT 20V Max Cordless Drill Combo Kit, 2-Tool (DCK240C2)
DCD771 in cordless drill combo kit features 2 speed transmission (0-450 / 0-1500 RPM)
DCD771 high performance motor of cordless tools combo kit delivers 300 unit watts out (UWO) of power ability completing a wide range of applications
DCD771 compact, lightweight design of the drill/ impact driver combo kit fits into tight areas
DCD771 1/2-inch single sleeve ratcheting chuck provides tight bit gripping strength
DCD771 Ergonomic handle delivers comfort and control
DCF885 Compact (5.55-inch front to back), lightweight (2.8 lbs) design fits into tight areas
DCF885 1-handed loading 1/4-inch hex chuck accepts 1-inch bit tips
DCF885 features 3 LED light ring withe 20 second delay to provide visibility without shadows
Cordless Drill: Which is the best in 2021?
Welcome to ReviewBox Brasil. Today you will find out which are the best models of cordless drills that can be found on the market. Let's talk about the differences between the main products and what you should pay attention to before making your purchase.
Who has never had to hang a picture on the wall, for example? Or fix a shelf? To carry out these and other activities, a cordless drill is very important. That's because it makes work easier and avoids the use of hammer and nail.
Having your own equipment also gives you more independence. With the drill, you don't need to ask for help from a neighbor to perform these services. So, read on to get to know all the features of a cordless drill.
First, the most important
Drills and screwdrivers are different equipment. Some models of drills, however, also have a screwdriver function.
Pay attention to the amount of accessories available. Some brands offer different parts such as gauges and screws, which can be useful in everyday life.
A cordless screwdriver can cost between R$200 and R$600, depending on its quality and accessories.
Best Cordless Drills: Our Favorites Let's now introduce the four best cordless drill models. To build this list, we take into account the main features of each product. Please read carefully and decide which one fits your needs best.
Black+Decker LD12SC Screwdriver/Drill Kit This model has the functions of a drill and screwdriver. The chuck measures 3/8” and the product has reversible, variable and lock speed. The equipment unites strength and speed in a single piece. Torque reaches 16NM and speed reaches up to 900 RPM.
The 12V battery is lithium. The charger is dual voltage. The set comes in a case and comes with 31 accessories, 30 bits for screwing, in addition to a magnetic adapter. Rotary Hammer Worx 3-in-1 Cordless Perforator At this time, the selected product is not available from the supplier. Therefore, we replaced it with another one with similar characteristics. To report a problem.Das Problem mit diesem Produkt wurde gemeldet. Danke!
The model from manufacturer Work is considered a 3 in 1. In addition to a drill and screwdriver, the equipment is also an SDS hammer.
Includes a mandrel that holds cylindrical drills, concrete drills and screw bits. One advantage of this product is flexibility. With it, it is possible to use standard drills and tips that the user already has.
It has a 12 V powershare system with batteries interchangeable with other tools. Despite being compact, the tool has a pneumatic mechanism for efficient drilling in concrete. Stanley SCD12S2K-BR Screwdriver / Drill Stanley's line of cordless tools is versatile and performs well. The size is compact and the equipment's weight is low.
With these features, it is possible to drill and screw hard-to-reach areas. The two-finger trigger is electronic and has variable and reversible speed. The set comes with a battery and a dual-voltage charger. Charging time is 70 minutes.
Stanley Screwdriver/Drilling Machine CD121K100-BR This model is variable speed, reversible and has a lock. Torque control has 17 positions.
Power is 12 volts and comes with a dual-voltage charger. The set comes with 101 pieces. Among them are ratchet wrench, guides for 1, 2 and 3” screw-on tips, sockets, screws and double-ended bit.
Buying Guide In this guide, we'll introduce you to the main advantages of a cordless drill and what you should pay attention to when choosing yours. Before going shopping, it is ideal that you know how you will use this equipment. Depending on usage, a specific model may be best.
Man using a cordless drill.
What is a cordless drill and what are its advantages? The cordless drill, as the name implies, is a tool that serves to drill surfaces. It is used for installing and fixing objects on walls and also for electrical, hydraulic and mobile network devices, for example. With drills, household activities like hanging pictures or assembling shelves are faster.
Technically, a drill is a machine whose function is to drill holes in any type of material. For this, the engine of this equipment applies a high rotation speed to the drills that make contact with the surface. As a result of this force, a hole is opened.
The main advantage of a cordless drill is the fact that it can perform everyday tasks without the need to be plugged in and therefore giving more speed and accuracy to the user.
On the other hand, a cordless drill can be a little expensive so you only want to use it once in a while. Furthermore, the fact that it is powered by a battery creates the risk that when you need it most, the accessory will simply stop working.
This, however, doesn't happen that often, as batteries are generally made to last a long time. Check, briefly, what are the advantages and disadvantages of a cordless drill:
Benefits
Makes housework more practical
It doesn't need to be in the socket
Facilitates everyday tasks
Disadvantages
cost may be high
Battery could run out at any time
Professional or home use? When choosing a cordless drill, the first step to be taken is to define whether it will be used professionally or just for home repairs. There are drills aimed at both types of audience. The difference is in the power and in the parts used in manufacturing. Models intended for home use are used for small jobs and shorter periods. The power is around 600W and some versions make it possible to work in masonry.
The professional drill, on the other hand, can work for long periods, continuously and is capable of drilling through heavy materials such as concrete and steel. Power reaches 1100W. In this article, we're focusing on cordless drills for home use.
Cordless drill on white background.
Cordless or cordless drill? Which one to choose? Cordless drills are suitable for more casual jobs, where a lot of power is not required. They are intended for use in locations where there is no access to an outlet. Anyone who needs mobility should choose this model. This type of drill is heavier and bulkier, as it has an attached battery. Cord drills, on the other hand, have greater power and are lighter. This model is suitable for more professional use or in case a higher power is required.
cordless drill wire drill power Smaller Bigger Mobility Total Smaller Weight Battery makes it weigh more Smaller, no battery Use mostly domestic Domestic and professional
Should I choose a screwdriver model? The main cordless drill models sold on the market are also screwdrivers. Screwdrivers are machines that are used to tighten, fix or unscrew rivets and screws. With them, the screw is firmer than if it had been fixed with a screwdriver. To use this function, just change the tip of the equipment.
These days, it's very difficult to find a cordless drill that doesn't have the option of screwing. So, basically, this is not a question you should spend a lot of time thinking about. After all, it's not a bad thing to have a screwdriver at home to help with the housework as well.
Did you know that the drill appeared in the year 1889? The invention was the Australian engineer Arthur James Arnot. A few years later, German brothers Wilhelm Emil Fein and Carl Fein registered the first portable electric drill.
How much? Cordless drills cost between R$ 200 and R$ 600. Prices may vary according to the power reached and also with the accessories that make up the set. Some models come with briefcases and various parts to make your work even easier. However, if you just need to do simple jobs at home, a more common and cheaper model might suffice.
Where to buy? To buy a cordless drill, you can go to a specialized tool store or large department stores, such as Magazine Luiza or Havan. However, there is also the option to buy online. On the internet, there are many options for models, and you can check the evaluation of previous buyers of each drill.
In large retail stores such as Amazon, Submarino, Shoptime and Lojas Americanas, you can find several models.
Man handling a cordless drill. Buying your cordless drill online can be an excellent option. (Source: rawpixel.com / Pexels) Purchasing Criteria: Criteria for comparing cordless drill models When buying, review all the details. By doing this, your money will be put to good use and you will not regret it.
So when choosing which cordless drill to take home, consider the following points.
power
Speed
Chuck Size
Handling handle
We will detail each of these items so that you can make the best choice.
power The more power, the more power your drill will have. Wireless models have power measured in volts, based on the voltage of the battery. Simple tools have between 3.6v and 4v. They are able to handle small objects.
Tools with more than 10 volts can handle large screws and pierce hard surfaces.
Speed Drill speed is controlled by a trigger. The more it is pulled back, the greater the speed of the drill. Equipment with variable speed control is a better purchase option.
A useful feature is the continuous actuation lock. With this function, the drill works without the need to continuously press the trigger.
Chuck Size Chuck is the part that fixes the drill to the rest of the drill. In general, the larger the chuck size, the more power the equipment will have.
There are two main types. The 3/8 inch size one accepts drills up to 10mm. It's enough for everyday tasks.
The 1/2 inch chuck, which accepts up to 13mm drills, is intended for heavier jobs.
Set of drills on white background. Some cordless drill models are purchased with drill sets and other parts. (Source: Pixabay / Pexels)
Handling handle Make sure the drill handle is comfortable and firm. Ideally, you should be able to firmly hold and keep the equipment in the proper position.
This way, the hole will not get bigger than planned. This also prevents screws from getting loose inside the drilled channel.
6.5 amp, 10,000 rpm motor of the joiner tool provides power for working in the hardest woods
Dual rack and pinion fence of the plate joiner ensure blade and fence are always parallel for accurate joints every time
Integral one-piece fence of DEWALT joiner is adjustable and tilts 0-90 degree
Flush cuts can be made at 0 degree without removing fence
45-degree locating notch in fence allows indexing off the outside surface of a mitered joint
Non-marring, heavy-duty aluminum shoe allows wood joiner to be clamped for stationary work
Retractable, anti-slip pins help hold work in place
Preset depth stops for all common biscuit sizes
How to use a Biscuit Joiner
How to use a Biscuit Joiner / Skills and know-how Step 1
Align the pieces of wood Line up the pieces of wood to be joined, with their grains oriented in the same way. Make sure the tree rings at the edges of the wood are in the shape of an arch, with the open end of the curves facing down. This positioning will prevent the wood from sagging when humidity is high.
Step 2
Draw a triangle through the boards Using a pencil, draw a triangle across the boards to be joined. This triangle will act as a guide to get the boards back into their correct positions.
Step 3
Mark each joint lightly with a pencil Make pencil marks along each joint where you want to put a cookie (Image 1). The biscuits should be approximately 6 "apart. Spread the boards. Using a biscuit jointer, cut a slot at each mark, making sure to center the cuts according to the marks (Image 2). Apply some wood glue to the along the Length of the edge to be joined, as well as inside the grooves.
Stage 4
Insert the cookies into the slots Insert the cookies into the grooves of a piece of wood. Then slide the cookies into their corresponding slots on the second piece of wood. Clamp the pieces of wood and allow them to dry.
Step 5
Make pencil marks 6 inches apart for perpendicular or T joints For perpendicular joints, such as in shelving construction where the edge of one board is clamped to the face of another, hold the boards to be joined and make pencil marks on both boards to indicate where the cookie cuts should be made. Space the cuts about 6 "apart. Lay the two parallel boards on top of each other, with the top of the horizontal board aligned with the line you just drew. Hold the two boards in this position.
Step 6 Cut the corresponding slots in both pieces of wood, join them and close them Use the cookie joiner to cut slots in the end of the top piece of wood. Rotate the jointer to a vertical position and cut the corresponding slots in the bottom piece of wood. Assemble with biscuits and a small amount of wood glue. Hold the joint and allow the glue to dry.
Do You Need A Biscuit Joiner?
Adding a joiner biscuit to your wood shop arsenal is an option for those who are serious about their woodworking. A biscuit joiner is a special type of saw that creates half-circle or crescent cuts in a piece of wood, usually two- or four-inch widths, in a variety of sizes and depths to accommodate a variety of small to large projects.
Cost
applications
Versatility
Adding a cookie joiner for your wood shop arsenal is an option for those who are serious about their woodworking. A biscuit joiner is a special type of saw that creates half-circle or crescent cuts in a piece of wood, usually two- or four-inch widths, in a variety of sizes and depths to accommodate a variety of small to large projects. An oval wooden "biscuit" is coated with cement and then inserted into both openings created. Cement expands the wood and acts as an adhesive, creating a bond that is stronger than many other types and methods of joining wood panels. The biscuit joiner was developed by Hermann Steiner in the mid 1950's, when trying to create a good method of joining the slug that was developed and commonly used in the 1950's.
Cost Authentic Lamello Biscuit Joiners aren't cheap, but the cost is similar to other special woodworking tools, especially authentic ones. You can buy a cabinet maker for around one hundred and seventy-five dollars in various other brands, about the same price as a good circular saw. A Lamello biscuit joiner will have between $5,600 and $6,000. If you do a lot of carpentry and need toIn addition to a method by which you effectively join wood panels other than the dovetail or dovetail, a cookie mat can be a good option. Biscuit joiner blades will cost approximately twenty to thirty dollars each, depending on size and application, and there are a variety of accessories to improve your joiner's performance on the market. applications There are other methods by which two panels can be joined that are more economical, such as a drill and screws. However, the most serious woodworkers consider the typical fasteners crude. Furthermore, traditional fasteners will end up being visible and detract from the beauty and aesthetic appeal of the created piece. A cookie joiner creates nearly invisible joints. A biscuit joiner is sometimes the ideal tool for working with chipboard, particleboard, plywood or composite wood panels and when creating joints with these materials, often creating a stronger and more durable joint than other methods in common use. . It's also the easiest way to join two panels together so they fit together.
Versatility Many biscuit joiners provide a variety of options so that all blade sizes and thus biscuit sizes can be accommodated by the same tool. This will allow you to work on a variety of sized projects with the same tool. In addition, many tools offer the ability to angle the blade to mitered joins, allowing you to create joins at a variety of different angles from ninety and one hundred and eighty degree angles.
HHIP 8600-0031 Heavy Duty Arbor Press, .5 Ton Capacity, 10" Height (Pack of 1)
Heavy duty frame.
4 position steel anvil.
Precision made
Steel pinions.
How to use Arbor Presses
A spindle press is necessary to stand, seal and remove the bearings. Arbor presses size range from small table mounts to large presses. Jewelers can use smaller arbor presses to insert precious metals. Larger shaft presses are used for thrust bearings in precision machinery. Although arbor presses vary in size, the function is almost the same. With some practice, you will be able to use a spindle press.
Instructions • Puts the part on the shaft press plate.
• Align the bearing with the hole in the bottom of the arbor press.
• Insert the thumbtack into the back of the Bearing Assembly. This will allow the thumbtack to sit against the rear of the bearing.
• Pull down on the spindle press handle. Push the bearing out of the assembly and return the lever to its original position.
What is an Arbor printer?
A mandrel press is a small press typically used for fine detail work and the installation of bearings and bearing races. Although similar to heavy-duty press machines, the mandrel press is generally classified according to the load it can exert on an object. A 2-ton mandrel press can exert 2 tons (1,814 kg) of force or pressure on its workpiece.
Many machine shops use the mandrel press to install pistons and pulse pins into piston rods. The small press's precise operation makes it ideal for precision work. The replacement and installation of the universal joint on a drive shaft and pressing the wheel bearings into the shaft bearings are also tasks reserved for the mandrel press operator.
The mandrel press typically utilizes a manually actuated hydraulic ram mounted within a steel frame. The ram is pumped and the press exerts pressure against a piece. The parts are held in place against the press frame so they don't move. As the pressure builds, the part eventually succumbs to the pressure and comes loose from the mounting location. The new part is pressed into place in the same way.
It is critical to accurately align all parts when using a mandrel press. Forces exerted on the workpiece are capable of destroying an object that may be slightly misaligned. Careful attention to detail must be observed when setting up the printer. It is never advisable to rush a press application.
Oftentimes, a part refuses to release when pressure is applied. In these cases, it is generally practical to apply the maximum amount of pressure to a part and allow it to remain under pressure for a short period of time. Pressure usually improves the most stubborn part and it lets go. It is rarely necessary to apply heat to an object in a printer, but when heat is needed to release an item, use it sparingly. The force placed on the object together with the applied heat can cause the part to leave the mounting location and cause injury or damage to the job site.
The mandrel press is a useful tool that saves many hours of hitting and hammering on many jobs. The precise action of the small press allows detailed and complex work to be carried out in the workshop or in the garage of the house. By performing some of the necessary repairs at home, a handyman can save resources.
CRAFTSMAN Air Compressor, 6 Gallon, Pancake, Oil-Free with 13 Piece Accessory Kit (CMEC6150K)
The portable air compressor is proudly made in the USA with Global Materials in Jackson, Tennessee
PORTABLE: 6 gallon capacity maximizes portability and stored air for CRAFTSMAN air compressor
NO MAINTENANCE: Durable, oil-free pump of the 6 gallon air compressor is made for long-life and no maintenance
PRESSURE: 150 Max PSI to ensure adequate cut-inch pressure for a variety of applications
QUICK RECOVERY TIME: 2.6 SCFM at 90 PSI allows for quick compressor recovery time
Tips for better use of the air compressor
How to use the air compressor is the question we have even before purchasing this type of equipment. But, to help you reduce this uncertainty, we've separated very practical tips for you to make the best use of this machine.
On the weekend we usually use that little free time to make small repairs at home, or even venture into craft activities. For this, we set up real arsenals of tools, and we try to have the most versatile equipment. Among these are air compressors .
But, do you know which compressors are the best? Do you already know how to use an air compressor? Fundamental questions to find out if you bought the right machine, and when using it, do not break the equipment or waste time trying to decipher how an air compressor works .
So, let's get to the tips! Know the types of air compressors It's no use wanting to learn how to use an air compressor, without even knowing the formats available for this type of equipment. The models vary from the engine to their applications with different power, pressure, accessories, etc.
In relation to the engine, you will find air compressors that use electricity and fuel (gasoline and diesel). According to its application , we divide the air compressor into the following categories:
Compressors for Ordinary Services
Compressors for Industrial Systems
Gas Compressors
Refrigeration Compressors
The Common Service compressors are meant for domestic activities and other smaller services. Commercially, these models are also divided as:
Small or compact air compressor
Professional air compressor
industrial air compressor
Dental air compressor
It is now possible to go ahead and learn how to use an air compressor.
And how to size air compressor? Knowing compressor capacity is critical to finding the one that will best meet your needs. Regarding how to size it, it is possible to consider 2 points: the air volume for all processes and the ideal working pressure.
The air volume – is the sum of all the processes that the air compressor must carry out over a day of service, for example. In this case, add up the total volume and add another 25% (safety margin). This way you arrive at the ideal model for your activity.
Optimal working pressure – This factor is the amount of pressure a given piece of equipment will need to run. In tire calibration, for example, you need a compressor that averages 25 to 38 pounds. Here the safety margin for sizing the right air compressor is 20% more.
Air compressors and their main technologies
When we talk about air compressor technologies we have the following classification: diaphragm, raceway and rotary screw.
Diaphragm Compressor - Its mechanism for producing air is a rubber diaphragm. It is known as a home compressor.
Piston compressor – a model characterized by its simplicity of structure and ease of maintenance. It is subdivided into: Hobby, Light Professional, Direct air, Medical/Dental and Industrial.
Rotary screw compressor – more robust model, which integrates with electronic boards to improve performance. It also has a frequency inverter, which helps in reducing energy consumption. It is mostly used in factory environments.
Reading the manual is essential
Manufacturers of air compressors detail the operation of these machines in their technical manuals. So, it is essential to carefully read all instructions before connecting the equipment.
It never hurts to check what the factory has on points such as:
Product inspection
Product configuration
Safety rules
correct applications
Technical characteristics (flow, maximum pressure, rotation, tension, etc.)
Maintenance
The big brands that produce the air compressor provide technical manuals on their websites. They also provide full content (videos) on platforms such as YouTube.
Double your care with the property's electrical network The air compressor will only work well if it uses proper electrical wiring. Everything has to fit the power needed to fire the engine. The tip is to install an outlet (with the right amperage) specific to use the equipment.
A start switch is normally used to start the compressor. Remember that if you are not experienced in this type of service, hiring an electrician is the most coherent.
Using in everyday activities Inside the house you will use the air compressor in many activities, but it is good to pay attention to some details. Let's see:
Compressor to inflate tires – we don't always want to go to a gas station to calibrate the tires on a car, motorcycle or bike. Having this equipment at home will help a lot. The guideline in this case is to consult the vehicle or tire manufacturer's manual and enter the recommended amount of pounds. You must monitor the air pressure level on the pressure gauge.
Compressor in maintenance – you know those areas you can't clean with a broom, for example? The blow from the compressor will be very effective, as it is able to reach places you couldn't reach with just a broom. Some models even come with exclusive nozzles for this type of use.
Balloon compressor and inflatable mattresses – children's birthdays at home are more fun with colorful balloons. And many models of air compressors can quickly fill the party balls. And if you are going to accommodate the guests on the inflatable mattresses, the compressor will be very useful to fill them with air.
Among the most common services that require air compressors, painting is the most frequent. Painting a wall, or finishing a sculpture are things you can do using this equipment. But, how to use air compressor for painting ? The main tips are:
Wear the necessary PPE (glasses, gloves, masks, etc.).
Use a gun suitable for your type of compressor; also pay attention to the connections required to connect the gun to the equipment.
Adjust the nozzle well to spray the area to be painted well.
Don't forget that the model has to be suitable for this type of activity.
Specific care for diesel air compressors If you choose a diesel powered air compressor you will need to take some precautions, so that the equipment works well and has a long service life. Take the following precautions:
Before calling, make sure the panel lights are on
It is important to always run the machine for a while, even if it is unloaded
Check engine oil level
It is important that you periodically change the filters (engine and fuel)
When the machine is on, look at the pressure gauges and make sure they are working
When turning off, make sure the engine has really stopped
Of course, fuel cannot be lacking in this machine.
These are the main tips on how to use an air compressor . To get the best brands of air compressors, just visit the Merit Comercial website .
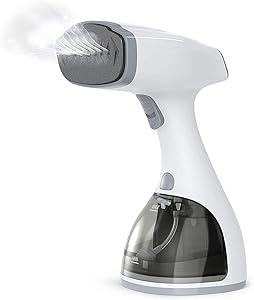
Steamer for Clothes,1800W 20s Heat Up Handheld Garment Steamer with LCD Smart Screen,2 Steam Options Fabric Steamer,Upgraded Nozzle and 350ml Water Tank,Portable Travel Clothing Steamer
【High Definition Smart LCD Screen Clothes Steamer Heating in 20 Seconds】Messtoo 2021 new smart clothes steamer is currently the most powerful hand-held clothes steamer, preheating within 20 seconds to produce strong steam. Remove unhealthy substances on the surface of the clothing, with a unique high-definition smart LCD display, which can clearly see the heating mode and whether the heating is completed
【1800W Super Wrinkle Remover】Compared with ordinary hand-held steam boilers, this steam boiler has professional functions and the most powerful 1800W power supply. Through the latest upgrade of the new nozzle, powerful power and powerful steam function, more than 80% of the steam can be thoroughly penetrated into the hard-to-reach fabric area to remove peculiar smell. Based on the function, it can prevent water leakage, safe and reliable, and easily restore your favorite clothing
【Unique Design of Two Ironing Modes】LCD smart garment steamer has 2 steam modes to choose from. The first-level steam is suitable for removing most of the wrinkles, and the unique second-level steam mode can produce a more powerful steam burst, which can thoroughly penetrate the fabric and smooth the hardest wrinkles, so as to achieve the best ironing effect. The 8-in-1 multifunctional steamer is suitable for any fabric, such as cotton, wool, linen, sequins, beads, embroidery, etc
【Portable and Ideal Travel Steamer】This clothing steamer, hand-held steamer, is light and easy to move and use, very suitable for travel and business. The water tank can hold up to 350ml, which can provide better full steam and extend the working time of up to 15 minutes, reducing the trouble of frequent water addition and saving you time. When the steamer temperature is too high or the water level is too low, it will automatically shut down to ensure your safety
【Perfect and Thoughtful Gift】This steamer is a good choice as a gift for family and friends. The high-quality clothing steamer will satisfy your family and friends.
How to vaporize clothes:
The mechanics of vertical vaporizers and portable vaporizers
Have a new experience with clothes vaporizers, which eliminate creases quickly and easily.
In this article, we share several tips and suggestions on how to achieve effortless crease removal in all your garments.
#1 – The clothes vaporizer must touch the clothes
In order to be able to remove as much crease as possible from your laundry, you must press the steamer plate onto the laundry. If you are concerned that the result might be burnt clothing or wet areas, it is important that you know that the steam plates in Philips vaporizers are safe and will not burn or damage clothing. You can press them directly onto any garment that needs steaming.
The clothes vaporizer must touch the clothes
#2 – Use the hand that is not holding the steamer to stretch your clothes
For best results, you will need to stretch the garment during steaming.
#3 – Use a support for cuffs and collars
The simplest way to remove stubborn creases from areas such as cuffs and collars is to vaporize them horizontally, allowing a surface to support the piece. You can do this using our Style Touch Pure and Steam & Go 2-in-1 portable laundry steamers.
If you have one of our vertical garment sprayers supplied with an extra long StyleBoard, you can use it as a base when spraying areas such as vertical cuffs and collars.
#4 - Keep the vaporizer tube stretched
The steamer works best if the tube is not bent, as the bends block the passage of steam.
#5 – Keep an upright position: save your back and knees
We know it's hard to resist and we easily bend our body while using a clothes vaporizer. However, we should always try to maintain a comfortable position. If you have a vertical vaporizer you should adjust it correctly, at a height where you can vaporize the entire garment without bending your body and without hurting your back.
If you have a portable vaporizer, try to find something at a reasonable height to hang the hanger. If you prefer to use the vaporizer horizontally, find a surface at a suitable height so that you can use it comfortably.
To further save your back and knees during vaporization, some of our vertical vaporizers feature FlexHead technology - which allows you to easily reach the underside of your clothes without bending your body.
keep an upright position
How to use a clothes steamer on special fabrics
#1 – Put the brush in the steamer, suitable for thicker fabrics
If you have to steam thicker items of clothing, such as jackets and jackets, we suggest you use the steamer with the brush.
The brush bristles, when passing through thicker fabrics, open the fibers, thus allowing a better penetration of steam into the fabric.
Using the brush on items such as coats and jackets has other benefits as it helps to remove dirt and hair from clothing, easily.
Put a brush on the vaporizer
#2 – How to steam delicate fabrics, with pleats, prints and embroidery
Do you have creases in pieces with pleats, prints, embroidery, ruffles, among others and do you want to know how to remove them?
Is easy.
Whether you are using one of our portable vaporizers or a vertical vaporizer, you can vaporize garments with prints, pleats, embroidery, and more, just as you vaporize any other garment. Just press the plate of your vaporizer against your clothes and vaporize!