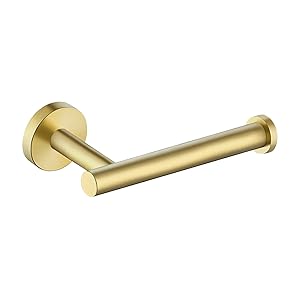
KES Bathroom Toilet Paper Holder Brushed Brass Wall Mount Toilet Roll Holder SUS304 Stainless Steel, A2175S12-BZ
- FITS BIG ROLL: Max. length of paper roll is 4.92-inch. Holds even jumbo-sized rolls of toilet tissue. Large stainless steel knob at the bar end prevents toilet paper roll from falling off.
- RUSTPROOF: The paper holder (bracket and screws included) is constructed from high quality SUS 304 Stainless Steel to protect against corrosion & rust. Ideal for humid environments such as bathroom and kitchen.
- ROTATE PROOF: Our toilet paper holder has unique slot design with screw tightening on the bracket to prevent from rotation. NO wobbling nor dropping off! Just enjoy this sturdy and heavy duty design.
- BRUSHED BRASS FINISH: Matte brushed brass finish, not mirror-like shining finish nor champagne gold finish, with a combination of clean, refined lines for a high-end style.
- EASY INSTALLATION: ONE piece, NO assembly required. Install either on walls or even under cabinet. Package comes with mounting screws, anchors, allen tool and bracket. Use included fixing screws to mount holder securely. Screw mounting can be applied to all the smooth walls including but not limited to tile walls, painted walls and marble walls.

How to install a toilet paper holder?
To install a toilet paper holder, start by finding a location that is 8 to 25 centimeters in front of or beside the toilet and about 66 centimeters off the floor. Then use the template provided with the bracket to mark where the brackets and screws are to be placed. Then drill holes for the screws, screw the brackets to the wall, and hang the roller brackets on the brackets. Finally, place a roll of toilet paper in the spring loaded paper holder and place it between the roll holders. For more tips, for example how to install the fixing screws included with your bracket, scroll down!
A toilet paper holder includes several parts: 2 roll holders, 2 metal holders that secure the roll holders to the wall, 4 screws, 4 wall anchors and 1 spring-loaded paper holder. The paper holder fits neatly between the 2 roller holders and holds a roll of toilet paper. To install a toilet paper holder, you will need to use the template provided to mark the location of the holder on the wall. Drill 4 holes (2 per bracket) and screw the brackets to the wall. Then secure the roll holders and add toilet paper over the spring loaded paper holder.
Steps
Part 1 of 3: Aligning the Toilet Paper Holder on the Wall
1
Choose the installation point. The toilet paper holder needs to be within arm's reach and must be high enough off the floor so that the hanging toilet paper does not drag on the floor. Select an installation point 8-25 centimeters (20-25 cm) in front of or beside the toilet. The installation point should also be about 66 centimeters (66 cm) high from the floor.
If you are installing the bracket on a drywall, try centering it over a beam . If you cannot find a suitable beam, you can insert dowels into the drywall before screwing the toilet paper holder into place.
2
Measure holder location with included template. The toilet paper holder packaging should include a paper template that will help you figure out where to attach the 2 holders to the wall. Hold the template against the wall and use a carpenter's level to confirm the template is level. Then use a pencil to mark the places where the 2 brackets will be fixed to the wall, as indicated by the template.
This will allow you to accurately drill holes to secure the bracket to the wall.
If the template is not a separate piece of paper included with the toilet paper holder, it can be printed directly on the back of the box.
3
Measure the 4 screw locations of an installed bracket before moving it. If you do not have a model for the toilet paper holder - for example, if you are moving an already installed toilet paper holder - you will need to use a ruler to measure the screw locations before moving the holder. Lift up the 2 roll holders and measure the distance (horizontal and vertical) between the 4 holder screws. Write down the measurements on a piece of paper.
Then use these measurements to transfer the toilet paper holder to its new location. Replication of measurements will ensure that the bracket fits correctly into the new wall.
Part 2 of 3: holes for bracket screws
1
Mark the screw locations on the wall with a felt tip marker. After using a pencil to mark the wall where the brackets will be placed, you can mark the exact locations of the screws with a felt marker. Hold the bracket in the position you outlined in pencil. Then insert the tip of the marker into the screw hole to make a mark on the wall behind the bracket.
Remove the bracket and you're ready to drill.
2
Drill holes slightly smaller than the included screws. If you are not using dowels to secure the screws to the drywall, select a drill bit that is slightly smaller than the screws. Drill 4 holes directly into the bathroom wall, directly over each mark you made with the felt tip marker. Drill each hole so that it is slightly shallower than the screw. For example, if the screws are 5 centimeters (5.1 cm) long, drill the hole 4 centimeters (4.4 cm) deep.
To select the correct drill size , take one of the 4 screws included with the toilet paper holder and compare it to small drills. Select a bit slightly smaller than the width of the screw.
Before drilling, make sure you are holding the drill perfectly straight both horizontally (left to right) and vertically (up and down). Squat down so you can look directly at the drill if necessary.
3
Drill larger holes and insert bushings to increase stability. Select a drill the same size as the widest point of the wall anchor and drill a hole in each of the 4 locations you identified on the marker. Drill the hole as deep as the length of the wall anchor. Then firmly insert each anchor into a hole. Use a hammer to tap the anchors into place if necessary. Now you can use the wall anchors to screw the brackets into place.
If you are installing the toilet paper holder on drywall (and cannot secure it to a stud), install wall plugs to prevent the toilet paper holder from tearing out of the drywall.
Plastic screw anchors are often included with new toilet paper holders. Otherwise, you can purchase wall anchors at any local hardware store. They look like small plastic cones and can be found in the "Drywall" section of hardware stores.
Part 3 of 3: Attaching the Toilet Paper Holder to the Wall
1
Screw the brackets to the wall. Position the brackets back on the wall and place 1 screw in each of the 2 bracket holes. (If you installed wall anchors, you will drive the screws into the anchors already inserted.) They should match the holes you just drilled. Use a screwdriver to tighten the 2 screws until both are secure. The screws will hold the bracket firmly against the wall.
If your toilet paper holder came with 6 screws, use the corresponding 4 holder screws for this step.
Before screwing in the brackets, you will need to visually determine whether the screws are common or Philips.
You will also need to determine the correct size screwdriver to use for each screw. Estimate the best fit and try using larger or smaller screwdrivers as needed until you find the best fit.
2
Hang each of the roll supports on the attached supports. Note the base of each roll holder: it should be marked with an up arrow (or other visual indicator) to show which side rises. The roll holder will also have 2 slots that will slide into the holders. Press each roll holder down into place, 1 on each holder.
Remember that the circular 1 ⁄ 2 inch (1.3 cm) indentations on the end of each roll holder (where the metal roll goes) must face inward.
If your toilet paper holder did not come with 2 fixing screws, you can skip the next step.
3
Screw 1 set screw into the bottom of each roll holder. Some roll holders have 1 screw hole on the bottom. If this is the case, screw 1 fixing screw into this hole. The set screw will secure the roll holder against the bottom of the holder and prevent the roll holder from coming off the holder.
As with the support screws, visually determine whether the screws are standard or Philips head screws before tightening them. They will likely be the same screw type and size as the support screws.
4
Add toilet paper and the spring loaded paper holder. Take a roll of toilet paper and slide the cardboard center tube onto the paper holder. Then squeeze both sides of the paper support inward and position the paper support between the two roller supports. Release the spring-loaded sides and make sure the toilet paper rolls out easily .
Your toilet paper holder is now installed and ready to use.
Tips
Installing a toilet paper holder is a quick project that shouldn't take more than 20 minutes.
Things you will need
- Toilet Paper Roll Holder
- 4 or 6 screws included
- Scissors
- Measuring tape
- Pencil
- Level
- Felt tip marker
- Drilling machine
- Drill
- Screwdriver
- Hammer (optional)