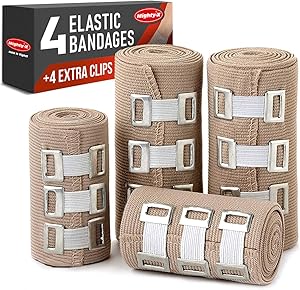
Premium Elastic Bandage Wrap - 4 Pack + 4 Extra Clips - Durable Compression Bandage (2X - 3 inch, 2X - 4 inch Rolls) Stretches up to 15ft in Length
- VALUE PACK - Your package includes 4 rolls of compression wrap, two 3-inch rolls, and two 4-inch rolls. The smaller bandage is perfect for covering smaller areas while the larger bandage is ideal for larger areas.
- DURABLE MATERIAL - Our elastic bandage wrap is made from premium polyester. It provides the best results by keeping your muscles tight. Each compression bandage extends up to 15ft when fully stretched. This is long enough to wrap most wrists, ankles, or knees.
- INDIVIDUALLY PACKAGED - Our elastic bandages come encased in a protective wrapper until you’re ready to use them. This keeps your crepe bandage hygienic and debris-free to help prevent any kind of adverse reaction should an injury occur.
- COMFORTABLE and SAFE CLOSURE - Each compression bandage wrap comes with two elastic bandage clips. This is one of the most effective ways to keep a wrap securely in place. Mighty-X will Hold it Tight!
- 4 EXTRA CLIPS are included with your elastic wrap bandages. It’s always a good idea to have some backups. If you’re dealing with a chronic injury or in case you lose one, you’ll have another to secure your wrap.

PHYSIOTHERAPEUTIC TREATMENT WITH ELASTIC BANDAGE
Functional bandages are widely used in physiotherapeutic treatment in conjunction with other specific techniques of these professionals. The elastic bandage has as a principle the adequacy of muscle tone and joint stabilization, with the correction of its positioning. As main results, we can highlight analgesia and selective limitation of range of motion.
There are two types of functional bandages: elastic and non-elastic bandages. Non-elastic bandages are indicated in cases of pain, joint instability, muscle imbalances and subluxations. They should not be used in cases of unconsolidated fractures, skin wounds, dislocations and tumors. Among the best known, McConneel, Mulligan, Spiral Taping and Sports Taping stand out.
This text has the function of addressing the important aspects of its technique and application.
What is elastic bandage?
The elastic bandage is the functional bandage with elastic properties. The best known elastic bandage is kinesio taping, created in 1973 by Dr. Kenzo Kase.
It is built 100% by cotton fibers that have up to 140% elasticity. To stick to the skin, the bandage has a special glue without latex, which allows skin breathing without obstructions and does not create friction with the skin.
The elastic bandage does not limit body movement, which is considered its greatest benefit in relation to rigid bandages. Added to this factor, it is waterproof, so it is not necessary to remove it to take a shower and it can be used in sports or leisure activities involving the aquatic environment. All of this contributes to the durability of the bandage is greater, and can last from three to five days.
They are sold in rolls, with dimensions of 5mx5cm and available in different colors. Unlike elastic resistance bands, where each color represents a different resistance, the colors of elastic bandages do not influence their tension, being all the same.
Purpose of elastic bandage
The elastic bandage aims to offer external support to soft tissues, not limiting its action. It promotes constant mechanical stimuli in the skin, which activate skin receptors that are sensitive to changes in the articular system. These communicate with deep tissues, causing an increase in interstitial space, which results in a decrease in pressure on the nocioceptors, decreasing pain and allowing circulation and lymph to flow more freely.
Importance of elastic bandage in physical therapy treatment
During physical therapy treatment, elastic bandage is another resource that should be used in conjunction with other techniques, especially kinesiotherapy. It can be used both in the prevention and rehabilitation of injuries. With it, the patient reports a feeling of security, as the execution of movements is allowed without harming the injury.
It will improve pain, blood and lymph circulation, stimulate proprioception and body awareness, correct joint misalignments, improve range of motion and decrease muscle spasm, thus acting in synergy of muscle contraction.
Due to all these resources, it is widely used in all areas of physiotherapy, having applicability in sports, musculoskeletal, neurological, pediatric, geriatric, rheumatological, women's health, among others.
How to apply elastic bandage to your student
As with any other physiotherapeutic procedure, before application, an evaluation is necessary to verify the possibilities and indications of the method. Through static postural assessment, the physiotherapist observes misalignments and postural deviations that can be corrected by bandaging.
Dynamic assessment is also of fundamental importance and, in addition to gait, postures and gestures used for work or sports gestures in cases of athlete patients must be observed. In addition, other functional assessments should also be used, such as the joint mobility test and the flexibility and muscle strength tests.
With the observation of these movements, it will be possible to complete the positioning and tensioning of the bandage, in order to facilitate and not harm the patient's routine. The reassessments must be frequent and standardized, to observe the progress of the treatment and for the professional to rethink his objectives and conduct, reevaluating the need, the positioning and the tension of the bandages.
Before applying the bandage it is very important to prepare the skin. The area must be cleaned with alcohol and in some cases a fixative may be used. Magnesium milk is indicated as a pre-applicator. If the bandage is applied in regions where hair is present, trichotomy is necessary to guarantee the adherence and durability of the method.
After preparing the area, the physiotherapist cuts a piece of the bandage according to the region and with the purpose of the application. It is not possible to make the cut by hand, and scissors are needed for the procedure. It is important to take into account the tension that will be applied, as this will increase the final size of the bandage.
With the cut made and without removing the protective adhesive from the glue, the edges must be cut in a rounded shape, as shown in the figure below. In applications where one side needs to be divided into smaller parts, all of these parts also need this rounded cut. This procedure facilitates the adhesion of the bandage on the skin, promoting its durability.
With the cut performed properly, the ends of the bandage should be separated from the center, by means of a small cut in the protective adhesive. These lateral parts are called anchors and serve to fix the bandage, with no traction being applied in this region. The center, called the tail, will receive tensioning, according to the specific purpose of the treatment.
The following steps are then taken at the time of application:
- The first anchor's protective adhesive is removed and it is placed in the desired region of the body, without tension;
- The protective adhesive of the tail is removed, the appropriate tensioning is applied and then it is glued to the body;
- The protective adhesive of the third anchor is removed and it is also finally glued to the body, without tensioning.
- After application, it is necessary to rub the bandage in order to activate the glue and thus promote greater durability. After application, the therapist should ask the patient to perform some functional movements, to see if the bandage is not interfering with the individual's comfort or functionality.
The most common applications are related to joint repositioning, changes in muscle activation and lymphatic drainage.
Joint repositioning
In bandages for joint repositioning, it is necessary to keep the joint in neutral and not perform movements during application. In cases where the patient is unable to reach the neutral range (or that is the treatment goal) the joint must be positioned as close to the neutral as possible.
Alteration of muscle activation
Regarding the alteration of muscle activation, there are two methods for applying elastic bandages: one to inhibit and the other to activate muscle activity:
Distal to proximal application
In this method, the elastic bandage is applied at the insertion of the muscle and the tensioning is performed towards the origin. This application is used to inhibit muscle contraction and is generally indicated for inflammation or acute pain. A voltage of 0 to 15% is used on average.
Proximal to distal application
In this method, the elastic bandage is applied at the origin of the muscle and the tensioning is performed towards the insertion. This method is used in chronic conditions to stimulate muscle contraction. Stresses from 15 to 100% can be used.
Lymphatic drainage
The application of elastic bandages with the objective of lymphatic drainage is being increasingly recognized for the treatment of patients with disorders of the circulatory and lymphatic system. It can be used in cases of lymphedema, edema in premenstrual and postoperative periods of cosmetic surgery.
The technique must always be associated with known manual lymphatic drainage. As is known, in cases of lymphedema there is an increase in the size of the affected limbs, due to the decrease in lymphatic pumping. For this reason, the elastic bandage is preferable to the non-elastic bandage, which does not allow accommodation according to the change in the size of the lymphedema.
The tape is applied with the first anchor close to the lymph node to be drained, being applied with a 0-15% tension pattern. Its tail is divided into several parts, which open the initial lymphatic vessels, allowing the movement and drainage of substances throughout the lymphatic system, favoring its absorption.
Applications of elastic bandage for injury prevention
The elastic bandage is widely used in chronic injuries, to prevent the injury from worsening. Often, the patient no longer has symptoms or movement restrictions, being already rehabilitated, however he will be exposed to some situation that will cause instability and may be a risk factor for the return of the injury.
The elastic bandage will stabilize the joint, allowing the functionality of the area, but preventing movements or positions that are harmful to patients. This technique is widely used by sports physiotherapists in athletes, in which the application is performed before athletes practice their sports.
The athletes are the public more discloses the use of elastic bandages for use in sports championships broadcast on national and international network. It is very common to observe pictures of famous sportsmen using the technique.
As said, bandages should be used by professionals who know the technique, in cases of prevention of chronic injuries or for analgesia. Each sport has injuries that are more common. In football players, for example, injuries occur mainly on the thigh and ankle.
In Muay Thai, lower limb injuries also appear predominantly. In sports such as boxing, most injuries affect ligaments of the hands and wrists. In these fighting sports, injuries can often also occur on the face, which implies the application of bandages on the face.
It is essential for the physiotherapist to know his athletes and their most common injuries in order to know which application to use in each case. Next, we will exemplify the application of elastic bandages in the most common pathologies.
Types of pathologies that can be treated with bandages
As previously stated, elastic bandages are widely used for postural corrections, using the technique of joint repositioning. They can also be applied to patients with osteoarthritis, patellar chondromalacia and ankle sprains.
In addition, using the technique of altering muscle activation, bandages are also indicated for patients with low back pain, muscle contractures and strains, facial paralysis, plantar fasciitis, herniated disc and various pain conditions.
Elastic bandage for patellar tendonitis
For this bandage, a tension of 60% is applied. The application is performed from distal to proximal and stabilization takes place around the patella. An additional bandage is used in the infrapatellar region , with the same pressure of 60%, which can be applied before or after the previous one.
Elastic bandage for patellar chondromalacia
For this bandage, the patient must be seated, with the knees flexed at 90°. A tension of 60% is applied. The bandage should be cut in the central region, keeping the anchors intact. The space in the middle is used to stabilize the patella. The application is performed from proximal to distal.
Elastic shoulder bandage - instability
For this bandage, a tension of 40% is applied. The joint must be positioned in lateral rotation for the application to occur properly. Two bandages are used, one horizontally and one vertically. The first band applied is the horizontal, which must be positioned in the middle of the joint, with the first anchor positioned on the axillary line and the tension applied from anterior to posterior. The vertical band is applied with the tension from top to bottom, with the first anchor positioned on the upper side of the joint.
Elastic ankle bandage - calcaneus tendonitis
For this bandage, a tension of 15% is applied. The first anchor remains whole, while the second is cut in two, reaching the division almost to the first anchor. The first anchor is inserted in the posterior part of the calcaneus and the two tails are tensioned in the posterolateral regions of the leg, meeting in the popliteal fossa.
Elastic bandage for plantar fasciitis
For this bandage, a tensioning of 15% is applied to Plantar Fascitis . The first anchor remains whole, while the second is cut into four parts. The first anchor is inserted at the bottom of the heel and the four tails are tensioned one by one, towards the toes.
In some cases, another 50% tension bandage is used to stimulate supination of the ankle. This second bandage remains with the two anchors intact, the first being glued to the lower part of the medial malleolus and the tension applied in the lower lateral direction, with insertion in the upper part of the lateral malleolus.
Elastic bandage for tension headache
For this pathology, three bandages are used. The first two, positioned vertically, have 15% tension. Anchors should be applied to the base of the occipital bone and tension is applied from top to bottom. The interval between these two bandages is intended for the spinous processes of the vertebrae. A third bandage is applied over the previous ones, with 40% tension, being applied the tail and then the two anchors.
Elastic bandage for generalized low back pain
In cases of generalized pain, the star application is used. For this bandage, a tension of 15% is applied. For the application of the bandage, the patient is positioned upright, with an anterior trunk flexion. First, the “x” bandages are applied, and on top of the cross-shaped application.
When the patient has some tension point in the lumbar region, it is important that the point in question is located right in the center, in the meeting of all the bandages. Unlike all other applications, in this case the tail tensioning is still carried out with the bandage outside the body and then the anchors are applied, without any traction.
Elastic bandage for temporomandibular disorder
For this change, two bandages are used. The first is cut in "V", as the first anchor remains whole, while the second is cut in two. A tension of 15% is applied. The first anchor is applied in front of the ear, on the zygomatic bone, with one tail directed to the side of the nose and another to the side of the mouth. A second horizontal strip is glued over the first, with a 40% tension.
Only one temporomandibular joint receives the application at a time. If both have dysfunction, the physiotherapist must observe when opening the mouth which moves first and apply it to that specific joint.
Contraindications for the use of elastic bandages on your student
There are no contraindications for the use of elastic bandages in relation to the age or sex of the patient. Being properly applied by trained professionals, there are no restrictions to the beneficiaries of the technique.
As it is a treatment technique in which the resource is glued directly to the skin, in some people who have fragile dermal tissues, in the healing phase or with skin allergy the application is not recommended. Following this line of thought, elastic bandages cannot be applied to cellulite or areas that have serious active infections, either deep or superficial.
Some other cases in which elastic bandages may be contraindicated are: thrombosis, skin wounds, abdominal region of pregnant women, tendon, ligament and muscle ruptures, fractures, edema of unknown causes and patients with changes in venous return.
Special care that must be taken when using the elastic bandage technique
The explanation about the objectives and the functioning of the treatment with elastic bandages must be very clear to the patients. They must understand its function, its effects on the skin and what they must do to contribute to its durability.
The patient is advised not to rub the area where the bandage was applied during the bath and, if possible, use a hair dryer to dry the area. In addition, it is also important to guide the patient so that in the presence of any discomfort (itchiness or burning, for example) he removes the bandage immediately.
This process must be performed slowly, using the aid of alcohol or some type of body oil.
Another precaution to be taken is during the application of bandages for cases of joint correction. For these patients, the ideal is to carry out the corrections gradually and not wait for results in the first application. Certainly, the change is the result of a long period of bodily modifications and readaptations. Therefore, it is most appropriate to progress with small amplitudes and angulations. At each session, the tension is slightly increased and progress is made in the correction, until the expected pattern is restored.
Excessive use of the technique can lead to increased stimulation, in which various areas of the body are receiving information and the response does not take place properly. Ideally, elastic bandages should be applied to one region of the body at a time, focusing on the specific treatment of the chosen region.
Conclusion
As previously stated, unlike elastic resistance bands, bandages do not show a difference in tension when comparing colors. However, some theories believe that different colors can directly influence the benefits of bandaging by associating the color therapy technique.
This technique believes that each color emits its own vibration, thus having particular therapeutic properties. These vibrations can influence the individual physically or emotionally. As a result, certain colors of bandages can be chosen in some cases, favoring the achievement of results due to chromotherapy.
Red is a color related to motivation and persistence of physical strength. Green can improve thinking and promote physical relaxation. Blue also promotes relaxation and inspires confidence. Violet helps in hormonal balance. The yellow color, known for its joy, assists in the choices and activates the lymphatic system. Orange is a source of courage and favors the circulatory system.