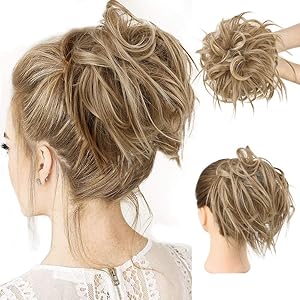
HMD Messy Bun Hair Piece Hair With Elastic Rubber Band Extensions Hairpiece Synthetic Hair Extensions Scrunchies Hairpiece for Women (Tousled Updo Bun, 12H24(Light Brown mix Natural Blonde)
Features - Messy Bun features adjustable buckle with drawstring and hair comb double clip, Clip in perfectly over your own ponytail.Perfect for adding volume and fullness to a bun or a ponytail,very comfortable and easy to use, elegant and lovely.
Material - Made by 100% high quality Synthetic fiber, it looks, moves and feels like real hair with affordable price.
Adjustable Size - Messy Bun can adjust size and easy to wear with light combs at both sides, fit most bun and ponytail, and uneasy to discover or fall.
Easy to Wear - Easy Stretch Updo Hair Chignons with combs at two sides brings you an elegant decent look in just a second, suitable for various occasions such as prom, wedding or going shopping.
Notice - Stretch Hair Comb and Messy Curly hairpiece are inseparable. Due to different computer monitor's color settings, Very slight Color difference may occur.
Hairpiece for party hairstyles
When naming hairpiece, we tend to think of the pieces that are applied for hair needs. But the reality is that despite not looking very popular, there is a great use of them to complement hairstyles and get a better image.
When used , the result achieved is spectacular.
There is a great variety of them. A hairpiece can be used to give more volume, to fill, to lengthen ... They are the best ally to give an extra touch to hairstyles and make them perfect. Below we are going to present some of them and discuss their possible uses:
Hair ties:
It is an elastic scrunchie with hair . Most are made with synthetic fibers as they keep their shape (they don't mess up) and hardly require maintenance. It offers a touch of volume and ease. Ideal both to enhance the day-to-day hairstyles and to wear it at events as you can see in the image of Miley Cirus.
Moldable hairpiece with comb:
Easy to install and very versatile. It is also like the previous one, a synthetic fiber hairpiece, which thanks to its wire system, allows it to be adapted so that it is the desired shape. It is also fully reversible, which increases the possibilities of use. It is one of the most used hairpieces and with a price for all budgets.
Ponytail with clip:
Ideal for a more pronounced length, more volume and movement. This false ponytail is a great resource when your hair itself is not showing off when you pick it up. This hairpiece also allows us to place it in 2 ways since it is also reversible. As it is placed, the tips face inward or outward.
Below you can see that the same type of hairpiece: the ponytail. It is available in various length and hairstyle options. So there are hairpieces for all tastes and hair types!
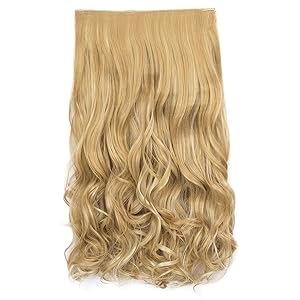
REECHO 14" Short Length 1-Pack 3/4 Full Head Curly Wavy Clips in on Synthetic Hair Extensions Hairpieces for Women 5 Clips 3.6 Oz per Piece - 25H613
The Model in the pitures is wearing 2 pieces hair extensions, If you have Thin / Fine / Baby hair, Try one first; Already have Thick hair, please order 2 pcs hair extensions to blend well; Length: Approx 14"; Package included: 1 piece of curly hair extensions (5 clips attached per piece)
UNLIKE the real human hair, the synthetic hair fiber may get tangled after 2-3 wears because the synthetic clothes that build up static,especilly in winter. Besides,the dust and moisture in the air may hurt the synthetic hair fiber.To prevent it,kindly you can get a spray bottle and put some conditioner in it, then fill it up with water. Spray it in the hair extensions.It will make the hair extensions not very dry and prevent getting tangled in some extent. Please understand
MATERIALS - Heat Resistant Fiber,able to resist the heat from styling tools to give you almost the same styling versatility as human hair (optimal temperature is 250-275 degrees). Going above 350 degrees is not recommended.With a matte looking, it looks real and you can restyled it with the scissors or curling iron
EASY TO WASH AND TAKE CARE - Just need a little mild shampoo and hair conditioner then washing in lukewarm water.then set on a flat towel and let them naturally dry.If the hair fiber has got tangled,kindly you can use little bit of laundry detergent and the water to soak and wash rinsed out then use a little bit of fabric softener and water to soak for conditioning then rinsed and let it air dry. Please don't blow-dry and don't wear it when sleeping or swimming
How many hair extensions do you need to achieve a voluminous mane?
If you've already decided to get extensions, congratulations! We congratulate you for taking the step to feel beautiful and strengthen your self-confidence . To achieve these goals it is necessary that the extensions you choose are of good quality, that they have a texture similar to your hair, that they are comfortable for you and also that you know how much hair is needed to get the hair you want. And that last is what we will help you choose in this post, how many extensions to put in the hair .
How to calculate how much hair you need to have a spectacular mane
Many people ask us: “How much hair do I need? How many microring extensions do I need? or how many adhesive extensions do I need? » But the truth is that each person is different and therefore has different needs and circumstances. That is why a specific amount cannot be said for all people. In order to calculate how much hair is needed, several factors must be taken into account .
First of all, how much hair is needed will depend on how thick you want your hair to be . If you want a discreet mane, which goes unnoticed, you will not need as many grams as you would need if you want a voluminous mane, which stands out.
On the other hand, there are other factors that also influence such as the size of your head, how you want to apply them, whether you are going to cut it, or even what type of cut you want to make. In these questions, the opinion of an extension expert can help you a lot, so do not hesitate to consult a professional you trust. You also have to take into account the length of your own hair. That is, if you have short hair and want to get a long hair with extensions, you will need more hair . However, if you already have long hair and you only want to lengthen a few centimeters, you will need fewer grams .
How many strands of extensions do I need?
If you like the type of extensions that are placed by highlights such as keratin or micro ring extensions, use at least 100 to 150 units (about 125 grams of hair ).
How many hair curtains do you need for short hair
In the case of the sewn curtain, we recommend buying one or two packages . Each pack has about 100 grams of hair . Remember that the longer the hair in the extensions, the less volume the curtain will have. This is because 100% human hair extensions are sold by the gram, so if the hair in the extensions is short, the bundle will have more hair strands, up to 100 grams, which is roughly what a bundle has. But in the case of extensions 60 cm , or more, the 100 grams have fewer strands, that is, less volume.
In the case of the adhesive curtain , keep in mind that the adhesive does not hold a lot of weight. That is why we do not recommend this method of placement if you have short hair and want a long hair with a lot of volume.
Also remember that if you choose extensions of more than 50 centimeters it is necessary to buy more grams to get enough volume.
How many curtains come out of an extension pack? One package brings a curtain between 1.20 and 1.30 centimeters wide . You must cut it to the measurements that are appropriate for you. But there are usually three large ones for the back of different sizes and two smaller ones for the sides of the head . They are all cut double, that is, in two layers, so that they are left with a little more volume. Of the three that go on the back of the head, you should put the smallest of the three first, in the lowest part. That is what determines the total length of the mane.
How to calculate how much hair I need depending on the texture of my hair If you have afro curly hair and you want extensions for the whole head you need about 250 to 300 grams . In this case, the most used are usually the hair curtains, sewn to the braided hair. Loose knotted hair is also often used. The amount we suggest works for both types of extensions.
When the hair texture is of the European type, 100 - 150 grams is usually sufficient . Although if you already have long hair and you only want to add volume and a few inches to your hair, less than 100 grams may be enough.
If you want to get adhesive extensions you can use just one pack. But if you want a hair with a lot of volume, we recommend two packages .
Something that you should also keep in mind is that if you are going to wear straight hair, your hair will look less voluminous than if you have it curly. This means that if you have curly hair and therefore use curly extensions , you will need fewer grams of hair in extensions. But with a straight hair you would need more grams , if you want it to look with enough volume.
If you have little and very fine hair, maybe 100 grams of hair in extensions will be enough. On the contrary, if your hair is thick or you have very marked layers, 100 grams is not enough.
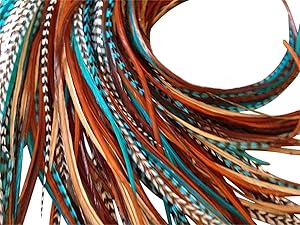
Feather Hair Extensions, 100% Real Rooster Feathers, Long Natural and Turquoise Blue Colors, 20 Feathers with Bonus FREE Beads and Loop Tool Kit NBT
20 Loose Feather Hair Extensions in Turquoise Natural Browns
100% Real Rooster Feathers, 8-11" in length (20-28cm)
Can be washed, styled, flat ironed, and curled with your natural hair
Salon Quality Feathers; Will last for months with proper care
Includes 20 beads and small loop tool kit for installation
Feather ornament for your hairstyles
Today in Con Idea de… we bring you a great idea to decorate hair, it is an ornament made with feathers .
This week I want you to be very pretty and for that reason, today, I recommend you this fantastic hair accessory. It gives a certain ethnic touch so if you like fashion, it becomes a perfect complement for this season.
The materials used are:
Two forks hair
Some scissors
A piece of black fabric or the color you like (we can recycle an old t-shirt)
Craft glue
Some large feathers
Leather rope or strips
You already know if you want to give a different touch to your hairstyles, follow this tutorial :
The first thing to do is cut a few thick strips from a black T-shirt, which you no longer wear. The length will depend on how long you want to give these ... let's say artificial braids. You can look at the photograph to get an idea.
When you cut the strips, you will see that they fold themselves, practically on their own, depending on the fabric from which they are made.
Now you just need to fix them, to form a kind of braid or small fabric dreadlocks.
To simulate this, what you will do is wrap leather rope around each strip.
Once this is done, take the two or three arranged strips and join them with the help of more leather rope and with a little glue .
The hair pins will be what you use to incorporate them into the hairstyle.
Once all this is done, the next step is to decorate the artificial braids with feathers .
Go to the free ends and fit the feathers between the string , also add a little glue.
fabric and feather ornament
As you can see, this beautiful hair ornament is ready, I hope you like it!
If you like these ideas to make accessories that we bring you, we encourage you to follow us on our Facebook page or on our twitter profile .
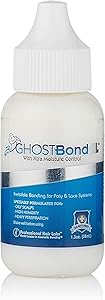
Ghost Bond XL Hair Replacement Adhesive - 1.3oz - Invisible Bonding Glue: Extra Moisture Control - Light Hold For Poly and Lace Hairpiece, Wig, Toupee Systems
LIGHT HOLD HAIR REPLACEMENT GLUE, ADHESIVE – Our Ghost Bond XL Adhesive is specially formulated for use as a pressure sensitive adhesive and glue for bonding hair replacement systems to skin and scalp. Our products are researched, manufactured and rigorously tested to ensure high-quality, exceptional performance and safety.
INVISIBLE BONDING FOR POLY & LACE SYSTEMS – Ghost Bond XL Adhesive is safe for use on both poly and lace hair replacement systems and creates an invisible bond after application. This invisible bonding helps to hide your hairline and creates a natural look for your wig or toupee for both men and women alike.
FORMULATED FOR OILY SCALPS, HIGH HUMIDITY & HEAVY PERSPIRATION – Ghost Bond XL Adhesive by Pro Hair Labs is specially formulated for those with oily skin and scalps, heavy perspiration and those in climates with high moisture and humidity. Our formula also has a higher melting point than other polyurethane and lace front wig and toupee glues, enabling you to rest easy that your hair will remain in place.
WATERPROOF & OIL-RESISTANT – Peace of mind when wearing a wig or toupee comes when you’re able to go about your day without worrying about your hair system moving or falling off from natural skin oils or wetness. That’s why our cosmetic hair system bonding glue is waterproof and oil-resistant to help ensure your hair looks and feels as natural as possible!
CONTAINS NO LATEX, HARSH SOLVENTS OR TOXIC INGREDIENTS – Our Ghost Bond XL is designed for those with sensitive skin and scalp, as our formula contains no nasty chemicals, no latex and no toxic ingredients. Also, when removing your hairpiece, using a skin-safe adhesive solvent – such as rubbing alcohol – may result in less skin and scalp irritation, as opposed to other harsh remedies.
How to choose the correct adhesive for Hair Prosthesis?
It is the great and important question if you want to start in this world. In the world of hair prostheses there are different materials used to make the base of the piece. And depending on the base, the laying method may vary. The bases are usually made of fabric or plasticized. Each of them has characteristics that make a specific type of prosthetic adhesive more suitable for them . The correct choice of adhesive for hair prosthesis is very important.
The personal characteristics of the user must also be taken into account . In this case, sweating greatly influences the result that the adhesive can offer. People with heavy sweating will have to use a more powerful denture adhesive .
The ideal is to find the ideal adhesive, which will be obtained through the testing of the different products that exist on the market . Thus the perfect fixation of the capillary system is achieved. We anticipate that the great difference between the adhesives, leaving aside the holding power, is the fact that they have or not a base of tissue, paper or other material between layer and layer of adhesive. Of all those that we present only one, it has no base (it is 100% adhesive).
Roll adhesives for hair prostheses
Yellow sticker
Description: It is an extra strong double-sided adhesive with a breathable effect. It leaves no residue and is quite resistant to sweat (does not come apart easily).
Duration : from 1 to 15 days.
Recommended for users who want a stronger adhesive than usual.
Price: € 13.00
You can buy it here
Red sticker
Description : It is a strong transparent double-sided adhesive. It leaves no residue and is flexible thanks to its paper base.
Duration: from 1 to 10 days.
Recommended for anyone who starts using hair prostheses.
Price: € 14.00
You can buy it here
Blue sticker
Description: is a double - sided adhesive without base, produced 100% with an adhesive film. It does not shine and is ultra-fine.
Duration : from 1 to 30 days.
Recommended for tulle bases or non-laminated clothes and pieces with lace front.
Price: € 15.20
Blue Adhesive Pre-cut into Straight Strips
Description: is a double - sided adhesive without base, produced 100% with an adhesive film. It does not shine and is ultra-fine.
Duration : from 1 to 30 days.
Recommended for tulle bases or non-laminated clothes and pieces with lace front.
Price: € 16.90 (Pack of 36 units)
Blue Adhesive Pre-cut into Curved Strips
Description: is a double - sided adhesive without base, produced 100% with an adhesive film. It does not shine and is ultra-fine.
Duration : from 1 to 30 days.
Recommended for tulle bases or non-laminated clothes and pieces with lace front.
Price: € 16.00 (Pack of 36 units)
Anti-allergic white sticker
Description : It is a very thin and transparent double-sided adhesive. It leaves no residue and is flexible. It is dermatologically tested.
Duration : from 1 to 7 days.
Recommended for people with sensitive scalps and prone to allergic reactions.
Price: € 13.80
White No Shine sticker
Description : It is an extra strong and very resistant adhesive. It is used as a powerful adhesive between the skin and the usual adhesive as it is preferable that it does not touch the hair prosthesis directly.
Duration : from 1 to 30 days.
Recommended for users who require an extra reinforcement in the grip.
Price: € 16.90
You can buy it here
Easy Green sticker
Description : It is a special adhesive for high resistance and fixation hair systems , it is a strong and dull adhesive . It is a double-sided adhesive, one of them adheres to the hair prosthesis or wig and the other to the skin.
Duration: from 2 to 4 weeks.
Its use in lace hair prostheses is more recommended due to its matte finish, but it can be used in any hair system.
Price: € 11.90
Liquid adhesive Gel adhesive
Description: Strong hold reinforcing adhesive. It is the classic adhesive, one of the first to be used. Currently the No Shine adhesive would perform this function.
Duration : from 1 to 30 days.
Recommended to complement the use of roll adhesive.
Price: € 16.20
Liquid adhesive
Description: Liquid adhesive for normal and anti allergic fastening Dermatologically tested.
Duration: 1 to 3 days
Recommended for the prosthesis frontal tulle area.
REMOVE PORE CLOGGING PRODUCTS and return your underarms to their natural state so you can make the transition to a natural deodorant without dealing with unwanted odors
GENTLY EXFOLIATE YOUR UNDERARMS with soothing ingredients like coconut and green tea, perfect for sensitive skin and gentle enough for daily use
ACTIVATED CHARCOAL REMOVES UNDERARM ODORS leaving your armpits feeling clean and renewed, enhancing the scent of your natural deodorant and keeping unwelcome scents away
DETOX THE DAY AWAY by massaging our coconut scented underarm scrub into your armpits and rinsing it all away to reveal soft and purified skin
FREE OF HARSH CHEMICALS including parabens, phthalates, SLS, mineral oil and petrolatum, as well as sulfate-free, cruelty free and 100% vegan
How to detox scrub
Should you cleanse or exfoliate first? If you are to cleanse and exfoliate your skin frequently, we congratulate you. Cleansing and exfoliating are essential to a good skincare routine and can produce beautifying results. Have you ever wondered about the correct order to apply cleansers and scrubs? Or if you should cleanse or exfoliate first? If the answer is yes, we are now going to discuss the advantages and disadvantages so that you can decide how to cleanse your skin accordingly.
Cleanse before exfoliating Cleansing the skin first helps remove dirt, sweat, and makeup from the skin's surface. This way you can work with a clean base to exfoliate the dead cells that accumulate on the surface of the skin. Exfoliation can soften the skin and allow a new layer of cells to emerge by removing dead cells. After these steps, your skin is ready for the moisturizer, oil, or serum.
Exfoliate before cleaning This method is less common, but it also has many benefits for the skin. Exfoliating first can remove debris, dead cells, and dirt from the skin's surface. The next step is to use a cleanser to help remove any dead particles or cells that remain on the skin's surface after exfoliating. It also allows for thorough cleansing and a smooth, responsive surface for skin to absorb moisturizer.
Our verdict? Try both methods and stick with the one you like best. There is no general rule of thumb as to whether to exfoliate or cleanse first. We recommend you try both methods and stick with the one that best meets your skin's needs. Either way, as long as you cleanse and exfoliate according to your skin type, you can achieve a deep clean and keep your skin more attractive.
If you think exfoliating and cleansing your skin is too complicated, you can combine them in one step. Garnier SkinActive Clean + Blackhead Eliminating Scrub is a gentle cleanser and exfoliator. Softens skin and unclogs pores. Charcoal-infused formula can pull away dirt, grease, and blackhead-causing impurities like a magnet.
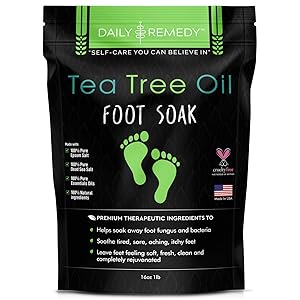
Tea Tree Oil Foot Soak with Epsom Salt - Made in USA - for Toenail Fungus, Athletes Foot, Stubborn Foot Odor Scent, Fungal, Softens Calluses & Soothes Sore Tired Feet - 16 Ounces
SOOTHE AND SMOOTH TIRED, ACHY FEET: Give your feet the nourishment that they crave with this natural foot bath soak. Quit paying hundreds of dollars at a spa when you can give your feet a daily pampering from the comfort of your own home at a fraction of the price.
THIS UNIQUE BLEND GETS THE JOB DONE: Our natural foot soak salts solution is a blend of epsom salt, sea salt, eucalyptus, peppermint, spearmint, cajuput, rosemary, lavender, and MSM. When everything else has failed, Daily Remedy steps to the plate and delivers.
NATURALLY TREATS MANY FOOT ISSUES: You’ll be astonished at what this tea tree foot soak can do for your feet and toenails. It works wonders for foot and toenail fungus, athlete’s foot, odor-causing bacteria, stubborn calluses, irritation, rashes, and loads more.
NO HARSH INGREDIENTS OR OTHER JUNK: Purchase with confidence knowing that when you put your trust in Daily Remedy, you’re getting nothing but the best. There are NEVER any chemicals, preservatives, synthetic detergents, additives, artificial fragrances, fillers, or binders.
CUSTOMERS WORLDWIDE ALL AGREE: That the Daily Remedy Tea Tree and Epsom Salts for Soaking Feet is #1. Check out the reviews to see for yourself! They took the plunge and quickly put their pesky foot issues in the rearview. When you buy today, you will too!
4 ways to prepare baths to soften feet
Soft and beautiful feet are synonymous with beauty and well-being. However, carelessly, they can look dry and cracked. We propose 5 ways to make baths to soften your skin.
Sudden changes in the weather, hormonal fluctuations and lack of care can be reflected in the condition of the feet. These factors affect the dryness of your skin, in addition to other problems such as the appearance of fungus, corns and cracks. Do you want to learn how to prepare baths to soften your feet?
Although a regular pedicure can help keep your feet nice and soft, regular bathing can be very beneficial. Not only does it allow to detach dead cells, but it also favors the relaxation of the muscles in the face of fatigue. Go ahead and try them!
4 baths to soften the feet that you will like to try Taking advantage of the properties of a series of ingredients of natural origin, we can prepare baths to soften and beautify the feet . Its application is ideal to alleviate the pain of a very heavy day , or to keep your skin free of dead cells.
1. Baths to soften the feet with vinegar and almond oil
Adding a little apple cider vinegar and almond oil to foot bath water can have important benefits. First of all, vinegar helps to inhibit the growth of fungi and bacteria, preventing infections.
On the other hand, almond oil has a moisturizing effect that helps combat dryness in this area, according to this study carried out by the Salisbury General Hospital (United Kingdom). In addition, together, both help to shed dead cells to leave feet with a renewed appearance.
Ingredients
1/2 cup of apple cider vinegar (125 ml)
4 cups of hot water (1 liter)
2 tablespoons of almond oil (30 ml)
Preparation
To start, dilute the apple cider vinegar in the liter of hot water.
Later, add the almond oil and mix.
How to use
Dip your feet in the preparation, for 15 to 20 minutes.
Repeat its use 2 times a week.
Go ahead and read: Reduce rough feet with 7 home remedies
2. Bath with sea salt, baking soda and lavender oil In addition to softening the skin of the feet, this bath is very relaxing and revitalizing. Its application 2 or 3 times a week reduces the feeling of tension in the feet and improves circulation . This is due to the anti-inflammatory action of lavender, according to this study carried out by the State University of Maringá (Brazil).
In addition, it removes dead cells and helps keep the skin clean and free of roughness.
Ingredients
4 tablespoons of sea salt (60 g)
6 tablespoons of baking soda (90 g)
10 drops of lavender essential oil
6 cups of water (liter and a half)
Preparation
First, heat the cups of water.
When they are at a bearable temperature for the skin, pour it into a bowl and add the salt, baking soda and oil.
How to use
Soak your feet in the liquid for 20 minutes.
3. Baths to soften the feet with clay
Clay has been used in natural cosmetics, according to this study by Shiraz University (Iran), due to its properties to improve skin health. In this particular case, it helps remove corns and reduces the presence of dead cells. In addition, its nutrients penetrate the skin and leave it looking healthy.
Ingredients
6 tablespoons of English salt (90 g)
6 cups of hot water (liter and a half)
1 teaspoon of St. John's wort oil (7 ml)
1/2 cup of cosmetic clay (100 g)
Preparation
First, pour the English salt into a basin of hot water.
Subsequently, add St. John's wort oil and cosmetic clay.
How to use
After mixing the ingredients, soak your feet for 20 minutes.
You can repeat the treatment 3 times a week.
Discover: The best remedy for calluses on the feet: onion and white vinegar
4. Bath with ginger and hydrogen peroxide The last recommended among these therapeutic foot baths is one made with ginger (which has anti-inflammatory properties, according to this study by Isfahan University (Iran) and hydrogen peroxide. Its formula reduces inflammation and pain in case of tension or overexertion , in addition to eliminating roughness and excess dryness.
Ingredients
2 tablespoons of ground ginger (40 g)
6 tablespoons of hydrogen peroxide (90 ml)
6 cups of water (liter and a half)
Preparation
First, heat the cups of water to a temperature that is bearable for your feet.
Then pour it into a tub or basin.
Later, add the ginger and hydrogen peroxide .
How to use
Soak your feet for 15-20 minutes.
After this time, dry them well and rest.
Do the remedy 2 or 3 times a week, before going to bed.
Do you have dry or callused feet? Do you want to relax your feet when you get home? Then do not hesitate to make one of these baths with therapeutic properties. You will love to enjoy its effects.
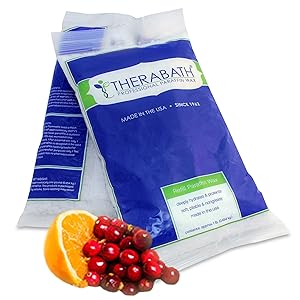
MADE IN THE USA! Professional quality Paraffin from Therabath will leave your skin soft, youthful, deeply moisturized, and healthy looking. Can be used in all paraffin baths.
SOFT AND PLIABLE! Our paraffin wax is soft and pliable, eliminating the mess found with dry, brittle paraffin waxes. Even use the pliable ball of wax to effectively exercise the hand during rehabilitation.
EFFECTIVE AND CLEAN! Therabath paraffin wax remains residue-free, while building thick, pliable layers in an easy-to-remove glove.
EXPERTLY BLENDED! All Therabath paraffin is odorless, colorless and hypoallergenic, then lightly scented and tinted. Blended with all required oils - no need to add additional oil! Contains only therapeutic-grade essential oils. Paraben free.
For over 90 years paraffin moist heat therapy has been used to relieve pain, inflammation and stiffness caused by arthritis. A form of thermotherapy, paraffin treatments effectively increase blood flow to aid in rehabilitation, or to warm an area of the body prior to other therapies or exercise.
Therabath Paraffin Wax Refill - Use to Relieve Arthritis Pain and Stiff Muscles - Deeply Hydrates and Protects – 6lb Cranberry Zest – Made in USA
Paraffin treatment in Physiotherapy
This time at Isidro y Márquez, Aesthetics Dentofacial we are going to talk about paraffin and its use in some physiotherapy treatments .
The paraffin is a hydrocarbon white malleable by its appearance and high thermal conductivity is used as therapeutic agent and soothing pain rheumatological, arthritis, contractures, stiffness, tendinitis or sprains.
The most common way to apply paraffin treatment is to immerse the area to be treated (usually hands or feet) in a container containing paraffin at a temperature ranging between 50 and 55 degrees. If the area cannot be submerged directly, the product should be applied directly to the affected area.
Once the paraffin is impregnated in the skin, it should be allowed to cool slowly, allowing a film to form that will keep the heat in the area. In many cases it is convenient to wrap the area with plastic so that the heat is stored for a longer time.
paraffin-treatment1.jpgExperts advise to keep the wrap for 15 to 20 minutes, until the substance stops transmitting heat. Subsequently, the product, already solidified, is removed, returning it to the initial container since it can be reused several times.
Our physiotherapist, Jorge Pérez Ondina , assures that the paraffin treatment is not definitive but after several sessions the patient will notice how the pain decreases and mobility in the area is gradually regaining.
But in addition, paraffin has a high moisturizing power and is widely used in beauty treatments in people with problems of dehydration, dryness, lack of elasticity, cracked or peeling skin. So in addition to calming our pain, it will help us maintain the health of our skin.
PARAFFIN BATHS FOR THERAPEUTIC PURPOSES
The paraffin is a white substance, unctuous aspect, wax form.
It has a melting point of 53ºC. At this temperature point, the paraffin, originally solid, becomes liquid, promoting a thermal action by giving up heat by conduction.
For paraffin to be used in thermotherapy, it must be heated until it reaches the melting point. For this, the paraffin bath is used.
Paraffin is highly indicated to provide high hydration in deep layers of the skin, as well as to treat muscle pain, osteoarthritis, arthritis, post-traumatic disorders , and other joint and periarticular diseases, especially in the hands and feet.
It also stimulates blood circulation since heat acts as a vasodilator by increasing blood flow in the veins.
To apply the Paraffin, in our case on the hands, we must take into account:
Wash the area to be treated.
Put your hands in the paraffin bath 3 times until you get a layer that retains the temperature.
To keep warm, it is wrapped in a plastic bag and then in a towel.
It keeps for 10-15 minutes until it cools down.
To take advantage of the benefits of paraffin after removing it, we perform different exercises that improve mobility, agility and strength of the fingers and wrist.