Saturday, March 6, 2021

Amazon Brand - Solimo Lawn & Leaf Drawstring Trash Bags, 39 Gallon, 40 Count

 Amazon Brand - Solimo Lawn & Leaf Drawstring Trash Bags, 39 Gallon, 40 Count

  •     Includes 40 lawn & leaf garbage bags
  •     Each bag holds 39 gallons
  •     Black trash bag with red drawstring for easy tying and carrying
  •     If you like Glad Large Drawstring Trash Bags, we invite you to try Solimo Lawn & Leaf Drawstring Trash Bags
  •     An Amazon brand


Remove leaves, grass and branches for collection


Learn how and when to dispose of your yard clippings, such as leaves, grass clippings, and small branches, using curbside collection service. Find out the dos and don'ts of yard trimmings.

  • Place grass clippings, dead leaves, small branches, and other yard debris in leaf and garden bags. If you have a green pot, put them there.
  • If the branches won't fit in your boat or bags, tie them up and place them next to the boat. Branches should be no more than 5 feet long and 3 inches in diameter.
  • Find your collection day with the My Collection Schedule tool below.
  • Remove clippings from the yard by 6:30 am on collection day. Be sure to leave a 5-foot space between boats, cars, and mailboxes.

Dos and don'ts of yard trimmings

  • Remove all rocks and dirt from your garden clippings.
  • Wrap thorns in newspaper or cardboard and tag “thorns” to protect City of Austin personnel.
  • Do not put large weeds, such as tree trunks and large branches, along with yard clippings. These are considered large items.
  • Do not include sawdust, wood, or animal waste.

Don't put plastic bags or extra trash with your yard trimmings. These will not be collected.


How to recycle yard waste


It's the time of year to garden, and you may have yard waste filling bags in your garage. Or maybe you're ready to take on a project and wonder where to recycle your yard waste. We can help. While recycling rules vary by city, recycling is incredibly good for the environment and worth considering!

Learn how to manage your garden or wood waste
Although recycling rules vary by city, we have many great tips for recycling wood and yard waste so it doesn't end up in a landfill. When this happens, it contributes to global climate change, but it also takes up space and produces methane gas. When yard debris such as leaves or clippings are burned, it is not only a fire hazard but it also creates air pollution. To avoid them, check your city or town website for the proper disposal site.

Reduce waste through reuse
A preliminary step to recycling is reuse, and what better way to avoid the need to recycle than by reusing your yard waste? You can avoid a trip to the local composter (if one exists) and you don't have to worry about filling your car with bags and bags of leaves, weeds, or tree trimming. Plus, reuse is much easier and takes less time!

Instead of packing your grass clippings after you cut them, leave them on the lawn where they will break down and return nutrients to the soil. Just make sure to avoid cutting the grass less than 3 cm.

Another great way to reuse is with dry leaves or shredded wood waste. You can use them to make mulch. Spread the mulch in thin layers around the base of the plants. This prevents weed growth, retains water, adds nutrients to the soil, and regulates soil temperature. You can do the same with grass clippings.

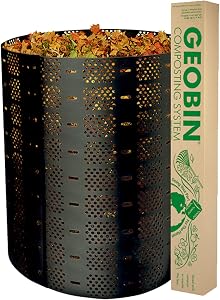
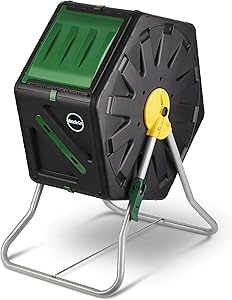
Learn to compost at home
Since food and yard waste makes up 20 to 30 percent of what we throw away, we should compost these items instead, keeping these materials out of landfills. Compost is an organic material that can be added to the soil to aid plant growth, such as dead leaves, twigs, branches (brown), grass clippings, plant debris, fruit debris, and coffee beans (green). Since many of us use these items on a regular basis, it is easy to start with a compost container, you can buy it in stores like Ecologicoysostenible.com

Compost piles should contain equal amounts of browns to greens, and the layers should alternate between the two groups. Brown items provide carbon and green items provide nitrogen. To create garden compost, you need a dry, shady area near a water source. Add brown or green materials and moisten as they are added.

After creating a compost pile, mix green waste and grass clippings in the pile and bury fruit and vegetable waste under 12 inches. of compost material. You can also choose to cover the top with a tarp to keep it moist. Your compost is ready to use when the material at the bottom is dark in color!

If you don't have room in your yard for an outdoor compost pile, just buy a compost bin and store it in your home! You can compost even in an apartment . For more information on how to create a compost pile, check out some tips .

Compost Bin by GEOBIN - 246 Gallon, Expandable, Easy Assembly

 Compost Bin by GEOBIN - 246 Gallon, Expandable, Easy Assembly

  • Large capacity—expandable to 4 feet (246 gallon)


How to compost at home? 5 steps to transform your organic waste into compost


Not everything is really rubbish! Learn to compost and reduce waste in your home.

In these days when we spend so much time at home, you may have noticed the amount of garbage that humans produce. Well, the good news we have for you is that not everything is really rubbish! What happens is that many times we do not know how to separate it or how to take advantage of it so as not to send so much waste to landfills.

One of those strategies, which at the same time is quite magical, is to make homemade compost so that the peels of fruits and vegetables , garden waste and paper do not go to the garbage but return to the earth to become compost for the plants. Interesting, right?

The fact: Composting you can reduce 60% of your waste (if you recycle you will reduce it by 90%). Together they are garbage but separately they can be used.

What is composting about?
Composting is the decomposition of organic matter that occurs thanks to the presence of oxygen and the work of bacteria, fungi, other microorganisms and small insects. There are many ways to do it, –even with the presence of worms and large insects–, but the advantage is that to carry it out at home we only need a few extra minutes of time and a space with good ventilation and shade to locate the container. the rest is made by nature!

The data: With 100 kg of organic waste, between 30-40 kg of compost is obtained, a little less than half of the starting material. The rest evaporates as water vapor and CO2.

What can be composted?
The materials that can be composted at home are divided into two groups:

a) Fresh waste:

  • Fruit and vegetable waste
  • Garden debris (leaves, flowers, etc.)
  • Coffee grounds and tea bags *
  • Eggshells

* If you put them to dry you can use them as dry waste.

→ Compost moderately : Remnants of cooked food such as rice, pasta, bread, vegetables.
→ Do not compost! : Meat, dairy, fats and oils, plastics, metals, feces.


b) Dry waste:

  • Dry leaves, branches, sawdust and grass
  • land
  • Paper, newspaper and cardboard without glossy, adhesive or plastic coatings
  • Grease-free napkins
  • Egg boxes


Step-by-step home composting:

1. Choose a container to be your compost bin

 It can be a bucket, fruit box, flowerpot, or plastic organizer box. The important thing is that you choose a material that will not be damaged by the humidity that will be generated inside the compost bin, that has a lid to prevent mosquitoes and that allows oxygenation of the content .

One idea that has worked for us is to put a cloth on the container as a lid and secure it with a rubber.

2. Collect your fresh and dry waste and chop it very small

Reducing the size of the two types of waste helps microorganisms break them down faster.

Here are some tips for this stage:

  • Locate a jar with a lid in the kitchen so that, every time they peel or chop something at home, they deposit the shells there and, as soon as it is full, they process them to include them in the compost bin. It's a good idea to keep it in the fridge so it doesn't attract mosquitoes.
  • The avocado seeds and mango take longer to break due to its size and hardness. What you can do is scratch the avocado seed and let the mango seed dry to scratch it as well.
  • If your home blender allows it, you can blend some items with a little water.
  • Use scissors to chop up the dried residue. It usually happens that these wastes are the most difficult to generate at home at the same volume as organic ones, so you can get sawdust for this purpose.

3. Put your waste in the compost bin taking care that the proportion of wet and dry material is the same.

The first time you do the process you must build a good layer of dry material, then add the wet material and finish with another layer of dry material, as if it were a lasagna.

* A tip: When the material that is inside a compost bin is well balanced and has adequate humidity, it does not present a bad smell. The coffee grounds is an element that also allows the material not to smell bad.

4. Cover your compost bin and place it in a shady place where it receives a good draft.

The microorganisms that will be working in the compost bin need oxygen and a humid environment to stay alive, so it is very important not to get the sun.

5. Add your waste again according to the rhythms of your house (it can be daily or once a week).

From the second time you add residuals, keep in mind that:

  • The ratio of dry and wet material must be the same.
  • Once you add your organic waste, you must stir all the material (use a glove or a shovel for this) so that it becomes oxygenated. Always finish with a layer of dry material.
  • When you are stirring, take the opportunity to check the humidity of the material: take a handful and squeeze it to check that just a couple of drops are generated. If it is very wet, stir dry material before the last coat.
  • If you feel that it is hot when stirring the material , it is a good sign! As part of the process carried out by the microorganisms, the temperature of the compost bin tends to rise.
  • Even if it doesn't smell bad, the compost bin will be generating gases so you can wear a mask to avoid breathing them.
  • When you fill a container you can pass this material to the maturation stage before using it as compost, it is necessary to stir it at least once a week and add a little water if it looks dry.

Miracle-Gro Small Composter - Compact Single Chamber Outdoor Garden Compost Bin (18.5 Gallon)

 Miracle-Gro Small Composter - Compact Single Chamber Outdoor Garden Compost Bin (18.5 Gallon)

  •  NO SPACE? NO PROBLEM! – Don’t let tight spaces keep you from composting! Miracle-Gro’s outdoor compost bin tumbler is small enough for even the tiniest spaces! The 18.5gal (70L) volume perfectly fits your balcony, porch, patio, or rooftop garden. Finally you can compost from anywhere!
  • TURN YOUR FOOD WASTE INTO GARDEN GOLD – Transform kitchen and garden waste into rich, fertile compost – the gardener’s treasured “black gold!” Ready-to-use compost will be yours in just 4-6 weeks, thanks to Miracle-Gro’s unique aeration system. Internal mixing bars speed up decomposition to make growing a happy garden easier than ever!
  • REDUCE YOUR CARBON FOOTPRINT – Studies show that approximately one third of the world’s food supply goes to waste. But with Miracle-Gro’s rolling compost box you can do your part to change that. Save your compostable food scraps, help the environment, and cook up some compost that your plants will love
  • YEAR-ROUND, HASSLE-FREE – Why should composting be a seasonal activity? Miracle-Gro’s heavy-duty design lets you keep your compost going all year round! The sturdy side-locking mechanism ensures easy loading and unloading, while the durable construction maintains a tight seal. And BPA-free, food grade, UV-protected plastic, means you won’t need to worry about harmful toxins.
  • Achieve your garden goals with a pair of multi-purpose gardening gloves! Each pair is latex-free, water-resistant, and features a no-slip grip, perfect for both indoor and outdoor projects. Grow your green thumb with Scotts and Miracle-Gro!


How to turn your organic waste into natural compost


Last January the European Environment Commission voted to increase the recycling targets for municipal waste . According to this proposal, 50% of municipal waste must be recycled by 2020, 70% by 2030. To achieve these ambitious goals it is necessary to take a look at the garbage bag. Let's see it: according to the most recent data published by the National Institute of Statistics (INE) , during 2014 more than 21 million tons of waste were produced, that is, 459 kilograms of waste per person per year. Of these, the most important part, 42% of the bag according to the Ministry, corresponds to organic waste or bio-waste: grass, leaves, pruning remains or discarded food , the most common.

Taking these numbers into account, the conclusion is clear: increasing the recycling rate of organic waste is a necessary strategy to achieve the European 2020-2030 goals. And without a doubt, its correct implementation will result in a better separation of the rest of the waste.

More and more towns are beginning to become aware of the importance of correctly managing their organic waste, designing separate collection and composting plans. But are we clear about what we are talking about? Don't miss this post!

What is compost?
Natural compost is an organic fertilizer that is obtained from the natural decomposition in the presence of oxygen from organic waste, either by means of microorganisms such as bacteria and fungi (composting) or by means of worms ( vermicomposting ). Depending on the type of waste used, from 100 kilograms we can obtain around 20 kg of organic compost.

What does it take to compost?
Composting household waste does not require complicated mechanisms or large investments. Simply a space inside the house or in shared areas of the community in which to locate the composter , a container where we will mix organic waste and in which the transformation process of said waste to obtain compost will take place.

How can I compost at home?
If you have a garden or a shared green area, you can install a composter that is in contact with the earth, preferably in the shade. If you live in an apartment you can also compost using a vermicomposter.

Do you have to spend a lot of time on it?
The truth is that no: make sure to remove the contents of the composter from time to time to aerate it, to keep the material to be composted moist and let it degrade little by little. Without bad smells or pesky bugs, in 5-6 months it is possible to obtain good quality organic compost.

What can be composted?
Only organic remains. In general, any discarded food such as leftover bread, coffee grounds, fruit, vegetables, rice, pasta, egg shells, expired yogurt, etc. as well as garden debris such as leaves, sawdust, branches and others. Meat, fish, cheese or bones can present some inconvenience in their transformation. Butts, cooking oil, ash or sweeping debris should not be thrown into the composter.

What are the advantages of compost?

First of all, we easily obtain a good quality organic fertilizer that we can apply to indoor plants or gardens, without the need to buy chemical fertilizers. In addition, compost has another added value compared to them, since it improves the structure of the earth by providing organic matter.

Based on environmental criteria, organic waste collected by conventional circuits is significantly reduced, which reduces management costs and avoids the generation of greenhouse gases. A clear example of the application of the principles of the circular economy , compost closes the cycle of organic matter returning to the earth and enriching it.

VIVOSUN Tumbling Composter Dual Rotating Batch Compost Bin 43 Gallon Black

 VIVOSUN Tumbling Composter Dual Rotating Batch Compost Bin 43 Gallon Black

  •  TWIN CHAMBER-Designed with 2 chamber benefits Batch composting, which is the most efficient way to produce high-quality compost; Let one side "cook" while you add fresh materials to the other, continuously swapping sides creates an uninterrupted flow of rich, healthy compost
  • CREATIVE TUMBLING DESIGN-The rotating design lets your hands-free, avoiding digging and mixing your compost pile by hands, making the mixing more easy and efficient; Just fill it up with garden refuse and kitchen scraps, slide the door closed and give it a turn every couple days
  • OUTSTANDING AERATION-Adjustable air vents and deep fins strengthen the air circulation, help decompose the clumps in the chamber and combine lots of oxygen into the compost, easily produce finished compost in weeks
  • STURDY & DURABLE CONSTRUCTION-Made of galvanized steel and high-quality PP plastic, this VIVOSUN Tumbling Composter is corrosion-resistant, degrade resistant, sturdy and durable for long-lasting service life
  • GARDEN GLOVES INCLUDED-Comes with 4 durable ABS plastic claws, no other tools required, convenient to excavate and plant in horticultural work; Latex rubber material not only protects your hands from cuts and broken nails but also makes it easy to clean as its waterproof function


How to transform organic waste that you throw into the garbage into natural compost?


With a little patience and letting nature act at its own pace, it is easy to always have a natural fertilizer on hand from which the plants you have in your home or garden will obtain all the nutrients they need.

The Spanish Association of Agronutrient Manufacturers (AEFA ) defines compost as a product obtained by aerobic fermentation of organic waste. According to current legislation, the compost that we can purchase must contain at least 25% organic matter, but if you want you can do it at home 100% natural.


How do you make homemade compost?
If you dare to try, your plants and the environment will thank you and, in addition, you will save money on chemical fertilizers. As experts point out, compost is a basic element that helps to achieve a more fertile soil .

To start composting you need very little. Ideally, you should have an appropriate container, a composter or compost bin , although a plastic bucket can also be useful.

To compost, you simply have to get into the habit of separating organic waste and taking what is useful for composting to the container.

It is advisable to start by placing a first layer of soil, dry branches or waste from cleaning the garden . Once the bottom is prepared, you can start to put the remains of usable food in the composter, for example fruits and vegetables, including seeds and shells, eggs, also with the shell, any food "half eaten" but that is in good condition (not rotten ). What you should not use for compost are the remains of meat or fish , nor their bones or thorns. Of course, we are talking about organic remains, so plastics, bricks or any type of metal or paper container are not valid . You should not pour oils either, neither raw nor used, nor some elements that could be toxic, such as the burnt ashes of a barbecue coal.

It is not about throwing it all in at once, but about going every day to dump the waste generated so that, little by little, it begins to ferment.

How long it takes?
The decomposition of food scraps occurs slowly. It can take between a month and a half and three months to see the first results , depending on the amount you want to achieve.

At this time it is essential to stir the compost every so often to aerate it and promote fermentation . Also, it needs some humidity, so if you have the compost bin outside, take advantage of a day of fine rain to uncover it and make it wet (you can also water it lightly).

If you see any worms, do not worry, it is normal and when the compost is ready for use, you will no longer see them. It is a clue to know when it is time to give it to your plants. Others are: the color, which must be very dark brown , almost black and the texture, which must be spongy, without the organic remains that you have been adding are visible.

Friday, March 5, 2021

Garden Genie Gloves, Waterproof Garden Gloves with Claw For Digging Planting, Best Gardening Gifts for Women and Men. (Green-2A)

 Garden Genie Gloves, Waterproof Garden Gloves with Claw For Digging Planting, Best Gardening Gifts for Women and Men. (Green-2A)

  •  ★ Quick and Easy to Plant - Garden genie gloves with 4 Built-in durable ABS Plastic Claws on each hand, Easy to dig and plant without hand tools in gardening work!
  • ★Waterproof and Puncture Resistant: - Using natural latex rubber coating material. Waterproof, puncture resistant and easy to clean, protects your hands from cuts and Broken nails!
  • ★Breathable Design - Nylon knitting on the back of the hand, comfortable and breathable to keep the hands cool and dry even in summer.
  • ★Universal Size Fits Most - High quality latex coating has good ductility, so garden genie gloves are universal size to suitable for women, men and even older kids.
  • ★A Great Gardening Gift - It is a great gift for a birthday, Holidays, Mother's Day, Father's Day, Thanksgiving and Christmas.


How to take care of your hands: tips for gardeners


As I dispatched enough this week, I realized that the problems in the skin of the hands were my biggest nightmare related to the profession in recent years, so I come to evangelize about it.

Post, don't google this term
The gringos refer to this as "hand rot" or "bar hands." My nightmare and that of many. As I am not one of those Instagram accounts that teach you to have a clean kitchen and show you worms and moths in your food, there will be no photos of hands in this email. What I must tell you is that it looks ugly and I recommend that, even if you are a very curious person, you want to googling. It looks ugly and it feels a thousand times worse. The thing starts when the skin of your hands begins to dehydrate, because poor girls you send them to the front of an intense battle: squeezing lemons, washing mint, cleaning bottles and a thousand other tasks take you away from that career as a model of hands with which some you ever dreamed.

One day the palm of your hand begins to itch, or perhaps the tips of your fingers. The skin begins to sag and there, dear viewer, you are closer to the cross than to the axis . It's hard for me to explain to you how difficult it is to keep your broken hands from getting infected while you work. Imagine that you have a wound, would you clean it with the rack that you use in a bar? There it goes, we begin to understand each other.

At this point, going back is very difficult. You are going to have to go to a dermatologist who is going to tell you that the way to solve it is to stop working at the bar for a while, or to use a double layer of gloves to work: cotton ones glued to the skin and latex on top. Dinnerware breakage imminent.

To prevent is to cure
Sorry for the cliche , but it's so so true in this case. The way I healed my hands was to stop dispatching. Industrial detergent, lemon, rubbing alcohol, alcoholic beverages, mint, all of these remove the magical protective layer from your skin. Avoiding coming into contact with these substances was impossible for me. So the point is not to let your hands slip. 

Here I go with my tips:

  • Wear gloves for production, not service. Latex gloves have powder and that dries out your skin, nitrile gloves do not have powder but they will make you perspire and that is not good either.
  • Keep your hands dry as much as possible. This involves taking your clean, dry cloths or towels to work.
  • There are things you need to wash with hot water, okay. Be careful with the temperature of the water, do not prime yourself.
  • Put on a lot of good cream every night before going to sleep and during the day, whenever it is within your means.
  • Be consistent with all of this.

The creams that worked best for me:
  • Really, I more than anyone would like this to be a trade, but it is not. I have researched the market for hand creams a lot in recent years, which in Argentina is large but does not even match the range of creams available in the United States. There are creams for people who perform very specific tasks, type, creams for gardeners , for climbers , for people who live in Vermont , etc.

Considering the price and the results, this is what I recommend:

  • Milking cream. No, it doesn't smell good. The whole of humanity has known for a couple of generations. In its defense I will say that it absorbs fast.
  • Neutrogena Hand Cream. Yes or yes before bed, unless you can do without using your hands for a good 30 minutes. It's like passing pig fat, but it goes prissy.
  • Atrix, the one your grandmother used. The one with the water green reusable can . Also to wear before bed.
  • As an over-the-counter antiseptic I always vote for tea tree oil . As it is very intense, you can add a drop to the cream you use.

According to the website, the wave is to spread a good amount of cream on clean hands before sleeping and put on cotton gloves. Unless you are a magician or a butler, I doubt you have cotton gloves, so I would tell you to put cotton stockings over your little hands. It remains between us.


So you can avoid getting dirt on your nails while taking care of your plants


Having your nails full of dirt from caring for plants is something that ALWAYS happens, unless you wear gloves, but if you don't get comfortable with them and you prefer your hands free, you know what I'm talking about.

Caring for and keeping nails clean is much easier with this trick, my grandmother taught me when I was little and now I always apply it when I do gardening practices.

Okay, there are only two ways to keep dirt from getting into your nails:

  • Using special gloves for gardening
  • My grandmother's trick
 

If you want to know, you need to keep reading, because I'm sure it will save your manicure.

When you go to change your pot plants or want to plant new ones, put compost, prune your trees and more, you must protect your nails.

In addition to keeping the dirt away from the bottom of your nails, you will also prevent them from breaking (in case of long nails).

The only thing you have to do to protect your nails and prevent them from being filled with dirt is to run it through a bar of soap.

Yes, with your nails rub a bar of soap several times, until it is all over the nail and prevents dirt from accumulating there.

After all, soap is easier to remove than dirt.

When you have passed your nails through the soap you can do any activity in the garden without fear of being mistreated. Trust me!

After this, your nails will never be filled with soil again from caring for plants. Do you want to try?

COOLJOB Gardening Gloves for Women, 10 Pairs Breathable Rubber Coated Garden Gloves, Outdoor Protective Work Gloves Medium Size Fits Most, Red & Green (10 Pairs, M)

 COOLJOB Gardening Gloves for Women, 10 Pairs Breathable Rubber Coated Garden Gloves, Outdoor Protective Work Gloves Medium Size Fits Most, Red & Green (10 Pairs, M)

  •  GARDENING GLOVES SPECIALLY FOR WOMEN - Lightweight & breathable knitted base for a comfortable fit. Flexible rubber gardening gloves in mint green & bright red to keep your hands cool & dry. Thicken fingertip to protect your hand and nails. Long and flexible cuff to keep dirt and debris out.
  • DURABLE & VERSTILE - Soft but sturdy foamed latex coating reduce fatigue. Non-slip grip to perform all your gardening tasks while weeding, planting, digging, seeding, picking fruits  and more. Also great for landscaping, handling, automotive, logistic, warehousing, driving, and DIY.
  • SAVE YOUR TIME & MONEY - 10 pairs valuable pack. Two bright colors in green and red to distinguish use. Perfect for home improvement. Hose off easily. Save your time from washing dirty garden gloves. COOLJOB gardening gloves are machine washable for long time use. Hang to dry.
  • PERFECT GIFT FOR GARDENERS - Medium size ladies gardening gloves fit most women. Coating in bright colors make them easier to find in your garden. A must have for all women in spring and summer. Gift package, ideal for you and your loved ones. Share with families and friends.
  • DEVOTED CUSTOMER SERVICE - Genuine COOLJOB garden gloves for women, trademark registered in U.S.A. For U.S customers, we offer One Month Free Trial and Free Life Time Customer Service. Satisfaction Guaranteed. If not, we shall send you a free replacement or issue a full refund.


Caring for your hands in the garden


When we associate the words care and garden, we can usually think of a series of tips to have our plants in better condition, or why not, the best times to water the lawn , or the way in which we should take care of the hedges. However, the first care that we must take in the garden is not associated with any of these themes, but is the one that we must apply to our hands .

In this sense, it must be considered that when exposed in the garden, the skin suffers from a series of inconveniences inherent to the presence of all kinds of textures and formations , such as those that usually exist in this part of the house. Among them we can mention the branches, which can scratch us, the erosion that bricks and walls generate, and also, the classic pricks of thorns, not to mention the cold or heat , which are impossible to avoid.

In the first place, it should be noted that beyond the usual resolution to use gloves to take care of our hands, if we do not add any cream to them that in turn protects us from their rather rubbery consistency, we will also be causing damage to long-term, although its use is more than recommended, especially in winter, because they help circulation and also keep warm.

Then, if you wonder about what type of gloves to use, the truth is that there is no uniform recommendation in this regard, and the best thing you can do is choose the gloves that allow you to work with ease . For some people they will be the thinnest, and others will prefer some thicker, being that we must also consider what type of plants are handled, for example.

Finally, we bring you some tips so you can choose the gloves that best suit you. First of all, you should see the design they have, and try them on, to see if their contours adapt to those of your hand. Then, you have to carefully observe the material they are made of, their durability , their thickness , and their size .


How to preserve the skin of the hands after gardening


Working in the garden, orchard or with indoor plants is a pleasure. But it can only end with the most pleasant moments. Women's hands, not protected by gloves, get dirty and the skin is dry and rough. The means in each home can correct the situation.

Essential oil
A few drops of essential oil will help enhance the effects of hand care products. It is added to sour cream, honey, butter, or warm water. To achieve maximum efficiency, two conditions must be met:

  • the temperature of the main component is up to 40 degrees;
  • procedure time: 20 minutes.

With the rough skin of the hands, it is taken as a base serum or potato broth.

Contact with the ground and grass also ruins nails. Lemon essential oil is used to restore them. Put a couple of drops of oil on your soapy hands and lubricate your nails and cuticles. Essential oils will maintain elasticity and repair damaged skin, increase blood flow, and give your hands a fresh, well-groomed look.

Soap solution
And now an analogue of expensive liquid gloves, which will protect delicate skin from external factors. It is prepared with ordinary liquid soap, which is applied to the hands in a thick layer and dries. As a result, a protective film will appear on the skin, which can be easily washed off with water at the end of the work.

After all the work is completed, you can turn to ordinary soap-based miracle remedies again. The bath is prepared as follows: a tablespoon of liquid soap, the same amount of glycerin, half a teaspoon of ammonia, 2 teaspoons. Dissolve all these ingredients in a liter of warm water, keep your hands in the solution for 10 minutes and lubricate with cream.

The soap will also help remove dried calluses from various garden tools. All you need is soap, baking soda, and warm water. Soak your palms in the bath for 20 minutes. At the end of the procedure, scrape off the corn and rinse with clean water.

Kefir
Regular kefir will help you remove grass stains from your hands. Regenerates and whitening the skin. The easiest way is to pour kefir into a wide container and place your palms in it. 15 minutes and your hands will turn white as snow.

Another option for using kefir to clean your hands is a lemon kefir mask. Squeeze the juice from a citrus fruit and mix it with a fermented dairy product. Apply to hands for 20 minutes, rinse with warm water. If necessary, the procedure can be repeated.

And a more effective mask, but it will take a little more time and components:

  • fresh cucumber - 1 piece;
  • flaxseed oil - 1 tablespoon
  • kefir - 100 grams.

Pass a fresh cucumber on a fine grater, add butter and kefir. Apply the prepared mixture with massage movements and put on polyethylene gloves. After half an hour, rinse with warm water and spread the skin with a nourishing cream. This compress will significantly soften the skin and soothe irritation.

Linseed oil
After working with the earth, the skin becomes rough. You will need linseed oil to fix this problem. It has bactericidal properties and heals small wounds and scratches well. If you take it as a base, you get an emollient cream. You need to mix the butter with freshly squeezed lemon juice and beat until you get the consistency of mayonnaise. Apply the mixture on rough and previously cleaned skin. Lemon juice is rich in vitamin C and has a bleaching effect. Flaxseed oil heals and softens. Such a cream will not only soften, but also whiten your hands after working on the floor.

Flaxseed oil can be used alone or with a few drops of lavender or bergamot essential oils. Proportions: a tablespoon of flaxseed oil in 1 drop of essential oil. Lubricate 2 times a day with light massage movements, this procedure is useful after washing your hands.

Coffee grains
If you're a fan of a morning cup of coffee made with real ground beans, then the following recipe is for you. Pour some liquid soap on the rest of the coffee grounds after preparation and mix well. With a ready-made scrub, massage your hands and rinse with warm water. After the procedure, apply any moisturizer. The coffee grounds will leave your hands soft and silky. Additional components can be changed; instead of liquid soap, add sour cream or kefir. There is a nuance in this cosmetic product. Later, the ashtray smell will remain on your hands, so it is advisable to wash your hands with any means that neutralizes the smell.

Tea tree oil
If you have cracks or wounds in your arsenal, it is important to have tea tree oil. The spectrum of its action is wide enough:

  • cleans and disinfects wounds;
  • heals cuts and wounds;
  • relieves swelling with insect bites.

Only wounds and cracks can be treated with oil. Or you can use it as a smoothing hand mask. Apply to the palms, leave to act for 15 to 20 minutes. Dry leftovers with a damp cloth.

Nutritious cream
The cream should be in any country house. Anyone will do it, from an elite moisturizer to a baby one. The main thing is that it is daring. It will serve both protection and nutrition for your skin. You should always have it in your hands, try to keep your hands on it while working with the floor, as if you are wearing gloves. It should be applied in a thick layer, put on cloth gloves on top. In this way, you can safely start gardening work.

Pine Tree Tools Bamboo Working Gloves for Women and Men. Ultimate Barehand Sensitivity Work Glove for Gardening, Fishing, Clamming, Restoration Work & More. S, M, L, XL, XXL (1 Pack S)

 Pine Tree Tools Bamboo Working Gloves for Women and Men. Ultimate Barehand Sensitivity Work Glove for Gardening, Fishing, Clamming, Restoration Work & More. S, M, L, XL, XXL (1 Pack S)

  •  Breathable Bamboo to Keep Your Hands Cool – Bamboo absorbs perspiration, is naturally very breathable. Keeps your hands cool in summer and warm in winter. Pine Tree Gloves are suitable for any job and guaranteed a pleasure to wear.
  • Fits Like A Second Skin - Do you take off your gloves for every chore that requires finger sensitivity? Pine Tree Gloves have bare hand sensitivity and are Touchscreen friendly! Now you can make those reminders on your smart phone or ipad without taking your gloves off! Fishermen also love the grip on those slippery fish and the protection when changing hooks!
  • Comfortable and Durable Hand Protection - We believe gardening should be safe and fulfilling. Avoid skin wounds and dirty hands and nails when doing yard chores. Why walking around with those thick and clumsy gloves while doing jobs around the house? How much more enjoyable would garden chores be, when you wear protective gloves with a snug fit? See our listed size chart picture on the left to determine your correct size. Our gloves have proven abrasion resistance.
  • Pure Satisfaction or Money Back – Although our gloves are initially designed for gardening, many enjoy them during construction and restoration work, fishing trips and lobster diving! Are you not entirely satisfied in the end? Our product comes with a full satisfaction promise!


6 tips to protect your hands while gardening

When we associate the words care and garden, we usually think of a series of tips to have our plants in better condition, or the best times to water the grass, or the way in which we should take care of the bushes, etc. However, the first care that we must take in the garden is not related to any of these issues, since the first and most important has to do with our hands .

When you take on the task of fixing your garden, digging or weeding can represent a series of dangers for these extremities, so you must be careful while working in it .

Therefore, the American Society for Surgery of the Hand suggests taking the following precautions:

  1. Wear a pair of leather gloves to protect your hands from bites, scratches, blisters, poison ivy, chemicals, fertilizers, bacteria, and sunburn.
  2. Perform a different task every 15 minutes so that you avoid using the same muscles repeatedly. These tasks include: raking, digging, planting, trimming, or pruning.
  3. Use a small hand shovel to dig, to avoid cuts from buried debris.
  4. Make sure any sharp tool has a safety lock . Use the tool only for what it was designed for.
  5. Practice proper body posture . And make sure your wrists are relaxed and straight (not bent) for maximum resistance.
  6. Avoid tools with grooved handles that are meant to improve grip . If these types of tools do not fit in your hand, they could lead to muscle aches and calluses.


Gardening safely


We have already told you about the advantages of having a garden, such as keeping you moving or having fresh produce . Also, working in the garden can bring you numerous benefits.

And is that giving yourself time to do work in the garden is also a good way to relax and enjoy the outdoors. However, it is important to take some precautions .

In the first instance, it is important that you protect yourself by wearing long pants, a long-sleeved shirt and shoes suitable for this activity, such as high boots, where you can tuck your pants.

If you use power tools, don't forget to wear safety glasses .

Also, if you use noisy machinery, you should use the appropriate hearing protection.

On the other hand, you need to protect your hands with gloves .

Use sunscreen, wear a wide-brimmed hat so the sun doesn't damage you, and sunglasses.

Similarly, you can use an insect repellent .

If you work with your young children, make sure they don't eat dirt or put dirty objects in their mouths.

Before entering the house, try to brush well and remove any dirt you may have.

When you have finished with your work in the garden remember that you must wash with soap and water.