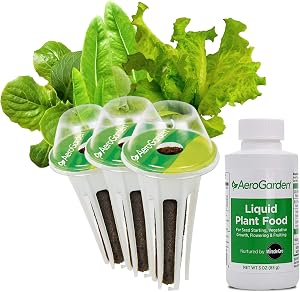
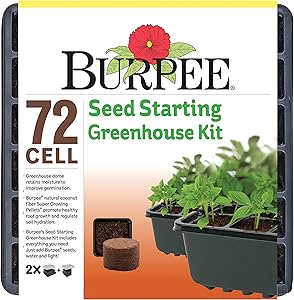
Burpee Seed Starter Tray with Coir Pellets, One Size, 72 Cells
- Burpee 72 cell complete seed starting kit comes with two 36 cell planting trays and one water reservoir tray
- 72 Burpee super growing pellets
- Two plant-o-gram diagrams to note which varieties were sown where
- Six 4" plant markers
- Expert tip: Place super growing pellets flat-side down, and add very warm water slowly for maximum expansion

Sprouting seeds and caring for seedlings
At first glance, a seed appears to be a small and simple thing, but hidden inside it is pure potential - the potential to grow into a beautiful, mature plant that can host beautiful flowers and delicious fruits.
Many of the foods we eat to survive and the medications we take to stay healthy come from plants that had humble beginnings as seeds.
How the seeds work
Inside this simple-looking seed you will find all the genetic information necessary to grow this plant throughout its life cycle. Whether a particular plant is intended to grow fruits, grains, or perhaps just oxygen, its destiny is in that little seed.
When a seed germinates, sprouts and begins to grow, nature kicks in and the life-sustaining processes within the plant begin. But for a seed to start life as a growing plant, it will take a little help.
The seeds of flowering plants (angiosperms) are divided into two distinct categories: monocots and dicots. This classification is based on a specific characteristic of a seedling.
Cotyledons are the first leaves that a young plant will grow and will act as a food source for seedlings until the first true leaves appear, when the plant begins the process of photosynthesis to provide carbohydrates for energy.
Monocots are classified as such because they only have one cotyledon (seed leaf) while dicots have two. Plant seeds classified as monocots include wheat, corn, sugar cane, and bamboo. Seeds classified as dicotyledonous include beans, tomatoes, peppers, and cucumbers.
A seed is essentially made up of three parts: the seed embryo, which is basically a baby plant that will grow and mature under favorable conditions, the endosperm that will provide the initial source of food and energy for the growing embryo, and the covering of the seed. - The hard outer shell that protects the seed until it is ready to grow.
Germination is the process in which a seed and its embryo go from a dormant state to an active and growing state. Successful seed germination depends on certain conditions that are provided. These conditions are internal and external and can vary from seed to seed. The most crucial external conditions are water, temperature, oxygen and, with certain seeds, even light or darkness.
Water and seeds
Water is essential because a mature seed is usually quite dry. The seeds absorb water through a process called soaking. As water accumulates in the seed, it causes the seed coat to swell and separate. Water also activates the breakdown of the endosperm, chemically turning it into a usable food source.
Temperature and seeds
Temperature affects the metabolism and growth rate of cells in the seed embryo. Seeds generally have a temperature range in which they germinate and germination is unlikely to occur above or below this range.
For most seeds this range is between 15 and 26 ° C, but some can germinate in soil temperatures as low as 4 ° C. Oxygen is required for proper seed germination. In the form of a gas, the oxygen will reside in the pore spaces of the soil and help the development of a much needed root system. If the seed is planted too deep or the soil becomes too full, the seed may not germinate.
Should I start the seeds indoors or outdoors?
When germinating seeds at home or in the greenhouse, the first thing to think about is whether a particular seed should be started and transplanted to another location or whether it should be sown directly into its permanent home, either in the ground or growing. medium Plants such as radishes and carrots should not be started indoors and transplanted later as this can lead to stunted growth which can lead to unfavorable results.
However, starting out on tomatoes, bell peppers, and cucumber seeds, just to name a few, is a great way to jump in early in the growing season outdoors or in an indoor garden. When choosing a seed germination medium, look for one that includes substrate as an initial seed mix. This type of growing medium is likely to have a moderate load of elemental fertilizer that will benefit newly germinated seedlings.
Seeds can be germinated in many different styles of trays and containers, so choose the type that best suits the project at hand. If you start just a few seeds, a simple, flat starter tray will work. When planting many seeds at the same time, it may be prudent to use trays that are divided into separate growing chambers to reduce the amount of transplantation needed as the plants grow.
Remember that most seeds germinate at medium room temperature, but some growers use heating pads under the trays.
Tips and Tricks for Seed Germination
Heat added to the growing medium can speed up the germination process, but for most seeds this is not necessary. The use of supplemental lighting, such as a T5 fluorescent lamp, can also help provide additional heat.
Although the seeds may not need light to germinate, the new seedlings will certainly need light; Therefore, it is a good idea to have a light source ready to go. We recommend not starting the seeds on a window sill because glass can change the intensity of sunlight and plants can stretch out and have legs.
We suggest slightly moistening the growing medium before planting the seeds. This will help ensure that the medium is not overly saturated or flooded and that the moisture is distributed evenly. Using the eraser side of a pencil or the tip of your little finger, carefully make tiny little discs in the middle at the desired planting depth.
Many plants require a depth of half an inch, but to find the correct planting depth for the type of seed being grown, see the back of the seed packet; In our experience, these suggested planting depths are accurate and by whom? If not followed, lower germination rates result. If planting in a flat tray, space the seeds at least 1 cm apart, in rows or in a grid pattern.
Gently drop one or two seeds into each fertilizer, cover lightly with growing medium (oxygen is important during germination, so don't overpack the medium), and lightly mist the entire tray with a portable water mixer.
Pre-moistened soil must remain moist enough for the seeds to germinate, but may sometimes need to be sprayed to maintain even moisture distribution.
Some growers use starter trays with plastic lids. This will keep the humidity around the seeds at higher than average ambient levels and can help increase the chance of successful germination. Be sure to check the seeds almost daily to maintain an ideal environment.
As the seedlings begin to emerge in the soil, there are some environmental aspects that should receive immediate attention: light intensity, humidity, and air flow. Seeds from different plants germinate in different time periods, so check the seed package for estimated germination times so you know when to be ready.
Lighting, humidity and air flow
Many seeds can sprout in total darkness, but once the plant goes through the ground, a sufficient source of light is essential. These first true leaves will need a light source to photosynthesize and create carbohydrates to support normal plant growth and, most importantly, root growth.
Without proper lighting, the early vegetative growth of a plant can be adversely affected and this can cause lasting problems that can lead to lower yields. Moisture can be helpful during the initial germination process, but when small seedlings start to grow, high humidity levels can spell disaster.
As internal processes burn the seedling's energy sources, the plant needs to release oxygen as a gas through its stomata, a process called perspiration.
As oxygen leaves the plant, the roots draw water and elemental nutrients. In a humid environment, the stomata will remain closed and the roots will not absorb water. If the growing medium is wet, as it probably will be, the water will have nowhere to go and the roots will likely suffocate and die. Airflow and humidity almost go hand in hand.
Good airflow through the plant canopy will encourage the flow of carbon dioxide to the leaves and then oxygen to the leaves, which is important for plants at all stages of growth. A small fan at medium or low heat can help keep the humidity and heat levels from any additional lighting low.
Seedling watering
For watering practices, be sure to keep the rooting medium moist but not too wet. Seedlings need water and running out for too long can cause serious damage, but if the medium stays too wet for too long it can affect root growth.
As the seedlings grow, they eventually deplete any nutrient load that the growing medium has to offer, so light fertilization with a nitrogen-based fertilizer may be necessary while waiting to transplant into a different or permanent container.
Thus, day after day, as the seedlings grow, with due care and attention, they come closer and closer to fulfilling their own destiny.
And as we wait, anxiously awaiting the literal fruits of our labor, it is important to remember that all the plants we grow have entered this life as something small, almost insignificant, that so many people call simply a seed.