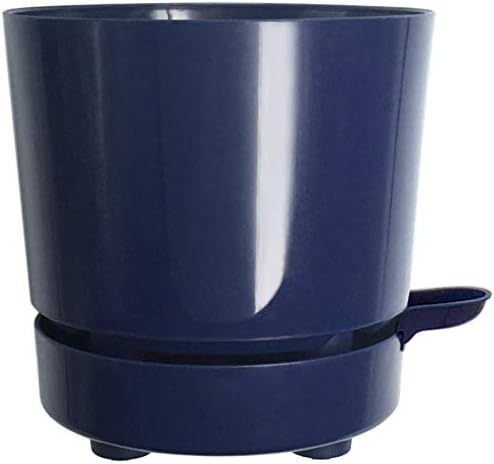
6" Self Watering + Self Aerating High Drainage Deep Reservoir Round Planter Pot Prevents Mold, Root Rot & Soil Fungus in Herbs, Succulents, for Indoor & Outdoor & Windowsill Gardens (Blue)
- SELF-WATERING, 2-WEEKS+ DEEP RESERVOIR: No more troublesome wicks that clog and stop working. Our patented design incorporates an integrated self-watering feature into the body of the planter. Hollow legs reach down into the reservoir to allow the soil itself to draw moisture naturally while lifting your plant above the water, keeping its delicate root system from being constantly flooded, minimizing upkeep while eliminating common problems associated with other planters and with over-watering.
- SELF-AERATING, PREVENT ROT & MOLD & FUNGUS: Open slats integrated into the body of the planter are designed to maintain oxygen circulation through the soil and around the bare root, minimizing the risk of rotting, mold, and smelly fungal growth that plague other self-watering planters. Keep your plants healthy, and keep your home healthy as well.
- EASY TO REFILL, NO MORE OVERFLOW: Each planter comes with an easy to use clip-on watering attachment (found inside the lower reservoir saucer) to make it easy for you to water your plants. Fill up the deep reservoir directly instead of pouring water through the planter and risking an overflow. Leave it on for ease of use, or clip it on when necessary to maintain a sleek modern look.
- MINDS YOUR FLOOR AND CARPET: The integrated deep reservoir dish is designed with studs on the bottom to lift the entire planter away from your floor and to prevent circular water stains typical of other flat-bottomed planters.
- SMOOTH GLOSS FINISH: Safe 100% UV stabilized plastic & UV resistant pigment. Intended for indoor AND outdoor use, the planters are 100% BPA-free, made from UV stabilized polypropylene (PP) plastic while the pigments are UV resistant and part of the plastic material, not painted on. Polypropylene planters are safe and do not leach chemicals into the soil or water, will not become brittle under the sun, will not fade, or become patchy, or peel.

How to transport plants in a move: practical guide
Plants are a very important part of our homes and workplaces, since they add color, renew the air and relax, and moving them during a move is something delicate after time of care and pampering. Plants are temperamental, and even in the best cases they can suffer from sudden changes in light, temperature, humidity, movement or other conditions. In this post we explain how to transport plants safely through good planning and good ideas, but ideally, ask a gardener for advice on larger or more delicate plants.
Should we take our plants with us?
Before knowing how to transport plants, we must consider whether it is really safe to take them, especially if the transfer is very long or in a very different climate. There are certain extremely fragile plants, as well as flowers and young shrubs and trees, that may not survive a move or relocation.If we know that someone is going to live or work in our current home or office and would like to conserve the plants, perhaps we should consider, for their health, leaving them where they are and making more people happy. One option may be to keep a cutting to plant in the new place, and thus keep some of them. We can also give some of our plants to close people who take care of them.
If, on the contrary, we cannot leave them or they have a lot of sentimental value for us, then this guide will help us to do so. Of course, we must be prepared for many extra hours of care for their preparation, their transfer and their acclimatization to the new home.
On the ownership of buried trees and perennials
There are some types of plants that are listed in the sales or rental contracts, so they are expected to remain in place, such as fruit trees, rose bushes, etc. The crops of a garden, however, are personal property and we can take them in any case. It is highly recommended to find out what the law says about it in the place where we are.
Steps to transport plants safely
Prepare the plants
A few weeks before the move, it is advisable to remove the dead leaves and branches from our plants, and give them a good pruning , and a few days before the move we must remove dust , possible pests and weeds. The better we prepare them, the more likely they are to survive. If we are not sure how to do it correctly, it is best to consult a specialist or inform ourselves thoroughly in reputable books.
Plants with pest problems
If our plants have pests and we have not been able to get rid of them by move-in day, they will most likely not survive the move and we should leave them in the current home or office.
To make the plants less heavy in transport, the ideal is to remove them from the pots (especially if they are very heavy like the terracotta ones) and put them in plastic pots (or homemade containers made with cut-out carafes, for example, if they are large enough rigid), several weeks before so that all the changes do not come together at once.
If we have the possibility, it is important to locate in the new home or office the places where we will place our plants , preferably in the same orientation and in the same type of place where they were previously.
Plants, Trees and Shrubs to Dig Up
If we have to take some type of plant, shrub or tree that needs to be dug up from a garden, we must extract it the day before as well in advance, soaking before and digging keeping its root system (thick and fine), in a ball of earth and placing the entire bottom in a plastic bag ensuring there is enough moisture until it is replanted. If we are not very skilled with gardening, it is highly recommended that all this part is done by a professional gardener.
Move the plants
The plants should be the last thing we move to the new place (in a moving truck they should be placed last). It's not a bad idea to have basic gardening tools on hand so you can easily access them.
If possible, we should transport the plants in a temperature controlled environment , such as an air-conditioned vehicle. If we go to a moving company and notify them, they will know how to transport plants with minimal risk, but we must bear in mind that not all moving companies accept transporting plants. Ideally, we do it.
To protect the entire plant in each pot, we can make a protective cover with wrapping paper that is the same height as the plant and surrounds the pot, sticking it with adhesive tape, so that it is like inside a tube of paper or a funnel. For possible water leaks, we can put newspapers under the pots. We should never put the plants in boxes without identifying them and even less so deliver them to a moving company, since they will not be responsible for any damage. If we have small or medium plants of similar sizes, we can group several, leaving enough space between the tallest plant and the lid of the container, which should have holes and an indication that it is fragile and cannot be turned over.
Plants must travel hydrated . Cold and humidity and heat and dryness are bad combinations for our dear botanical companions, so if we move them in summer we must water them on the day of the move (except in the case of species with a dry and hot climate) and if they We move in winter, we must do it for the last time days before so that the same day of the move they have dry land (except in case of humid and cold climate species).
Re-arrange plants
Once the journey is completed, the plants must be the first to be unloaded , and we must place them in their pot and in a temporary place where their stress is as low as possible, without drafts, without direct sun, and with enough water, and they must stay there for several days to recover from the shock they have experienced.
When our plants have acclimatized to the new home, we can place them in the final place that we have chosen for each one of them, ideally in places similar to the place of origin as we explained at the beginning.
If we have been left with cuttings or have relocated entire bushes or saplings, we must immediately replant them in the appropriate places in the new garden.
If the leaves of our relocated plants fall or turn yellow after the transfer it is usually normal, since it is a defense reaction of these sensitive living beings and is usually temporary. It's not a bad idea to put these pretty plant friends in the hands of a specialist to help them recover.
Let us advise on how to transport plants
In the whole process of transporting plants to a new place, it is a good idea to let us advise you by experts in gardening and also by moving professionals. They will help us to find the best solution to increase the chances that our beloved plants will survive the transfer in the best conditions and last for many more years.