Keenray Bucket Style Towel Warmers, Luxury Bucket Towel Warmer, Large Towel Warmer for Bathroom, Auto Shut Off, Fits Up to Two 40"X70" Oversized Towels, Bathrobes, Blankets, PJ's and More, White
Extra Large Capacity - Ultra large Bucket towel warmers for bathroom, accommodates up to two 40" X 70" oversized bath towels, bathrobes, blankets, PJ's and more. Dimensions: 19" (h) x 13" (w) x 13" (d), total 20 L capacity. Meet a whole family use!
Quickly Heating up - Offers rapid heat up in just 1 minute and reaches high temperature in just 6 minutes. This Luxury Bucket Towel Warmer is single button control, up to 60 minutes heating time. Decent design, easy operation like a breeze! Keep the towels warm and cozy around the clock. Whether you're taking a quick shower or long, relaxing soak, the warmer suits all your need, use it with more confidence!
Heat Evenly - This bath towel warmer will heat towels all the way through! No cold spot anymore. Enter a whole new world when you step out of the shower and turn your bathroom into a spa-like experience!
Compact and Safe - Safe to use, compact for easy storage. The towel warmer is lightweight enough to move around the home; the bucket and lid separate for quick cleaning, while the round-shaped base is stylish and attractive; operates efficiently and quietly.
A Warm and Sweet Gift - This versatile Bucket towel warmer makes it a well thought out gift for housewarming, wedding, shower or birthday, anniversary and more occasions. Perfect Accessory for Home, Pool House, Shower, Salon, Hotel, Spa, Massage, Baby Care, Elders and people getting bed bath & More. Once you have experienced the comfort of a warm towel, that will become your daily pleasant surprise after a bath. Pamper your friends & family with this incredible present!
How to heat towels in the microwave
If you have a stiff muscle or sore body part, heat therapy can help. To do this therapy at home, consider using warm towels. You can simply heat a towel using a microwave oven within minutes. Follow these steps to begin simple home therapy using microwave-warmed towels.
Step 1 Moisten the towel
Wet the towel with water and wring it out with your hands so that it is not dripping, just damp. Cleaning cloths are a great choice for microwave use.
Step 2 Put the towel in the bag
Fold the towel and place it inside a zippered food container.
Step 3 Throw in the towel
Wrap the towel in the zippered bag tightly and leave the zipper open.
Step 4 Insert in microwave
Place the rolled towel in the microwave. Be sure to lay it flat.
Step 5 Remove from microwave
Heat the towel on high power for two to four minutes, or until it reaches the desired level.
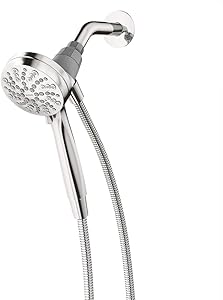
Moen 26100EP Engage Magnetix 3.5-Inch Six-Function Handheld Showerhead with Eco-Performance Magnetic Docking System, Chrome
VERSATILE DESIGN: Chrome finish is highly reflective for a mirror-like look that works with any decorating style
MAGNETIC BASE: The magnetic docking system allows you to easily detach and use as a handheld shower head or effortlessly replace it to dock with the snap of a magnet
CUSTOMIZE YOUR SHOWER: Multiple distinct shower settings gives flexibility and variety
ADA COMPLIANT: Complies with Americans with Disabilities Act (ADA) specifications
BUILT TO LAST: Backed by Moen’s Limited Lifetime Warranty
How to Unclog a Shower: 3 Foolproof Techniques to Test at Home
It is common that, with daily use, the holes in the shower end up clogging. This happens because, along with the water, there are also minerals that end up depositing in this place. However, there is no reason to despair, as there are several ways to unclog the shower.
The part of the electric shower where the “holes” that clog over time are called the spreader, and that's where we'll focus our efforts. Next, you will learn about three foolproof techniques on how to unclog a shower at home. Read on and choose the one that looks most interesting to you!
How to unclog shower with vinegar Vinegar is really quite a partner of household cleaning products and can be used for many different purposes. So it's no surprise that there's also (at least) a way to unclog a shower with vinegar, is there?
To test this tutorial on how to unclog shower with vinegar, you will need:
1 deep bowl or bowls
VinegarWater
Brush or sponge (for teeth or washing)
Toothpick, paper clip or small wire
With these super easy-to-find items on hand, follow the following step-by-step steps on how to unclog shower with vinegar:
Before starting the shower cleaning, turn off the circuit breaker or the main power switch;
In a bowl, pour enough water to cover the spreader, add half a glass of water and mix well;
Unscrew the spreader and immerse it in the bowl;
Wait 1 hour, remove the air cap and brush the holes that are still clogged;
If some holes are still clogged, use a toothpick, paper clip, or small wire to remove stubborn residue;
Finally, screw the spreader back on and reset the circuit breaker.
How to clean shower without taking it off the wall Did you try to remove the spreader and failed? Smoothly! Here we are going to go through a guide on how to clean shower without taking it off the wall.
To put into practice our tutorial on how to clean shower without taking it off the wall, you will need:
1 plastic bag
Vinegar
Warm water
String
Do you already have all this at home? So let's go step-by-step on how to clean a shower without taking it off the wall:
Turn off the circuit breaker or main power switch;
Pour a glass of vinegar and a glass of warm water into the plastic bag;
Tie the bag in the shower leaving the spreader immersed in the mixture of vinegar and water;
Let it act for 1 hour, turn the circuit breaker back on, remove the bag and open the valve to rinse the spreader
Take the time to act to clean other bathroom fixtures and wall coverings.
If your shower still has some clogged holes even after following this guide, we recommend imitating steps 4 to 6 from the previous tutorial on how to unclog shower with vinegar. Remember that all-purpose cabinets need to be clean too.
How to clean shower holes with a brush Our latest guide on how to unclog the shower is just as practical as the last one, as it is also an alternative on how to clean the shower holes without having to remove it from the wall. To put it into practice, you will only need a washing brush or a toothbrush to clean your bathroom shower .
See how simple our instructions on how to clean the shower holes with a brush are:
Turn off the circuit breaker or main power switch;
Turn on the valve and, while the water falls, scrub the spreader with the washing brush or toothbrush;
When you notice that the holes are all free, turn off the electro register and turn the circuit breaker back on.
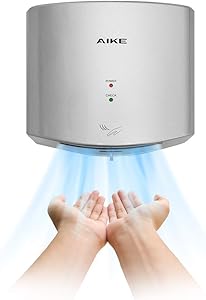
AIKE AK2630S Compact Automatic High Speed Hand Dryer Commercial and Household,ABS Cover 110v 1400W(Silver)
INSTALLATION - Come with 67inch(1.7m) power cord, can simply plug into an outlet. Cord can not be removed directly, if need it hard-wired, you may want to consider an electrician to make the power connection.
Compact Design - Fast dry within 10-15s. Compact size, strong airflow. Designed for limited space area, but still meet commercial grade requirement.
ABS Polycarbonate Construction - Provide long-lasting strength, this durable, corrosion-proof bathroom accessory will stand up to extensive use and everyday wear and tear.
AIKE Support - 2 year manufacturer warranty, lifetime technical support. AIKE always here to make it better.
Learn How To Use A Hand Dryer Properly
Surely you've already walked into the public or corporate restroom and found a hand dryer in place of a paper towel, right? That's because this is a trend, as hand dryers are more practical and economical.
But after all, do people know how to use the hand dryer correctly? Do you know? We made a small step by step so that you know how to better use this equipment.
Brakey makes available inside the box of its equipment, a sticker with instructions for use, to make the user's life easier.
Using a hand dryer correctly
Step 1 While proper hand drying is important to reducing the spread of germs, there is an even more important step beforehand: hand washing !
Soap should be applied to the palms of the hands, the back, between the fingers and under the nails. Hands should be scrubbed well and rinsed under running water.
Step 2 It is still at the sink that the hand drying process begins. Remove excess water by shaking your hands. The more water that falls from your hands into the tub, the quicker and easier it will be to dry in the hand dryer.
Step 3 Now it's time to use the hand dryer. Position yourself in front of the equipment and place your hands under the device's sensor, which will identify the movement and trigger it automatically.
This system makes the use of the hand dryer even more hygienic, after all, the user does not need to press a button or pull a lever to be able to dry hands that are wet.
Step 4 Rub your hands together, turning your palms up and down. This movement prevents the dryers from stopping the activation (they are often activated by a motion sensor) and also reduces the time spent on drying.
Some dryers, such as Brakey's CV-107, have a swiveling air outlet so that the user can also direct the flow to their face, drying after washing.
Step 5 Wait until your hands are completely dry, depending on the type of equipment you are using, this process takes about 10 to 25 seconds.
Avoid putting your hands inside the unit, if the appliance does not work or has a problem, look for a responsible technician.
When the process is finished, move away from the equipment so that the sensor can turn off. Some models stop working after a specific time if it doesn't detect any more movements. If you feel that it wasn't enough, you can put your hands under the sensor again and repeat the process.
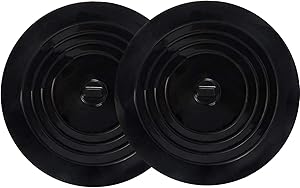
V-TOP Tub Stopper 2 Pack, 6 inches Large Silicone Drain Plug Hair Stopper Flat Suction Cover for Kitchen Bathroom and Laundry
★ Large, Universal Fit: Diameter 6 inches Tub Stopper use in the kitchen, Bathtub and Laundry
★ Pack of 2 Black Soft rubber sink cover, washbasin drain stopper
★ Sealed perfectly, flat cover will not get into the drain, so won't get moldy
★ Silicone materials, won't hurt kids, and easy to clean
★ Your search is over, get the best sink stopper replacement for your kitchen, bathroom and laundry
How to correctly use the sewer system?
For proper operation, the sewer system must only carry human waste and liquid waste. These residues are called domestic effluents and are conducted through the collection network to the Sewage Treatment Station - ETE, where this effluent is properly treated.
Do not throw solid materials into the sewer, they can clog the network causing the sewage from your residence to return or leak into a manhole. In addition to the inconvenience caused, the sewage when it leaks can cause a series of serious illnesses.
Manholes are wide openings in the sewage collection network that are intended for maintenance. Unfortunately, some people throw garbage in these places, making it impossible to access the network for maintenance services and clogging up the network, which has a diameter much smaller than the well.
If your home's sewage clogged, preferably use a rubber plunger or contact specialized professionals to solve the problem. Do not throw chemicals like caustic soda or acids, they can cause irreversible damage to the pipes.
Organic solvents such as thinner, kerosene or gasoline do not mix with water and can even cause an explosion when thrown into the sewer system. Furthermore, these substances are highly toxic and cannot be efficiently eliminated in conventional sewage treatment plants, ending up polluting rivers and other water courses.
Avoid excess cleaning products, even biodegradable detergents. In excess, they cause a decrease in dissolved oxygen in the water, harming the treatment and the aquatic fauna and flora.
Rainwater is not sewage: it must be directed to the storm sewers. No sewer system is sized to receive rainwater that comes from patios, roofs and open areas.
For this reason, it is prohibited by law to channel rainwater into the sewer.
Grease boxes: always keep clean. This box is responsible for retaining oils, fats and food remains, preserving the sewage system. Over time, the fat ends up solidifying, preventing the flow to the sewer system.
A liter of oil can contaminate up to 1 million liters of water, so used cooking oil should be disposed of in domestic waste and not in the sewer.
Carry out vehicle oil changes only at gas stations, these places have sandboxes that separate the oil from the sewage.
Batteries and batteries contain heavy metals such as mercury. They must be separated and disposed of at delivery points for recycling. Do not dispose of in common garbage, much less in vacant lots or in the sewer.
The sewage collection network is one of the main basic sanitation works in a municipality. Its conscientious use guarantees the population's quality of life.
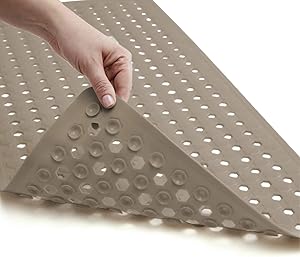
Gorilla Grip Patented Bath Tub and Shower Mat, 35x16, Machine Washable, Extra Large Bathtub Mats with Drain Holes and Suction Cups to Keep Floor Clean, Soft on Feet, Bathroom Accessories, Beige Opaque
Hundreds of Suction Cups: bath and shower mats feature 324 suction cups that help hold in place on smooth clean surfaces; a great choice for the home, gym, spa and more; not for use on newly refinished surfaces
Larger Size: extra large and generously sized mat is 35 by 16 inches; providing excellent coverage in tubs and showers
Drain Holes: small holes throughout the mat to help water circulate; helps prevent a moist underside
Easy to Clean: machine washable to uphold its fresh appearance; wash mat prior to first use; wash in the washing machine on cold with gentle detergent; no bleach; rinse and dry after each use to remove oily and slippery buildup that may occur from soaps; allow the mat to air out in a well ventilated area 24 hours before use
Beautiful Design: choose the color to best fit your tub or shower and help enhance your bathroom oasis
How to choose the best bathroom rug?
Anyone who thinks that the bathroom rug is just another decorative item that can be used to enhance the look of the room is wrong. In addition to contributing to the decor and making the environment more charming, the piece also offers comfort and security to residents, since the floor can often become slippery due to the humidity of the place.
However, before defining which bathroom mat will be used, it is important to pay attention to certain specifications at the time of purchase, such as texture, shape and size. To help you choose the ideal and most suitable item, check out the tips we've prepared in this article!
Part size
To start with, it is essential to choose the ideal size piece so that it does not interfere with the circulation area. This means that the resident must focus on the available width, height and layout to get it right. Therefore, it is a good idea to pay attention to the length of the bench and base yourself on that measurement.
You can also choose from several small bathroom mats and place them in front of the toilet, near the shower, and near the sink.
Ideal materials
There are several materials available on the market that can be used to decorate and bring benefits. It is necessary to opt for those that guarantee more durability, especially in an environment that has humidity. Among the options that can be applied, those made of polyester have the benefit of drying quickly. Meanwhile, cotton garments are comfortable and soft to the touch. Rubberized bathroom mats are practical and easy to clean.
The floor towel is usually made with the same fabric as other towels in the bathroom and has the advantage of easily harmonizing with the rest of the decor.
Another recommended point is to opt for a non-slip mat for the bathroom , which brings safety, as it does not allow the person to slip when leaving a wet area.
Choose bathroom rug colors that harmonize
We know that colors are capable of transmitting sensations and, therefore, the resident needs to choose tones that match their personality and, at the same time, harmonize with those already in the room - whether in decorative items or in the pieces used in the day by day.
In addition, there are several prints available, which add an even more special touch. If the towel is on display, a tip is to make combinations between it and the rugs. Light pieces can match dark items. For a vibrant composition, bet on a color block . Now if you want a modern decor, the monochrome style is welcome.
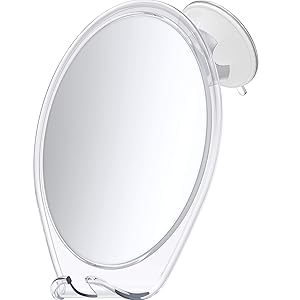
HoneyBull Shower Mirror for Shaving Fogless - with Suction, Razor Holder for Shower & Swivel, Mirrors, Shower Accessories, Bathroom Mirror, Fogless Mirror for Shower (White)
Shave in the shower: Save time by shaving in the shower with our fogless shower mirror. An excellent bathroom mirror in addition to your shower accessories
Does not fog: The anti-fog coating will keep the mirror fog free in hot steamy showers. No need to run it under water. This fogless mirror for shower just works, every time
Easy to install: Simply twist to lock our powerful suction cup into place. Holds tight on all shower surfaces. An excellet shower mirror fogless for shaving
Razor holder for Shower: Store your razor conveniently on the mirror. Makings it the perfect shaving mirror since you can now shave in the shower or bathtub
Bigger & better: Get a better look at yourself with this extra-large mirror. Perfect for comfortable viewing. This shower mirror is also a fantastic gift
How to Choose the Bathroom Mirror
How to Choose a Bathroom or Toilet Mirror The mirror is one of the main elements of a bathroom / toilet : in addition to being functional , its design enhances the decoration and helps to expand the feeling of the space, improving the lighting of the environment. Also read: Mirrors: How to Use?
So which model to choose? As it is possible to use various shapes and sizes, we have gathered some important tips for those who want to opt for a beautiful design in the right measure for their needs:
Formats
Round: round mirrors are delicate and convey a feeling of relaxation. They are great for enhancing bench space, drawing attention to this focal point;
Rectangular: mark a horizontal line, conveying the feeling of tranquility, or vertical, conveying the feeling of action and strength. Due to their larger size, they are indicated to enlarge small environments;
Squares: convey the feeling of order. They can be used to mark bench space, enhancing this focal point. They are especially indicated for formal places that want to transmit stability, strength and sobriety;
Irregular: create relaxed environments, but with a much more marked personality than round ones. Depending on the composition, they can convey order, chaos, balance, etc.
Size
Small Mirrors: their presence complements the decor. It is possible to create a good composition, but the chances of creating an environment with "loose elements" are very high, which creates a feeling of lack of unity and a little psychological discomfort;
Medium Mirrors: are great for favoring a good image of the body, conveying a feeling of comfort (they increase the feeling of space, allow the viewer to view their image properly - including part of the clothing, they mark the space on the bench);
Large Mirrors: they are indicated for large bathrooms (since their size is proportional to the space in which it is inserted), harmoniously composing with the other elements of the environment. They are also often used in small spaces to bring more comfort, increasing the feeling of the size of the place and improving light distribution (this can be seen in many apartments decorated by builders in their sales stands).
Important Measurements and Details We know we have at our disposal a wide range of models of mirrors and there is no fixed rule to determine the best model . However, some details are important and that is why we indicate some measures (which are not fixed, nor are they even a standard) that we consider adequate for your project to be comfortable and enhance your environment:
Mirror Size - Minimum Measurements
Width: the mirror should be at least 30cm wide so that you can see most of your body. However, consider having at least 50cm so that you can view your face and upper body more comfortably. Remember that, depending on the project, the measures can be smaller (there can always be interesting compositions and with different functions); Height: 30cm is a good measure, minimal, so that you can see your head and part of your body; Proportion: this is the keyword for your choice to be the ideal one. Analyze your environment (what is its size? Who will use the mirror and how? What is the feeling you want to convey?) and then think about the size of the mirror considering the size of the space and other elements of the environment, especially the countertop . Investing in a mirror can greatly enhance your decor.
Position - for Small Mirrors
Top line: If the mirror is small, first worry about the position of its top, which should show the viewer's head (nothing more terrible than having to bend down to see yourself). For example, for a person who is 1.70m tall, the top height of the mirror could be 1.75m. Bottom line: A comfortable measurement, for small mirrors, is between 1.30m and 1.40m from the floor. Remember that there is no standard, fixed measure. These are suggestions for those who need to work with reduced sizes. Below you will find some more ideas for models and decorations.
Examples of Mirrors in Bathrooms and Toilets We have selected some examples of mirrors for bathrooms and toilets, presenting interesting information:
With Frame: it marks the perimeter of the mirror giving more weight to the decoration. In addition, the frame design also strongly interferes with the final result, giving a retro, modern, classic, etc. style to the environment.
Starting at skirting: creates a good finish.
Mirror starting on the bench (without skirting)
Starting above the bench /tub
Mirror glued to the wall and mirror at a distance from it
floor to ceiling
Mirror Models We have gathered some round, square and framed mirrors to illustrate the various formats and models available on the market:
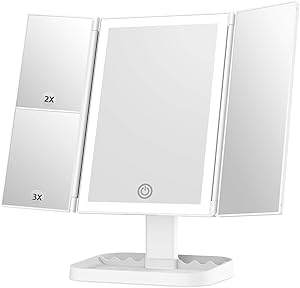
Wondruz Makeup Mirror Vanity Mirror with Lights, 3 Color Lighting, 1x 2X 3X Magnification, Touch Screen Switch, Dual Power Supply, Portable High Definition Cosmetic Trifold Lighted Makeup Mirror
3 color lighting and adjustable brightness; The makeup mirror has 3 color lighting, cold, warm, and natural light, providing 3 light scene; Press the touch screen switch, changing the color of light; hold the touch switch longer, brightness dim or bright
1X,2X,3X magnification; The lighted makeup mirror has 4 panels magnifying and wide-angle viewing, 1X,2X,3X magnification; see clearly your face and make a flawless makeup
Dual power supply; The vanity mirror with lights can be powered by USB charging cable or 4xAAA batteries; batteries not included
Free degree rotation and removable base; adjust the makeup mirror as per the suitable viewing angle you need; a removable base from the cosmetic mirror, good for traveling
Perfect gift; birthday gift, Valentine's Day gift, Mother’s Day gift, Father's Day gift, Christmas gifts for family, wife, husband, boyfriend, or girlfriend, or another special day gift; Customer first; we can help if you have any issues with your purchase;
Makeup Mirror: What's the Best of 2021?
Welcome to the Wellness Guide! Today's text will please our readers who are passionate about the makeup universe, as we are going to talk about the benefits of a good makeup mirror.
This type of mirror is quite different from conventional ones. It is specially designed to carry out beauty processes, having unique characteristics that tend to please the female audience.
If you still don't know all the advantages of this product, we invite you to immerse yourself in the world of beauty with us, through our special guide about the makeup mirror.
buying guide The makeup mirror is endowed with differentials that help to make it easier when producing the make-up, precisely because it was specifically designed for this. See here in our guide what these differentials are and learn about the main benefits of the product.
Makeup Mirror: What is it? The makeup mirror is an item that has been gaining more space in the cosmetics and beauty market. It is a mirror in a smaller version, which can be round or square, normally easy to carry, which is specially designed for makeup.
It has a LED light around it, and can run on battery power or have a cable to be connected directly to a power source.
In summary, it is a practical product, very useful and that is of great help for people who like to make up but do not have good mirror structure and lighting at home.
What are the main advantages of makeup mirrors? A well-done makeup does not only depend on your technique and the quality of the products used in the production, it also depends on good ambient lighting and a well-structured mirror. At home, we don't always have a corner with all these features, and that's why the makeup mirror is so advantageous: it brings together in a single item all the necessary features to carry out the process. First of all, this product is small and easily transportable, which allows you to use it in the most different spaces in your home, and even transport it to other places and take it on trips.
In addition, it has LED lighting around it, which is the best type of light to make a well done makeup, since it brightens a lot and allows you to easily see any error in tone or poorly done lines.
The led, despite being essential in this type of mirror, needs special care, since it works through energy.
Some mirrors are rechargeable via a USB cable, others only work by plugging into an outlet, and there are also those that rely on batteries. So be sure to note this issue before starting to use.
Finally, make-up mirrors have reflex magnification technology, some 2x, others 5x, and there are those that magnify up to 10x.
This is a very interesting question as it ensures that you can closely observe every point of your face without having to be super close to it.
The makeup mirror, in general, gives you security to finish a production with the certainty that nothing went wrong and that it looks exactly as you would like it to be.
Makeup mirror or purse mirror? Those looking for practical and easy-to-transport options are faced with two possibilities: the makeup mirror or the purse mirror, that tiny one that we carry loose in our purse, and that sometimes comes with a compact powder or blush. The first, as we said, is full of advantages and is the best option for those who like to take a few minutes out of the day to make up. It can be supported on any surface and comes with its own lighting.
Its disadvantage is that it is not suitable to be carried in your purse, or even less for makeup retouching in restrooms in restaurants, nightclubs, etc.
The handbag mirror is different. It is not suitable for the production of make up, as it is very small and hardly has support, which makes you need to use one of your hands to hold it.
However, its advantage in retouching. It is super recommended to be carried in your purse and used to touch up lipstick, powder or blush during any event or appointment.
In summary, the ideal is that you have the makeup mirror at home, but don't forget to take the purse mirror in your bag, after all, the use of one complements the other.
How much does a makeup mirror cost?
The makeup mirror is a medium-priced item, but it can vary slightly. On average, its cost is in the range of R$50 to R$200, always depending on the chosen model.
Where to buy makeup mirrors?
Although it is a product related to makeup, in cosmetic stores you should not find options for makeup mirrors. The best place to buy this item is at home improvement and home improvement stores.
In this case, we can recommend Etna, Tok Stok, Multi Things, Leroy Merlin and even the Imaginarium Store. Some department stores also offer options, such as Lojas Americanas and Rede Carrefour.
There is also the possibility of buying online, if you prefer. Amazon, Buscapé, Submarino and Mercado Livre represent good choices.
Purchasing Criteria: How to Compare Makeup Mirrors Every product must be carefully analyzed before purchase and the makeup mirror is no different. We've selected some points about it that you should take into account:
Material
Power supply
Enlargement
Size
Now we are going to give you the details about these items.
Material The durability of your makeup mirror is related to the material its structure is made of. Give preference to firm and resistant options, and leave the plastic models aside, as these are the most fragile and less suitable.
Power supply As the makeup mirror has LED lights around it, it needs an energy source to light it.
Some run on batteries, others are rechargeable and come with a USB cable, and some need to be plugged into an outlet.
Choose the model that you like best, according to what fits best in your makeup routine.
Enlargement A great advantage of this product is that it has reflex magnification, which is great to ensure that your make is finished without errors. Some have 2x magnification, while others have up to 10x magnification.
The ideal is that you find the middle ground and buy a model that allows you to make up while observing the details, but without turning the mirror into a super magnifying glass.
Size The ideal mirror size varies with each one. If you already have a pre-defined space for the product, choose a size that will look nice in this space and meet your needs.
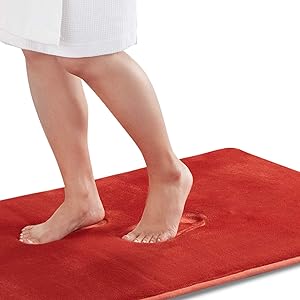
Genteele Memory Foam Bath Mat Non Slip Absorbent Super Cozy Velvet Bathroom Rug Carpet (17 inches X 24 inches, Autumn Glaze)
COMFORTABLE AND LUXURIOUS – The Genteele bath mat is filled with soft and comfortable polyurethane memory foam and outer material is super soft and cozy coral velvet feel microfiber. Never have you been able to step right out of the bath or shower onto a cloud! Thicker and better constructed than most other brands. Great for bathroom, vanity, vacation home, master bathroom, kids bathroom, guest suite. Great gift idea for all occasions, Christmas, Wedding, Fathers Day, Mothers Day, Valentines.
A BREEZE! - MACHINE WASHABLE & DRYABLE- Machine wash in cold water with mild detergent. Do not use chlorine or bleach. Tumble dry on low heat or lay to air dry. Color will not fade. Color will stay nice and vibrant for years to come no matter how many times they’ll be washed and dried!
MULTI PURPOSE USE – A Genteele elegant bath mat rug can be used at tub-side, front of the sink, or at any place in your home where you want support and warmth on your toes! And from a design viewpoint, this rug can make a significant difference in the overall color scheme of your bathroom scheme or coordinate with towels and other bathroom décor or accessories.
GUARANTEE - Love it or your money back! Life time warranty by Genteele. If you are not satisfied with your rug or if you decide that this is not for you, then please do not hesitate and reach out to us through Amazon at any time for either a refund or replacement.
5 types of carpet and how to clean them efficiently and quickly
From bedroom to living room, the right rug is capable of transforming any environment. However, each one also brings its own peculiarities in terms of cleaning - a super important step to avoid allergies and the accumulation of bacteria and other organisms that are harmful to health. Want to know more? We have prepared a complete guide on the most common types of rugs and the correct way to clean them. Check it out! 1. Shaggy rugs can be cleaned with detergent and fabric softener A trend in the decoration universe, plush rugs - also known as shaggy - make the atmosphere of any environment more comfortable and cozy. However, the coat also requires greater care so that the piece does not accumulate germs or mites. To clean this type of rug, start by vacuuming it to remove all the dust. Afterwards, prepare a mixture with equal parts of water and detergent and apply on its surface. A good tip is to use a soft brush to help remove stains, gently brushing in the direction of the hair. If the hairs on your rug are longer, you can also mix fabric softener with the detergent and water solution to make them softer to the touch.
2. Stains on Persian rugs should be removed with water, detergent and vinegar Classic, Persian rugs are usually made of materials such as wool and silk, dyed with natural pigments - which calls for even greater care when cleaning. Use the vacuum to clean the fringes on the sides and remove any dust from the carpet. The ideal is to wash it with cold water and mild soap, which helps to prevent it from fading. To remove stubborn stains such as coffee, wine, or pet stains, use a little white vinegar, detergent, and water on the affected area.
3. Synthetic rugs in general can be washed in the washing machine Synthetic rugs are often more affordable and are made from fibers such as nylon, acrylic and polyester. Because they are more resistant, they are ideal for living rooms, hallways or high-traffic environments. They can often be washed in the washing machine - so it's worth checking the instructions on the label! If this is not the case, you can wash them by hand in the tank or remove stains with a little water and detergent.
4. Use mild soap to clean natural fiber rugs Known for their more rustic look, natural fiber rugs can be made from materials such as sisal, coconut fiber, jute, seagrass and mountaingrass. To clean them, first shake the mat and vacuum to remove dust. Afterwards, use neutral soap to extend the natural fibers and rinse with a damp cloth to remove the product.
5. Bathroom rugs require different care Bathroom mats, both fabric and rubber, deserve special attention to prevent the accumulation of bacteria and dirt. To wash the rubber parts, use warm or hot water and a little bleach - always remembering to wear gloves to protect your hands. In the case of bathroom rugs made from fabric, you can put them in the washing machine as usual, using hot water to eliminate mold and other harmful organisms.
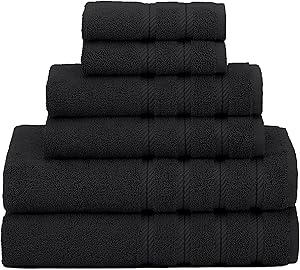
The Set includes (2-Piece) 27 x 54 inch Bath Towels, (2-Piece) 16 x 28 inch Hand Towels & (2-Piece) 13 x 13 inch Washcloths
6-Piece premium 100% Genuine Turkish Cotton Towel Set adds a touch of elegance to any home decor, hotel, spa & dorm. These Towels are also used by Colleges, High Schools, Gyms, Hospitals & Clinics.
Heavyweight towels quickly absorbs moisture. Give your body a delicate touch with our extra soft towels and for a good price, give your bathroom an elegant and sophisticated look.
Always wash your Towels before usage, some lint may be observed in the first few launderings of towels, and will diminish with each subsequent laundering. This does not affect the look, feel or performance of your towels. Please follow the recommended care instructions on the label and keep the lint trap clean on your dryer.
SAME DAY FREE SHIPPING - 30 DAYS MONEY BACK GUARANTEED (No hassle)
How to care for bath towels with 5 simple tips
Those who learn how to take care of bath towels can feel the pleasure of the fabric's softness on their skin. In fact, it doesn't feel better than getting out of a nice bath and feeling the soft touch of a clean, fragrant towel. Now, you might be wondering if this isn't just soap opera stuff, right? Is not it. You can have fragrant bath towels every day and we have the perfect tips here.
See how to take care of bath towels The first important point when learning how to care for bath towels is to demystify that excess fabric softener can make the towel softer. On the contrary, excess washing products can make the towel even rougher. Fran Adorno , a blogger specializing in beauty and home care, stresses that this recipe doesn't work. “Excess of soap, powder or liquid, bleach and even fabric softener destroys the towel, and over time the fiber wears out. This means that it is necessary to have common sense and use the product in the right measure”, he explains.
In the case of excessive use of fabric softener, we have a slightly bigger problem: in addition to the dry towel, the bad smell. The product normally creates a protective layer, and this prevents water from penetrating to carry out the deeper wash. The fabric softener doesn't come out and the water doesn't fulfill its mission, the towel is taken to dry without an ideal cleaning. And the result is not the best...
5 tips to make towels soft
Now, avoiding the above mistake and applying the practical tips below, your towels will always be soft and fragrant.
1. Let the towel dry completely
Towel needs to dry completely for reuse. Continued use of a damp towel can accumulate bacteria and dirt. By the way, don't delay washing the towels and avoid leaving them grimy. If that happens, before you leave the towels soft again, you'll need to get rid of the mess, explains Fran. “When the towel is very dirty, the procedure is different. Before washing it is necessary to soak the towel in the bicarbonate, this product does not harm the fabric and removes the dirt plates”. 2. Wet towel place is on the clothesline
The ideal environment for the towel to dry without any bad smells is on the clothesline, but this is only true on sunny days. It's no use putting the bath towels outside on wet days, as they won't dry out and will still receive moisture from the weather.
3. Vinegar for soft towels
Another amazing tip on how to take care of bath towels is to apply white alcohol vinegar, the same one we have at home. As well as window cleaning, this kitchen product also helps to clean the fibers and remove any smell from the towels. The ideal is always to apply vinegar on thicker fabric products and never on delicate fabrics such as silk. When washing the pieces, add a glass of vinegar in the fabric softener compartment and start washing.
4. Rinse twice
Rinse towels twice to completely remove any product and remove all dirt. They are much softer and smell nice. 5. If you can, use the dryer
The dryer is a great ally to make towels softer. Anyone who has the equipment at home can use it, as in addition to helping the fibers, drying will leave the towel warm, ready to be used. The ideal is to dry at a temperature above 60 degrees. Other key tips about bath towels
After leaving them very soft, it's time for you to know some very specific tips about this product that we use as part of our hygiene. Ideally, never share towels with anyone. Furthermore, we must also not use a single towel more than 6 times in a row without washing. And iron the towel… no way! Direct heat damages the fibers, as does exposure to the sun.
When putting away the soft towels, remember to fold them and run your hand so that the fibers stay in one direction only. The ideal is to store them in a closet or wardrobe that is well ventilated, so as not to mold the items.
Mederma Advanced Scar Gel - 1x Daily: Use less, save more - Reduces the Appearance of Old & New Scars - #1 Doctor & Pharmacist Recommended Brand for Scars - 0.7 ounce, 0.7 Ounce
Clinically shown to improve the overall appearance, color, and texture of scars
The ONLY 1x daily topical gel making it one of the most cost effective products available
Works for many types of scars, including acne scars, surgery scars, and scars from burns, cuts, and other injuries
From Mederma – the #1 Scar Care brand
5 Treatments to remove Old Scar
Old scars are the most difficult to remove, but they can all be more discreet, flat and move well and we indicate here everything you can do to improve your appearance, leaving it more discreet or almost imperceptible.
Scars older than 60 days are usually completely healed, not painful, not itchy but may be darker than the skin and raised or stuck to the muscle. Learn about some treatment options: 1. Therapeutic massage The first step is to apply some almond oil or moisturizing cream, those that are very thick, which are more difficult to apply because the skin does not absorb as much.
Then, press the scar and with your fingertips make circular movements, up and down and from side to side along the entire scar. This massage will loosen the scar and the closer it is to the skin, the more time you need to invest in this massage.
In addition, during the massage you can also try to pull the skin that is 2 centimeters above the scar upwards and make a detachment of the skin also above the skin and another 2 centimeters below the scar. 2. Use vacuum to loosen the scar There are small silicone 'cups' that can be bought in aesthetic stores or on the internet that promote a small vacuum, sucking the skin, releasing any adhesion.
To use the vacuum in order to remove the scar, it is necessary to apply oil or moisturizing cream on the site, press the 'cup' and place it on top of the scar and then release it. The vacuum will lift the scar and to have the desired effect, it is recommended that the vacuum be done along the entire length of the scar for 3 to 5 minutes.
There is also an aesthetic vacuum therapy device that uses this same method to promote better lymphatic drainage and eliminate cellulite, which can also be used to detach the scar. You can find this type of treatment in aesthetic clinics.
3. Whitening cream Sometimes older scars are stained due to sun exposure without sunscreen, and the skin ends up darker. In this case, what can be done is to apply daily a cream with a whitening action that can be purchased in pharmacies, drugstores or even online. However, it is important to be careful to only pass over the scar to even out the skin tone.
4. Cream with corticoid to reduce volume The dermatologist can recommend the use of a corticoid cream so that the scar is not so high and ugly, but it is also indicated when the scar is already too high. These high scars can be of two types, the scar with keloid or hypertrophic and although they are caused by different situations, the treatment is similar and can be done with corticosteroids, and for the keloid they can be used as an injection directly into the scar and in hypertrophic scars, just apply the cream daily.
The main difference is that the hypertrophic scar is only high and does not exceed the size of the base of the scar, while the keloid scar is tall and appears to be swollen, and its edges are outside the base of the scar.
5. Aesthetic treatment The aesthetic physiotherapy clinics have several treatment protocols to improve the appearance of the scar, making it smaller, with good mobility and thinner. Some options are chemical peeling, microdermabrasion, use of laser, radiofrequency, ultrasound or carboxytherapy. The dermato-functional physiotherapist must personally evaluate and indicate the best treatment for each case, achieving optimal results.
When to resort to surgery Subcision surgery is indicated when none of the aesthetic procedures to eliminate or lighten the scar have the desired effect. Thus, it may be indicated to perform plastic surgery that aims to remove the scar or treat irregularities in texture or size, leaving the skin more uniform.
In this type of plastic surgery, the surgeon cuts the skin just above or below the scar, removes the adhesions that are underneath it and, using more modern techniques, creates a new scar that is much more discreet than the previous one. Know the types of surgery to remove scars and how it is performed.
Licefreee Kit All-In-One Complete Lice Killing Treatment, Daily Maintenance Shampoo & Professional Nit Comb In One Box, Set
ALL-IN-ONE LICE TREATMENT - The Licefreee Kit provides everything you'll need to kill super lice and eggs and help avoid reinfestation. Safe for kids six months and older, and strong enough for adults.
TREAT HEAD LICE - Licefreee Gel efficiently starts killing head lice, eggs and nits on contact, making it easier than ever to be lice free. Use the included root applicator to effortlessly saturate the roots and scalp and ensure all lice are killed.
REMOVE DEAD LICE, EGGS & NITS - After letting the gel kill the lice and eggs, rinse hair and comb thoroughly using our included patented metal lice comb to remove dead lice, eggs and nits.
AVOID REINFESTATION - When used daily for 7-10 days following treatment, Licefreee Everyday Lice Shampoo helps avoid lice reinfestation.
MORE FROM LICEFREEE - Licefreee is the original non-toxic lice brand, introduced in 1999. We have a full line of products to kill and remove lice from hair, body, furniture and bedding.
Head lice infestation
Head lice (Pediculus capitis) are wingless (non-flying) insects that live on the scalp of the human species, especially children and young people, and although they do not transmit any disease, they can be itchy and unpleasant. All children can have them, regardless of their level of hygiene, and they should not be a reason for fear or shame. Due to the extent of the infestation (we speak of infestation in the case of parasites, such as lice, and infection in the case of viruses and bacteria), it is very likely that your children will have lice at one time or another, and even find out at school and let him know that he must eliminate them. The instructions included below are intended to show you how.
REALITIES ABOUT LICE
There are many popular beliefs about head lice and it is necessary to know what is actually true. Head lice infestation is the most common childhood illness after constipation, and is even more frequent than other childhood infections combined. Children do not get lice because they are dirty or careless. Therefore, meticulous hygiene does not prevent lice infestation. Most often, they are infected by direct head-to-head contact while playing with infected peers (infected by combs or hats is much rarer). Head lice no longer infest children with long hair. Although they are slightly more frequent in girls, it is believed that it is because they tend to be more in direct contact with friends while playing than boys.
Lice do not fly or jump, which limits their contagion to direct contact. However, they move very quickly through the hair and escape easily. Infested children don't usually have a lot of head lice, just a few.
SYMPTOMS OF LICE INFESTATION
Most of the time, the infestation causes no symptoms. Some children may have itching, although it is not felt right away, but it is quite a few days after the infestation. There may be lesions if you scratch a lot, so consult your pediatrician if you notice rashes from scratching or if the skin on the scalp turns red. You should also consult your doctor if you notice an enlargement of the lymph nodes in the neck area.
Knowing the lice life cycle will help you to better understand some aspects of treatment. The adult female louse lays its eggs in the hair as close as possible to the scalp, to keep it warm and hatch better. After 8-10 days, the young lice hatch from the egg, which remains glued to the already empty hair. The young louse or nymph takes about 7-10 days to reach adulthood, to mate and lay eggs. The average lifespan of a louse is approximately 30 days and a female louse can lay between 80 and 100 eggs in that period of time. Head lice “eat” (sting) blood from the scalp every 4 hours. Outside of man, they die within 24 hours, so objects are not a major source of contagion.
HOW TO DETECT LICE Lice quickly flee between the hair when you shine a light or when you start to comb your hair, especially with dry hair. Therefore, the best way to discover head lice is to comb your hair thoroughly with wet hair, a special comb (with little distance between your teeth), good light and a white background (a towel over your shoulders or over the sink) . The adult female louse is the size of a sesame grain and is black or reddish brown in color. Eggs are located mainly behind the ears or on the back of the head. The “alive” (with an embryo) have a gelatinous gray color and are found close to the scalp. The “voids” (nits) are white in color and are farther away from the hair root. The hair grows around 0, 4 mm/day and the egg takes approximately 8-10 days to empty (let the young louse out) and is located close to the root. Therefore, any egg located more than 1 cm from the scalp is almost certainly empty. (Discovering eggs or nits is not a sure sign of active infestation.)
WHAT SHOULD BE DONE?
The treatment of lice infestation consists of applying a pediculicide product and continuing to comb periodically. There are different types of these products, but not all are equally effective. Head lice have become resistant to some. It is best to consult your pediatrician before starting treatment. In general, it is preferable to use lotions or gels rather than shampoos, as the action time is longer and the lice are more sensitive to the products if they are not covered with water. Strictly follow the application instructions, otherwise it may be more toxic or less effective. Most treatments should be repeated after a week.
Nix® cream: apply to dry hair for 10-15 minutes, wait 30 minutes and wash with your usual shampoo. Then comb with the nit comb (Lice Meister®), putting a white towel over your shoulders to check if the lice fall out. Repeat after 12-24 hours. Combing is very important to know if the treatment was effective (don't forget that there are resistances).
One or two days after treatment you should comb thoroughly under the conditions mentioned above. If you do not detect lice, it is assumed that the treatment was effective. If you detect only one or two adult lice, it may have re-infested soon after treatment or that there is some resistance. If you detect several lice, especially if they are both young and adult, they are certainly resistant and you should consider using a different pediculicide. It is not essential to eliminate the eggs (embryos may be dead due to the treatment) nor even the nits, which will almost certainly be empty. If you want to do it for aesthetic reasons, applying a solution of vinegar and water in equal parts for a few hours undoes the sticky substance that sticks them to the hair and makes it easier to eliminate them when styling. Some children may continue to itch, or even more, after taking the treatment. This is due to an allergic reaction to the lice products and dead eggs. If it causes a lot of discomfort, it may be necessary to consult a pediatrician, as there are medications to improve it.
HOW TO PREVENT? It is totally inadvisable to use pediculicide products (shampoos or lotions) as prevention. It has not been proven to be effective, they irritate the skin on the scalp and, above all, they make lice resistant. The best and most innocuous prevention is to comb your hair well several times a week. Taking into account the lice's life cycle, by combing well 2 or 3 times a week we will be able to eliminate the adult lice and, above all, the young lice before they reach the adult stage and are able to lay eggs, interrupting thus the progression of the infestation. Repeated styling is proven to be not only preventative but nearly as effective as pediculicides in treating the infestation.
WHAT TO DO WITH THE OBJECTS AND CLOTHING OF INFECTED CHILDREN? As explained above, lice live a few hours outside of man and do not infect objects. In any case, it is wise to remove them from the combs by submerging them in alcohol or boiling water. Clothes should be washed in a hot water cycle (60°), dry-cleaned or sealed in an airtight plastic bag for 2 weeks (time it takes a complete cycle of possible lice or their eggs to complete before they die). Domestic animals (dogs, cats, birds, etc.) do not catch human lice and are not a source of contagion.
Is it true that lice jump from head to head?
No, lice do not jump or fly. They move from one head to the other if there is enough proximity between one person and another. They can also be transmitted through caps, helmets or household clothes if there has been direct contact with the hair.
Preventive treatments: lotions, shampoos, etc. ... are they effective in preventing children from getting head lice?
Shampoos and lotions with “preventive use” are not effective in preventing transmission of the parasite. The only effective “preventive” measures are: early detection of infestation cases, simultaneous treatment of parasitic individuals who are in close contact (friends and classmates who sit together in class or in the school cafeteria, colleagues who play together in the courtyard, parents and siblings) and, finally, the effective treatment of those affected and the clothes that come into contact with their heads.
Is it true that alcohol and vinegar eradicate lice and are more effective than the “insecticide” substances available in pharmacies?
Neither vinegar nor alcohol are the most effective or least toxic treatments available to us today. Wetting a special metal nit comb twice a day in water-diluted vinegar before carefully and repeatedly combing the parasitized child can help to loosen the nits stuck to the scalp, provided it is after the pediculicide treatment in gel or lotion suitable for eradicate the parasite. It should be noted that the mechanical action of the fine comb (“suitable for nits” type) is more effective in eliminating nits than the application of more chemical substances, which will only achieve greater irritation of the skin in the treated area.
What is the most suitable treatment for head lice?
What is adequate is: identify the cases well and use the treatment correctly. If possible, you should visualize the parasite or the presence of new nits in the hair. If there are parasites, the itching symptom is evident, although in children with topical skin the abuse of chemical substances can cause inflammation of the scalp and intense itching. The correct thing is to apply substances with a low toxicity pediculicide action (permethrin, pyrethrin) -and avoid Lindane, available in pharmacies without a prescription, as it is toxic!!!- in the form of foams, gels or lotions, on dry hair copiously covering the head to the hairline for a few minutes to several hours. A single-use plastic cap can help to eradicate the parasite and shorten the duration of treatment.
How can lice be removed from caps, helmets, hats or other items of clothing that have been in contact with the hair?
Clothes should be washed at 60 degrees or stored in an airtight plastic bag for 10 days.
Are there people more likely than others to get head lice?
It is not proven that there are people with a greater predisposition than others to this type of parasitosis. Compliance with basic body hygiene measures, specifically daily combing or brushing and regular hair washing, certainly has a positive influence on the infestation. I don't know whether or not my daughter has head lice. What should I look for?
If you are itchy and there is a precise epidemiological environment – there are lice in her class – it is very likely that you have head lice. If possible, the definitive thing is to visualize the parasite or insect or the presence of new nits – stuck in the form of small whitish colored capsules to the hair, 10-20 mm from the root-. If there are live parasites, itching is an obvious symptom. In children with topical skin, the abuse of chemical substances can cause inflammation of the scalp and intense itching after elimination of the parasite. Do you need to shave your hair using machine zero to eradicate lice?
It is not essential, but it facilitates daily combing with a fine metallic comb to eradicate nits is one of the basic measures for anti-parasitic treatment and, if there are curls and/or long hair, there will be more tears than smiles...
Is it possible to get lice in different areas of the head?
Pediculosis capitis affects the hair on the head, although it can rarely infest the hair on the eyebrows or eyelashes either. A similar parasite is pediculosis pubis, which infests the pubic hair and is contracted through sexual intercourse or direct contact with parasitic bed linen.
Why is it that nowadays, even though the population's level of hygiene has increased, there are still lice in schools?
The right science is not known, but different factors are likely to collaborate: the current lifestyle, with the high rate of children who go to kindergarten from the first few months and live closely, the haste with which we often leave home. morning, sometimes no time to carefully comb the children and, finally, the lack of timely detection or, in some cases, the lack of adequate treatment (not only treatment at the time, but very close monitoring during the weeks after detection) .
Licefreee Spray, Head Lice Treatment for Kids and Adults, Includes Lice Comb, Family Size, 12 Fluid Ounces
KILLS LICE ON CONTACT - Licefreee Spray effectively kills lice, eggs and nits on contact, so you can be lice free, effortlessly. 100% Satisfaction Guaranteed and safe on kids six months and older.
KILLS SUPER LICE AND EGGS - Instead of using harsh chemicals and pesticides, Licefreee contains the naturally occurring mineral, sodium chloride, to kill super lice, eggs and nits.
EASY TO USE - Hold the bottle 4-6" away from the head. Spray on dry hair and cover the entire scalp until all of the hair is thoroughly saturated. Allow product to air dry. That's it!
INCLUDES LICE COMB - After applying the spray, comb through hair with the included patented metal lice and nit comb to remove the dead lice, nits and eggs.
MORE FROM LICEFREEE - Licefreee is the original non-toxic lice brand, introduced in 1999. We have a full line of products to kill and remove lice from hair, body, furniture and bedding.
4 tips to get rid of head lice
To get rid of lice, it is important to use a proper shampoo that works against lice, use a fine-tooth comb daily, wash everything that comes into contact with the hair and avoid sharing hairbrushes, for example. That's because lice can easily be passed from one person to another through direct contact with the hair of another person who has lice or through sharing hairbrushes, hats and pillows, for example.
Getting rid of lice is not always easy, especially in schoolchildren who transmit the parasite more easily even after treatment. However, there are some tips that can help make the treatment more effective and prevent reinfestation, the main ones being:
1. Apply treatment shampoo Shampoo or treatment spray is a great option and the most effective to eliminate head lice and nits, because they promote the death of lice and nits, facilitating their removal with a fine-tooth comb. There are several shampoos that can be used and that can be applied to dry or wet hair, it is important to read the shampoo label to know which is the most suitable way of application. See more details on how to use head lice shampoo.
In general, it is recommended that the product be applied to the entire hair, from the roots to the ends, and left for about 10 to 15 minutes or according to the manufacturer's instructions. It is recommended that the shampoo be applied again after 1 week, because the development of the lice happens in about 12 days and, therefore, it is important to use the product again to ensure its elimination. 2. Use a comb frequently The use of a fine-tooth comb is very important to correctly perform the treatment, as it can be used to better spread the shampoo, and also to eliminate lice and check for reinfestation. For school-age children, even after treatment, it is very important to check the hair frequently and with the help of a suitable comb, to prevent the lice from multiplying again.
To do this, you must pass a fine comb through each lock of hair, from the roots of the hair to the ends, placing a white towel or sheet on the table, to more easily identify the lice. This procedure must be repeated with the head facing downwards.
In addition, electronic combs are also available for sale, which kill the louse or nit in a single pass.
3. Wash objects that come into contact with hair Louse is a parasite that is transmitted through brushes, combs, hats, pillows or sheets, so it is very important to wash these objects frequently to avoid reinfestation or even transmission of the parasite to another person.
Thus, all objects that have been in contact with the child's hair, such as sheets, blankets, clothing, plush toys, hair clips and bows, hats, caps, rugs, pillows and the sofa cover, must be washed if possible in water with a temperature above 60º, or sealed in a plastic bag for 15 days, to asphyxiate the lice.
4. Use repellent Even if the treatment works and kills all the lice and nits, reinfestation can occur, especially in children when they return to school. Thus, the use of repellents can help prevent the lice from getting close to the child's head, as it has essential oils in its composition that release a smell that the lice do not like and that is why they do not come close.
Lice Shield Shampoo and Conditioner in 1 Bottle, 300 ml, Rosemary, 10 Fl.Oz
PROTECT YOUR WHOLE FAMILY WITH LICE SHIELD: Lice Shield Shampoo & Conditioner in 1 is a lice repellent 2in1 shampoo that is proven to repel head lice and persistent super lice in laboratory tests, and that gently cleanses and conditions hair
POWERED BY EXCLUSIVE BLEND OF 5 NATURAL ESSENTIAL OILS: Specially developed with an exclusive blend of 5 natural essential oils (Citronella, Rosemary, Lemongrass, Cedar, and Geraniol) to repel head lice
SAFE FOR ALL-FAMILY USE: Lice Shield products are specially formulated to be gentle to a child’s hair and skin, and are also appropriate for the whole family when child is infested with lice or during peak lice periods or lice outbreak
FOR PEACE OF MIND: Lice Shield Shampoo & Conditioner in 1 is a safe, effective, and easy-to-use option to repel lice. Just a simple swap of Lice Shield Shampoo into your child or family’s hair care routine provides peace of mind
COMPARE TO lice repellent shampoos by Fairy Tales and So Cozy Boo!. Ideally used by rest of family when child infested with lice, or by child returning to camp or school after being treated by a lice treatment product by brands such as RID or Nix
Hair type: Normal
How to use head lice shampoo
To effectively eliminate lice, it is important to wash your hair with adequate shampoos, and it is recommended to give preference to shampoos that contain permethrin in their formula, because this substance is capable of promoting the death of the lice. Some examples of shampoos to get rid of lice that can be indicated by a pediatrician or dermatologist and that are easily found in pharmacies are:
Kwell;
Sanasar
Escabin;
Deltacid;
Stop lice;
Del-lend;
Requester;
Keltrine.
In addition to shampoos, there are also anti-parasitic drugs, in tablet form, that can promote the death of lice, such as Ivermectin, for example. However, its use should be recommended by the dermatologist or pediatrician to avoid possible side effects related to high doses of this medication.
How to use head lice shampoos The application varies a lot depending on the shampoo that is used and, therefore, it is recommended to read the shampoo label first to identify the most suitable way of use. In general, the use of shampoo should take place as follows:
Apply the product on dry hair , because this way it is possible to promote the death of the lice by suffocation. If the product is applied to wet hair, the lice can close their respiratory holes and protect themselves from the action of the product. Despite this, some shampoos may be indicated for application on wet hair and, therefore, it is important that the label is read before the application is made;
Spread the product well over the wires and let it act for 10 to 20 minutes or according to the manufacturer's instructions;
Rinse the head , completely removing the shampoo, and comb with a fine-tooth comb to remove dead lice and nits. To make it easier, you can divide the hair into strands, so you can be sure that the comb will be passed through the hair;
Afterwards, wash your head normally , using the shampoo and conditioner preferably.
As lice can live for up to 30 days, changing from nit to adult louse in about 12 days, it is recommended to re-apply the lice shampoo a second time after 7 days of the first application.
Natural Remedies for Head Lice To combat the infestation of lice and nits, you can also bet on natural ingredients such as essential oils, but it is also possible to kill the lice with a cornmeal porridge that is placed on the scalp, preventing the lice from breathing. Another natural solution against lice and nits is to bet on the thyme oil that must be mixed with the shampoo.
1. With essential oils A great natural remedy to get rid of lice and nits is to wash your hair with essential oils and olive oil, because the oil prevents the lice from sticking to the hair, making it easier to remove them with a fine-tooth comb.
In addition, Malaleuca Essential Oil has repellent properties that prevent a re-infestation of lice. Rosemary and lavender essential oils are used to complement the treatment, soothing scalp irritation and relieving itchiness.
Ingredients
30 ml of oil; 10 drops of rosemary essential oil; 10 drops of lavender essential oil; 10 drops of Malaleuca Essential Oil.
Preparation mode
Mix the ingredients in a container until you get a smooth mixture. Then, using a cotton, pass the medicine all over the scalp, rubbing it well, especially at the hairline. Then cover with a cap and wait 2-3 hours to kill all lice and nits before washing your hair with an oily hair shampoo.
After washing your hair, use a fine comb, lock by lock. Between each pass of the comb, it is very important to check if there are any lice clinging to the comb and, if any, they must be removed before re-combing the hair.
Attention: This home remedy should only be used after 2 years of age, as Malaleuca Essential Oil should not be used on babies. Since head lice eggs can take up to 7 days to hatch, it is important to use this natural remedy every 3 days for at least 4 weeks.
2. With cornmeal An excellent natural treatment for hair lice is a mixture of cornmeal and rue, as they are medicinal plants with properties that help to kill worms, such as lice, and soothe the scalp, reducing itching.
Ingredients
1 handful of rue; 1 handful of cornmeal; 4 cups of water.
Preparation mode
Add the rue to the boiling water and let it boil for approximately 5 minutes. Then add the cornmeal and mix well, preventing lumps from forming. When the mixture has the consistency of porridge, it is ready to be used.
Allow the mixture to cool and apply along the strands and on the scalp. Then wrap the hair in a cap and let the medicine work for approximately one hour. After the specified time, the hair must be washed with plenty of water and a neutral shampoo. For best effectiveness, it is recommended to use a fine-tooth comb to remove dead lice and nits.
3. With thyme Another excellent natural solution for lice and nits is the homemade shampoo made from thyme, as it is a medicinal plant with powerful insecticidal properties.
Ingredients
Thyme essential oil; Shampoo with neem.
Preparation Mode
Add 3 drops of thyme essential oil to neem shampoo and mix well. Then apply the mixture to wet hair with a light massage, leaving it to act for 5 minutes. After the set time, rinse the hair well with lukewarm water and use a fine comb to remove the dead lice and nits.
Thyme can be irritating to the skin on the scalp, and you should never exceed the recommended amount, nor use it undiluted.
Nit Free Terminator Lice Comb, Professional Stainless Steel Louse and Nit Comb for Head Lice Treatment, Removes Nits, COLORS MAY VARY
Get underneath and remove even the tiniest lice eggs (nits) from hair with this comb's spiral micro-grooved teeth.
Tightly grip the comb with the anti-slip bands on the handle and protect the scalp and hair thanks to microscopically-rounded tooth ends that prevent pricking, scratching, or pulling.
Made from durable and corrosion-resistant stainless steel, this comb can be sterilized for clean use by the whole family day after day.
Nit Free lice-fighting formulas includes products that help safely remove and prevent lice with lice combs, shampoos, conditioners, mousse, sprays, and more.
This pack includes one Terminator Lice Comb with Ginesis Natural Product's Lifetime Guarantee.
How to use the fine comb against lice
The method of combing a child's hair with a fine-tooth comb to eliminate lice and nits is effective as long as it's applied frequently -- and with a lot of patience.
You can also use the fine comb in conjunction with a specific anti-louse product, which can make the job easier.
It is also important to know how to use the fine comb to detect if your child really has lice. How often should I comb? If you've confirmed that your son or daughter does have lice , comb them every day, or every other day, until about 15 days have passed without you seeing any live lice.
The first "fine comb operation" should get most of the lice out. On the other days, you will remove the ones that are left and the ones that are born from the remaining nits.
If head lice are common in your neighborhood or at your child's school, comb them once a month, just in case.
Tips for a successful louse-finger comb operation
Prefer a metal comb, with longer teeth, specific for picking up lice and nits. Electric combs that claim to kill more lice apparently don't have much different effect than regular combs.
Apply conditioner on the child's head to facilitate combing. Wet hair also helps to immobilize the lice.
Use an ordinary comb to untangle the hair and then go to a fine-tooth comb.
Use hairpins, clips or piranhas to separate the part of the hair that has already been combed.
Let your child watch a movie or cartoon, play a video game, or look at books and comics to distract himself while you comb through.
Stay in a well-lit environment.
What if the hair is too difficult to comb? If your daughter's or son's hair is too fine, or too frizzy, or too bulky, you may find it difficult to do the fine-tooth comb operation.
In this case, the options remain to use other methods of fighting the lice and to cut the hair to facilitate the process.
In girls, shaving the back of the neck helps. The "damage" doesn't show up as much, and the measure eliminates a region where lice like to breed.
Is it any use putting vinegar on your hair? There are experts who claim that vinegar helps to loosen the nits from the hair strands. At the height of the infestation, however, the child's scalp is likely to be irritated and bruised from the itchiness, and smearing vinegar will make it sting.
You can try the vinegar method when you've already used a head lice product, or a few days after the first fine-combing operation, when the itching and irritation are already improving. Vinegar alone does not kill the lice.
To loosen the nits, mix the same amount of warm water and white vinegar and apply to hair for 15 minutes. Then go through the fine-tooth comb.
Tecnu Extreme Poison Ivy and Oak Scrub, Removes Poisonous Plant Oils That Cause Rash and Itching, 4 Ounces
BEST CHOICE IF RASH HAS STARTED - Tecnu Extreme Poison Ivy and Oak Scrub gets to the root of your problem by removing the oil (urushiol) that causes the rash, spreading and itching.
REMOVES THE SOURCE OF ITCHING – If your itching is unbearable, Tecnu Extreme removes the source of the itching to allow your body to begin its natural healing process unimpeded.
SIMPLE & EASY TO USE – Works in 15 seconds. Apply to entire body. Wet skin and apply Tecnu Extreme, gently scrubbing for 15 seconds. Rinse with water (not hot). Gently towel dry. Repeat as necessary.
100% GUARANTEED - Tecnu Extreme is 100% guaranteed, making it a go-to for gardeners, forestry workers, hikers, mountain bikers, campers, landscapers and any fan of the outdoors.
COMPLETE YOUR TREATMENT – After using Tecnu Extreme you can treat any remaining rash symptoms with Calagel Anti-Itch Gel or Tecnu Rash Relief Spray.
How to care for ivy
Hera is a plant as flexible as its branches: it goes up when it has support, it goes down when it's to cosplay a pendant species; it is found with leaves of different shapes and colors. Our gardener Carol Costa talks about these characteristics of ivy and tells many others, in this video made in one of the greenhouses at Sítio São Jorge , a large producer of these plants, in Holambra (SP). Have a question about caring for ivy? With this video and the professional tips of the madwoman for plants, her doubt was gone ("it was", you know... "ivy"). Enough cute and let's learn all about ivy!
Hera is easy to take care of
Ivy is a more than democratic plant. Pretty much everything you want to do with it, as long as you water it and fertilize it right, your ivy will obey and grow happy and green... or patterned... That's because you can find a very large number of ivy species, cultivars and hybrids : girl's finger ivy ( Hedera helix "Mona Lisa"), with its jagged leaves; Variegate ivy ( Hedera helix "Glacier"), with broad leaves and a "camouflage" print; ivy "Gloire de Marengo" ( Hedera algeriensis "Gloire de Marengo"), with yellow outlines; yellow ivy ( Hedera hybrid ),heart ivy ( Hedera helix "Tear Drop") and its... heart shape!
Is Ivy Hanging or Creeping?
This plant is a lining , ie the ivy like space and grows in the ground, stretching in all directions. But if you want to grow it as a hanging plant , just plant it in a pot and hang it up: its branches will grow like long hairs. If you want it to "go up", a trellis or other framework can act as a tutor for the ivy to grow upwards.. It is such a good plant, that it can be grown in shade, half-shade and even in a place with a little more sun – just that strong sun is not worth it. If you want to place your ivy in a sunnier area, do what is called "rustification". Introduce the plant gradually to the sunny environment, so as not to burn its leaves. Ivy grow happily in places with good light, but don't overdo it. Don't leave the plant far from the window or locked in a room that lives with the curtain closed – or worse – in a toilet!
variegate ivy
One of the charms of ivy is its variegated (or variegated) leaves. This is characteristic of some plants having foliage with lighter, almost white spots. It is not a "defect" but a characteristic: the plant develops normally. Specialized producers, such as Sítio São Jorge , select plants with this characteristic and cultivate them, enabling a variety of tones. Imagine an arrangement with several different ivy, going from darker green to white, passing to yellow edges and details in very light tones.
How to make an arrangement with ivy
Can you create a composition using taller vases, taking advantage of the ivy's natural trim? Of course it can! But what about the recommendation to avoid very deep vessels? In the video, Carol manages to create an arrangement only with ivy, choosing tall glasses from TS Brasiland also using a clever trick to prevent water accumulation: a huge false bottom, filling most of the long cylindrical glasses with empty plastic vases. In the outermost parts of the array, layers of substrate are added. Rice husk, fluffy moss, sand, substrate and vermiculite arranged in overlaps, create interesting patterns and shapes, taking advantage of the transparency of the glass. Only at the top of the arrangement is there a layer of substrate, very shallow, for the ivy plants. With three long windows, of different heights and using different species of ivy, you can create a very interesting set.
How to make ivy seedlings
To grow ivy, prefer shallow pots or gourds . Very soaked substrate ends up rotting the leaves and roots, so avoid using pots or vases that are too high. When properly cared for, the ivy grows vigorous and happy, stretching wherever it gets space. If you get a very long size, maybe your ivy needs a branch pruning. Take advantage of these pieces to make new seedlingsof the plant. This is because, in each segment where a leaf is born, there is, on the opposite part of the stem, a formation that can originate a root.
All this little formation needs is to touch a substrate, feel that there is a little moisture there and... that's it! Roots appear and a new plant originates from this tic of a branch. Prepare some pots with very soft and good quality seedling substrate (Carol Costa uses All Garden substrate ). In this substrate, skewer the tip of the ivy branch just a little. Cut the branch segments very close to one leaf and keep another. In three weeks, the ivy starts to take root.
Tip: If you have kids or a nosy dog, put the ivy in taller pots. The plant is toxic, so it must be grown out of reach of curious little hands and mouths. Do you have a cat? Hang your ivy up there and it's okay. But, you can't even be upset with this very nice plant: even if toxic, ivy serves as the basis for herbal cough syrups. If you look closely, you'll find one with the scientific name of the ivy, Hedera helix .